
iOS Authentication Template
Created: July 2025
Developer: SamiDev Studio
Platform: iOS 15.0+ | SwiftUI + MVVM
Contact: Support Section
Thank you for purchasing this iOS Authentication Template! This comprehensive SwiftUI solution provides Firebase authentication, Google Sign-In, Apple Sign-In, email verification, username selection, and much more. Follow this step-by-step guide to set up your professional authentication system.
🎯 Getting Started
🎉 Two Ways to Get Started
Choose the approach that works best for you:
Option 1: Complete Template (Recommended)
Perfect for new projects or when you want a complete authentication system.
- Download the template and open in Xcode 15+
- Configure Firebase (see detailed setup below)
- Customize branding in AppConfig.swift and AppTheme.swift
- Run and test all authentication flows
- Build your app features on top of the authentication system
Option 2: Integrate into Existing Project
Add professional authentication to your existing iOS app.
- Copy core files (ViewModels, Models, Services, Utilities)
- Install dependencies (Firebase, GoogleSignIn)
- Integrate views into your app's navigation flow
- Configure Firebase and authentication providers
- Test integration and customize as needed
✨ Complete Feature Set
Multiple Authentication Methods
Email/Password, Google Sign-In, Apple Sign-In with seamless switching between methods
Email Verification System
Automatic email verification with resend functionality and user-friendly verification pending screen
Username Selection
Interactive username picker with real-time availability checking and validation
Password Reset
Secure password reset flow with email verification and user guidance
Modern UI/UX
Beautiful dark theme, smooth animations, responsive design for all iPhone sizes
Multilingual Support
Built-in localization for English, German, and Arabic with easy expansion for more languages
Easy Customization
Centralized configuration files for colors, themes, app settings, and authentication options
Security Features
Input validation, temporary email blocking, secure error handling, and Firebase security rules
📋 Prerequisites
- Xcode 15.0 or later
- iOS 15.0+ deployment target
- Swift 5.9 or later
- Active Apple Developer Account
- Google Developer Account (for Google Sign-In)
Step 1: Download and Open Project
📱 What you'll do:
Download the iOS Authentication Template from CodeCanyon and open it in Xcode. This template includes all the necessary files and structure for a complete authentication system.
🔧 Detailed Instructions:
- Download the template ZIP file from your CodeCanyon purchase
- Extract the ZIP file to your desired location
- Open Xcode 15 or later
- Navigate to the extracted folder
- Double-click the .xcodeproj file to open the project
✅ What you'll see:
The project will open with a complete folder structure including Views, ViewModels, Models, Services, and Utilities folders, all organized following MVVM architecture.
Step 2: Access Package Dependencies
📦 What you'll do:
Navigate to Package Dependencies in Xcode to add the required Firebase and Google Sign-In packages.
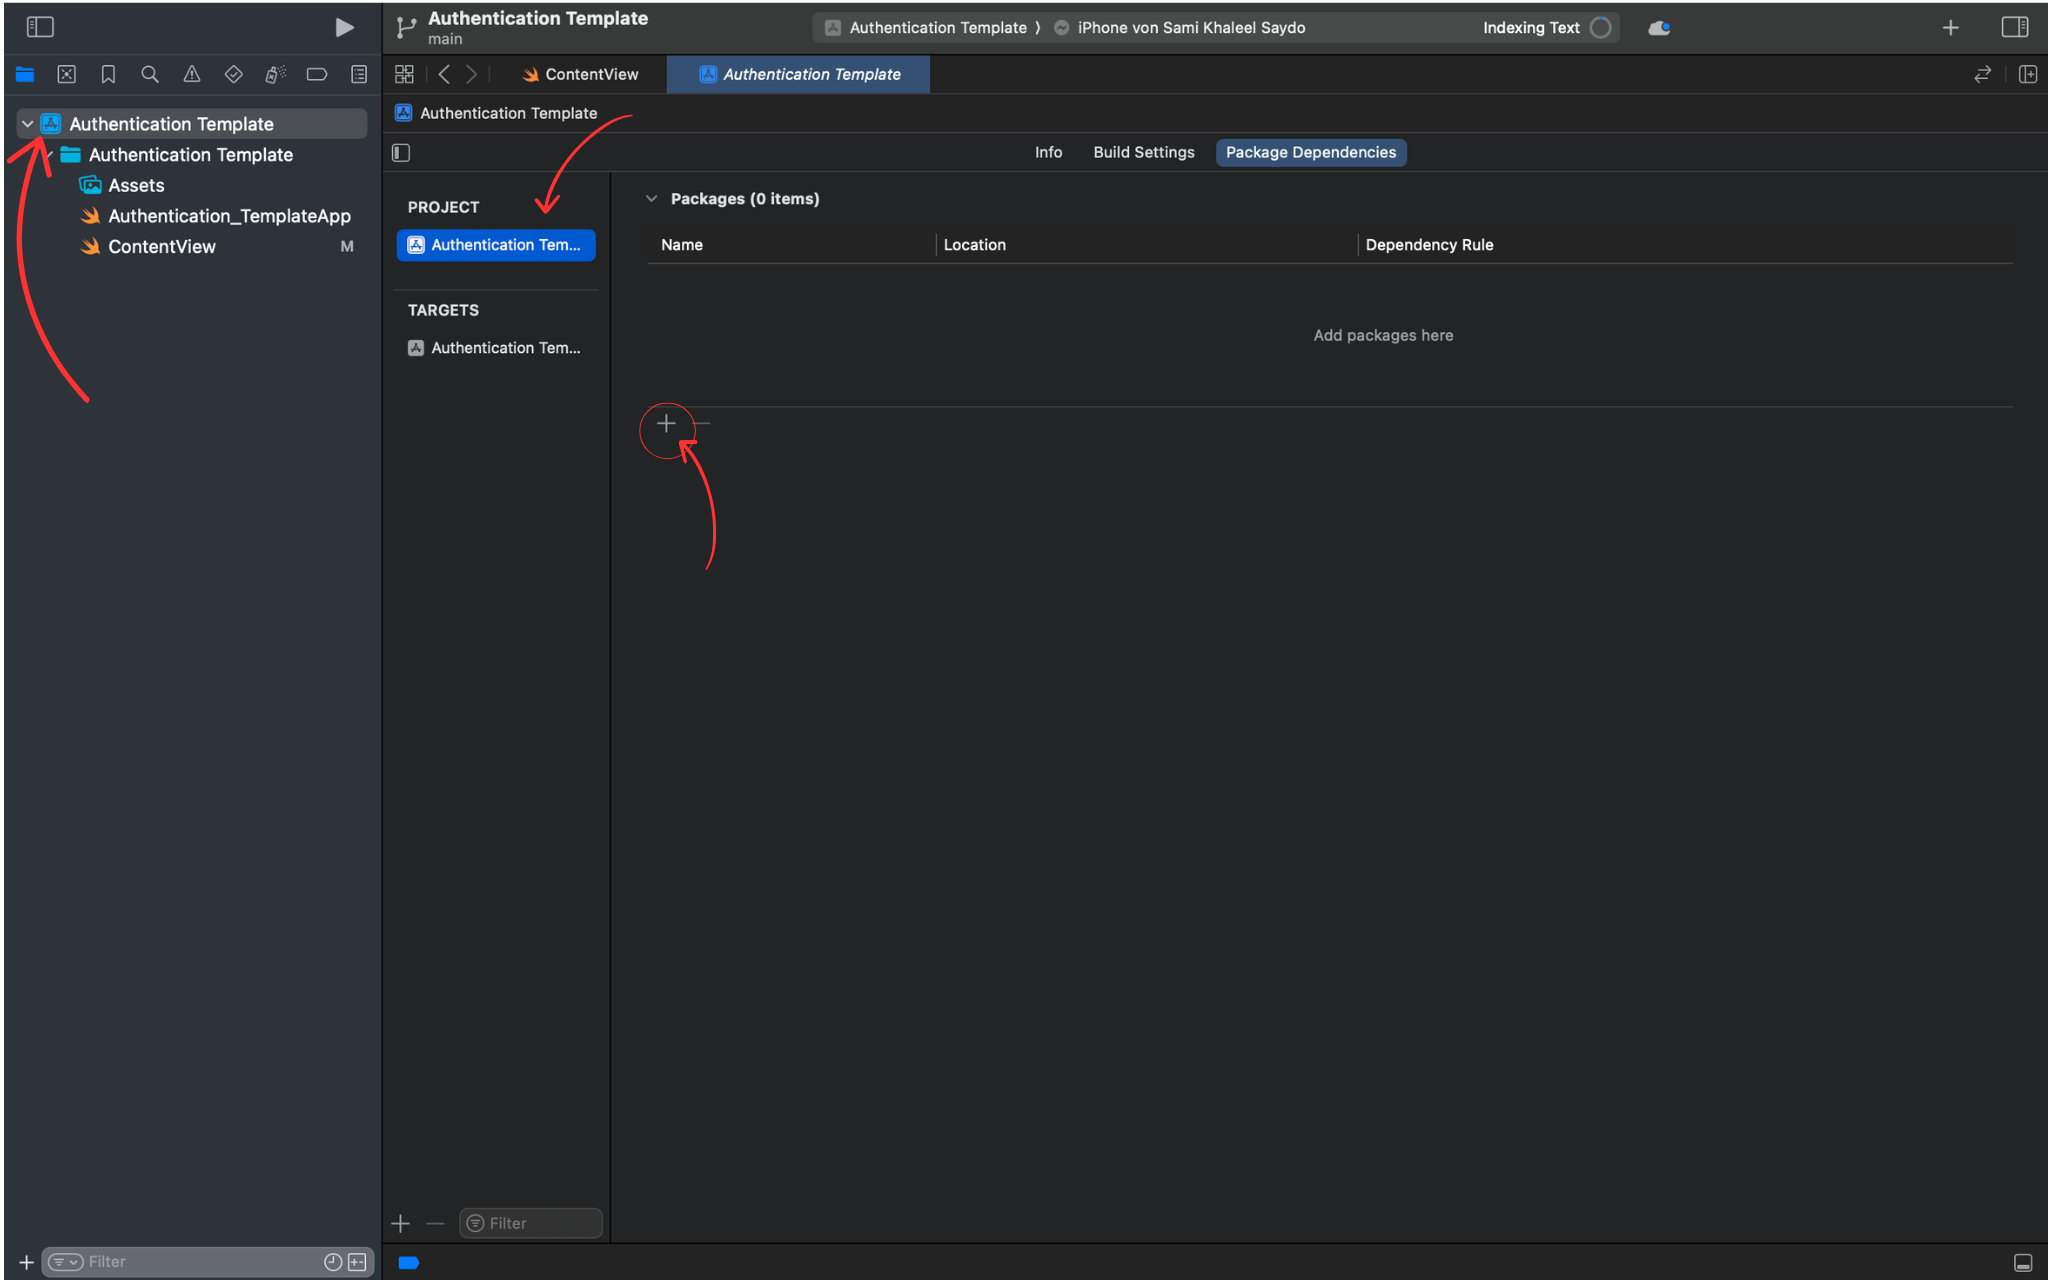
🔧 Detailed Instructions:
- In Xcode, select your project in the navigator
- Click on your target under "TARGETS"
- Go to the "Package Dependencies" tab
- Click the "+" button to add a new package
- You'll see the "Add Package Dependency" window
📋 Required packages:
You'll need to add these two packages in the next steps:
- Firebase iOS SDK
- Google Sign-In iOS
Step 3: Add Firebase iOS SDK
🔥 What you'll do:
Add the Firebase iOS SDK URL to your project to enable Firebase authentication and Firestore database functionality.
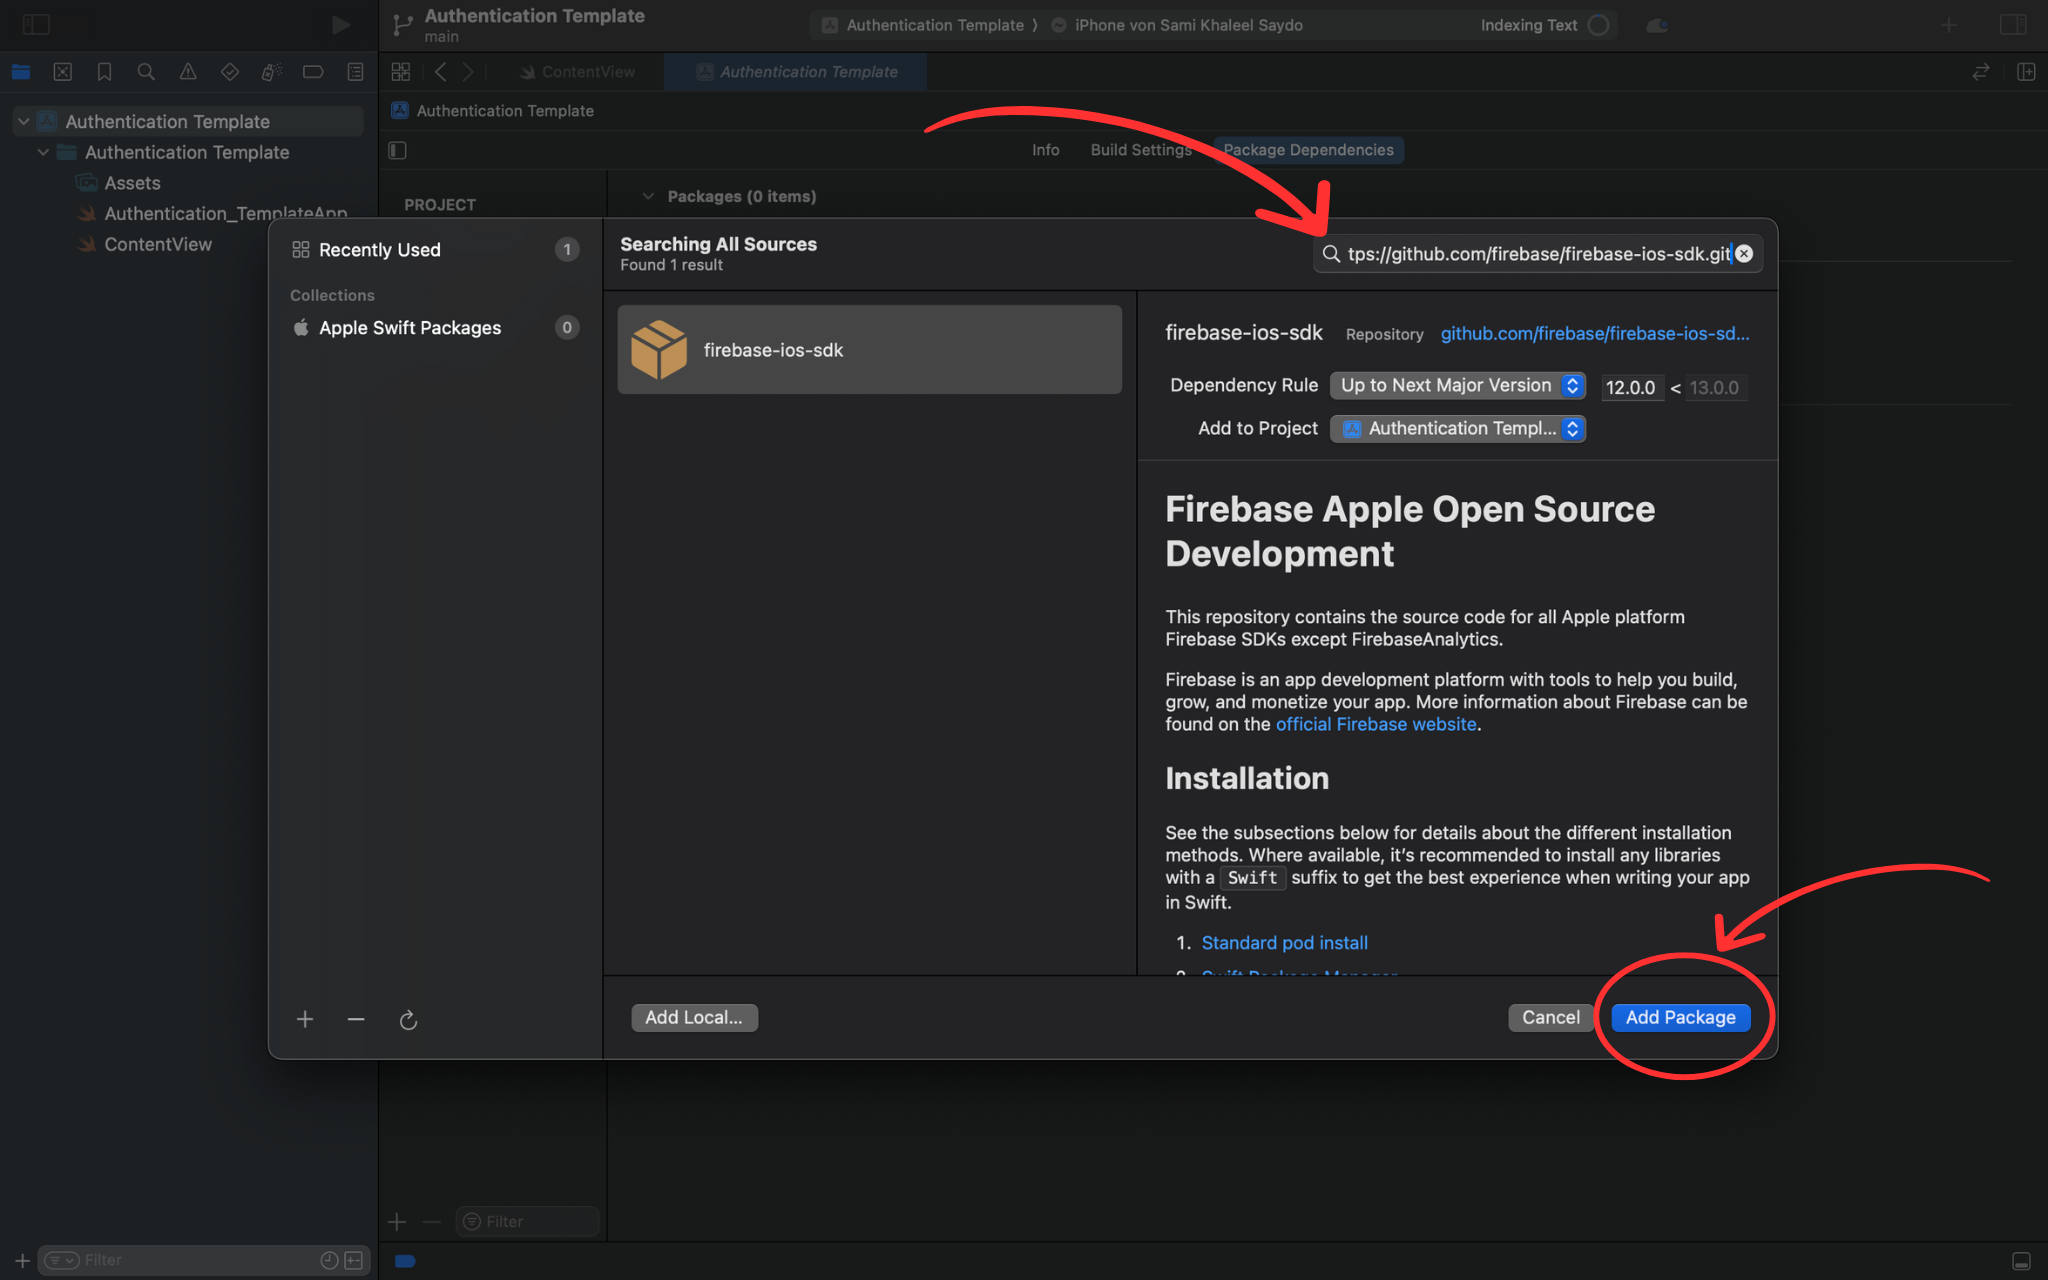
🔧 Detailed Instructions:
- In the "Add Package Dependency" window, paste the Firebase URL
- Enter: https://github.com/firebase/firebase-ios-sdk
- Click "Add Package" and wait for Xcode to resolve the package
- The package will be validated and ready for product selection
Step 4: Select Firebase Products
🎯 What you'll do:
Choose the specific Firebase products your authentication system needs.
🔧 Detailed Instructions:
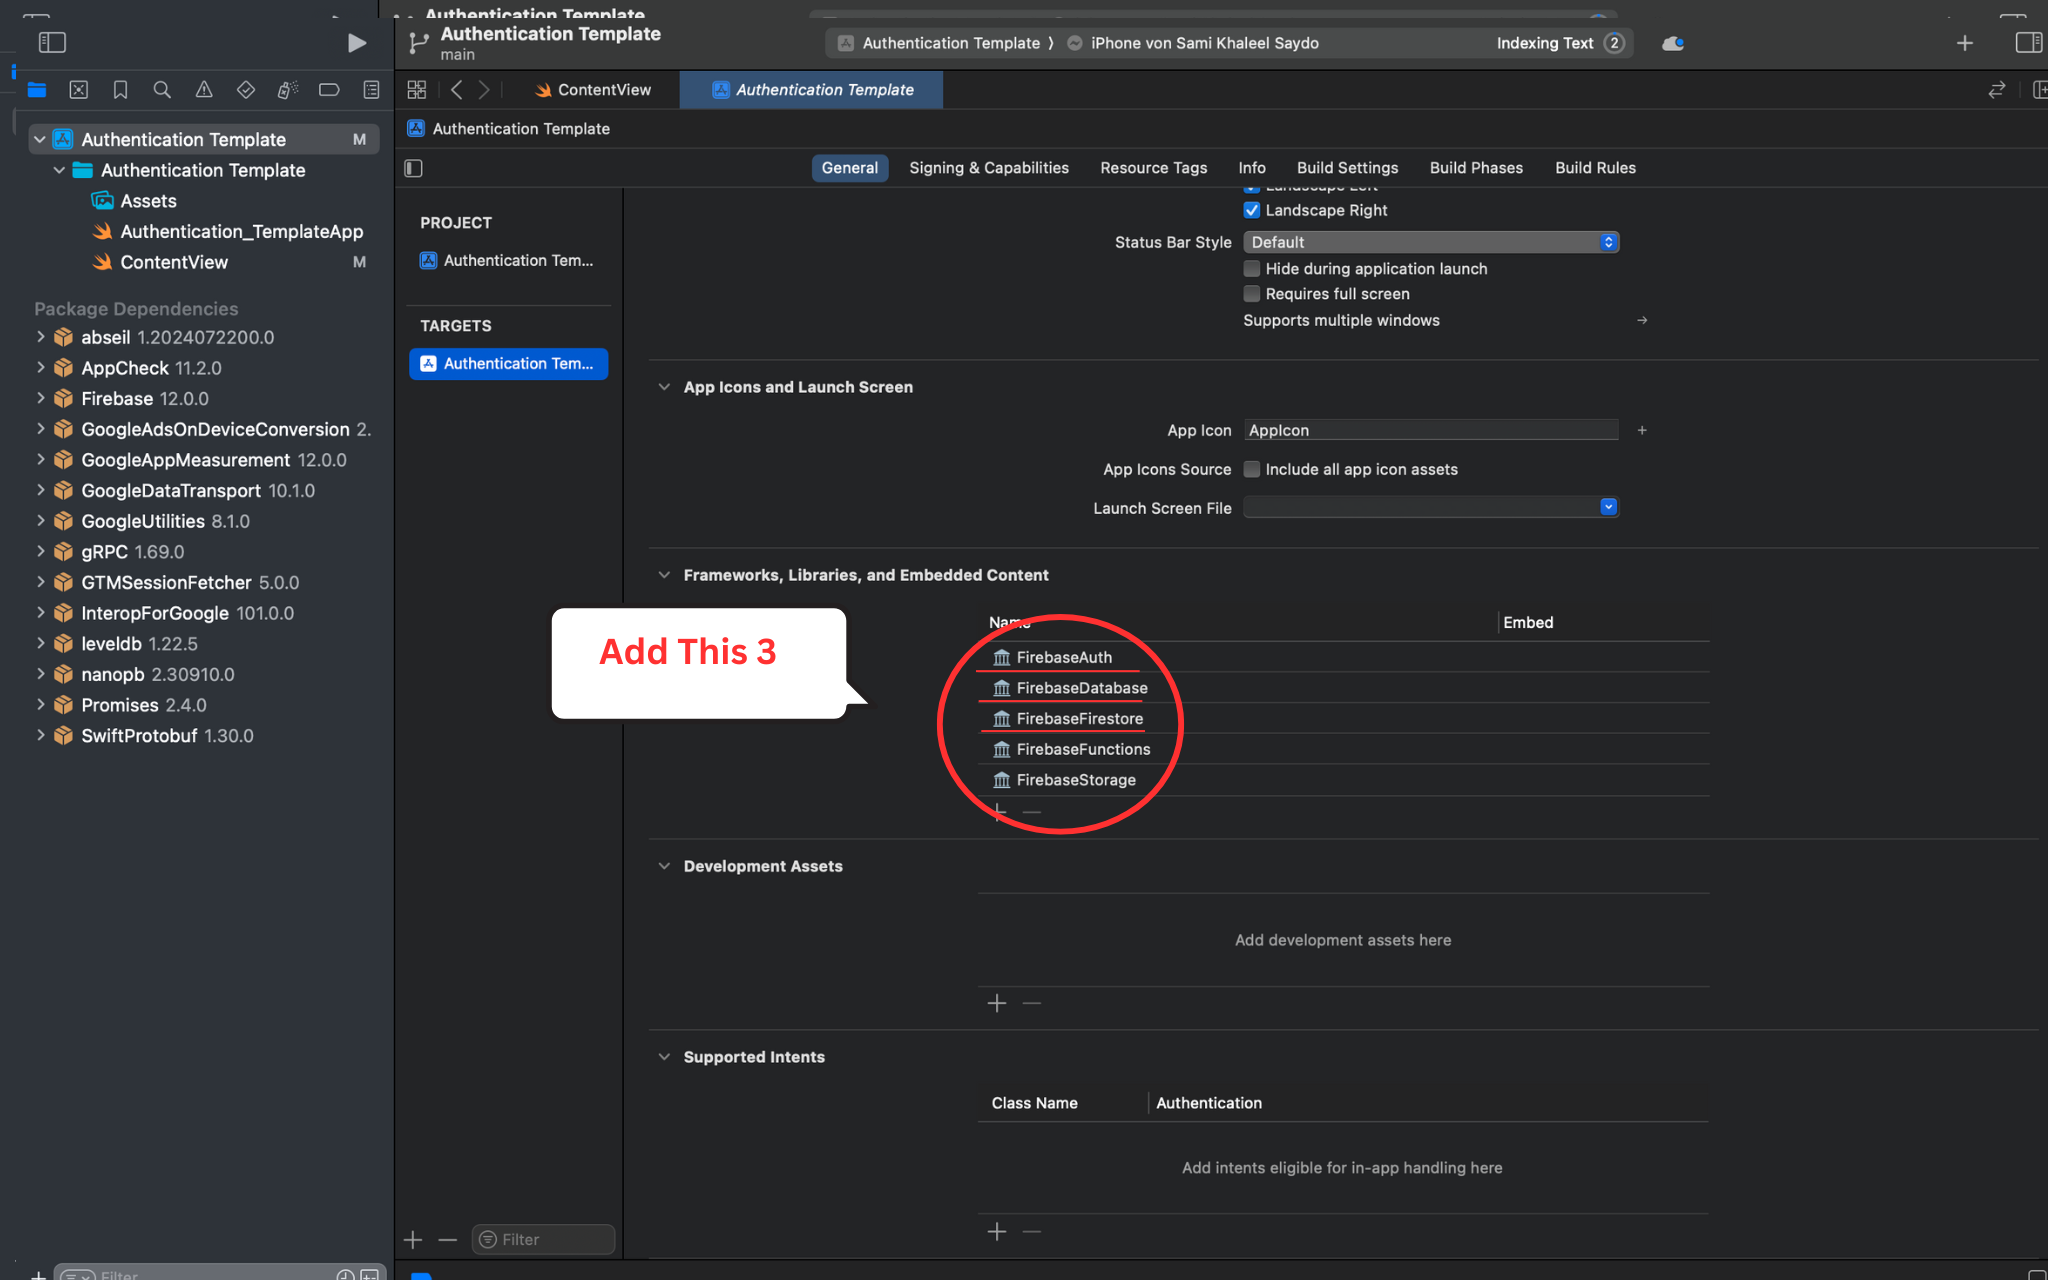
- After Xcode resolves the Firebase package, you'll see a list of available products
- Select FirebaseAuth - Essential for authentication
- Select FirebaseFirestore - For storing user data and usernames
- Select FirebaseStorage - For profile pictures (optional)
- Click "Add Package" to add these to your project
⚠️ Important:
Only select these three products to keep your app size manageable!
Step 5: Add Google Sign-In SDK
🌐 What you'll do:
Add the Google Sign-In iOS SDK to enable Google authentication in your app.
🔧 Detailed Instructions:
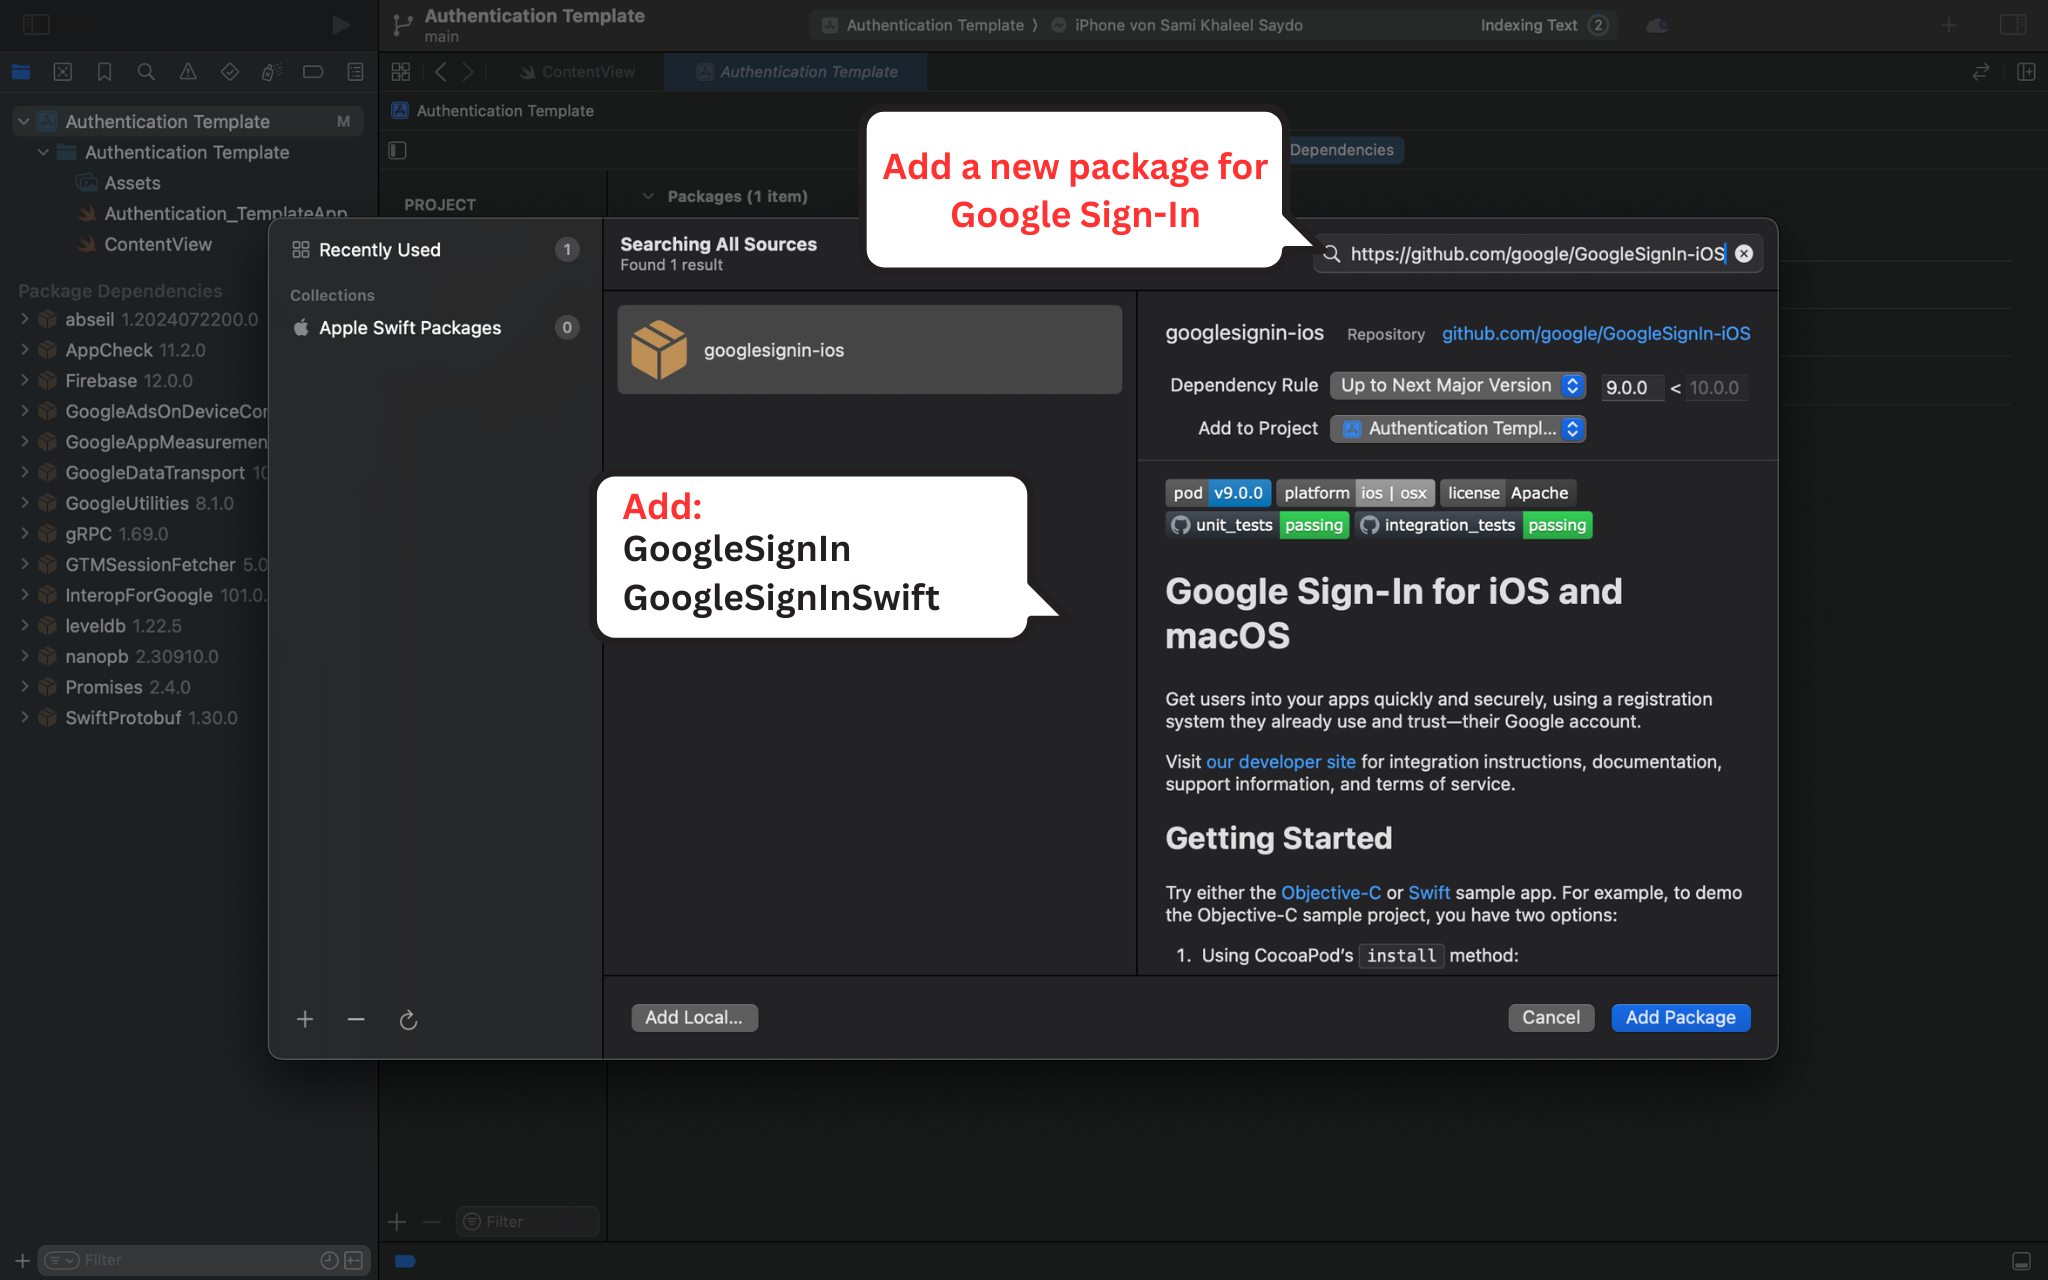
- Click the "+" button again to add another package
- Enter the Google Sign-In iOS SDK URL
- Paste: https://github.com/google/GoogleSignIn-iOS
- Click "Add Package" and wait for resolution
- Select the GoogleSignIn product in the next step
✅ Verification:
After installation, you should see both Firebase and GoogleSignIn in your Package Dependencies list.
Step 6: Create Firebase Project & Register iOS App
🎯 What you'll do:
Create a Firebase project and register your iOS app with the correct Bundle ID.
🔧 Detailed Instructions:
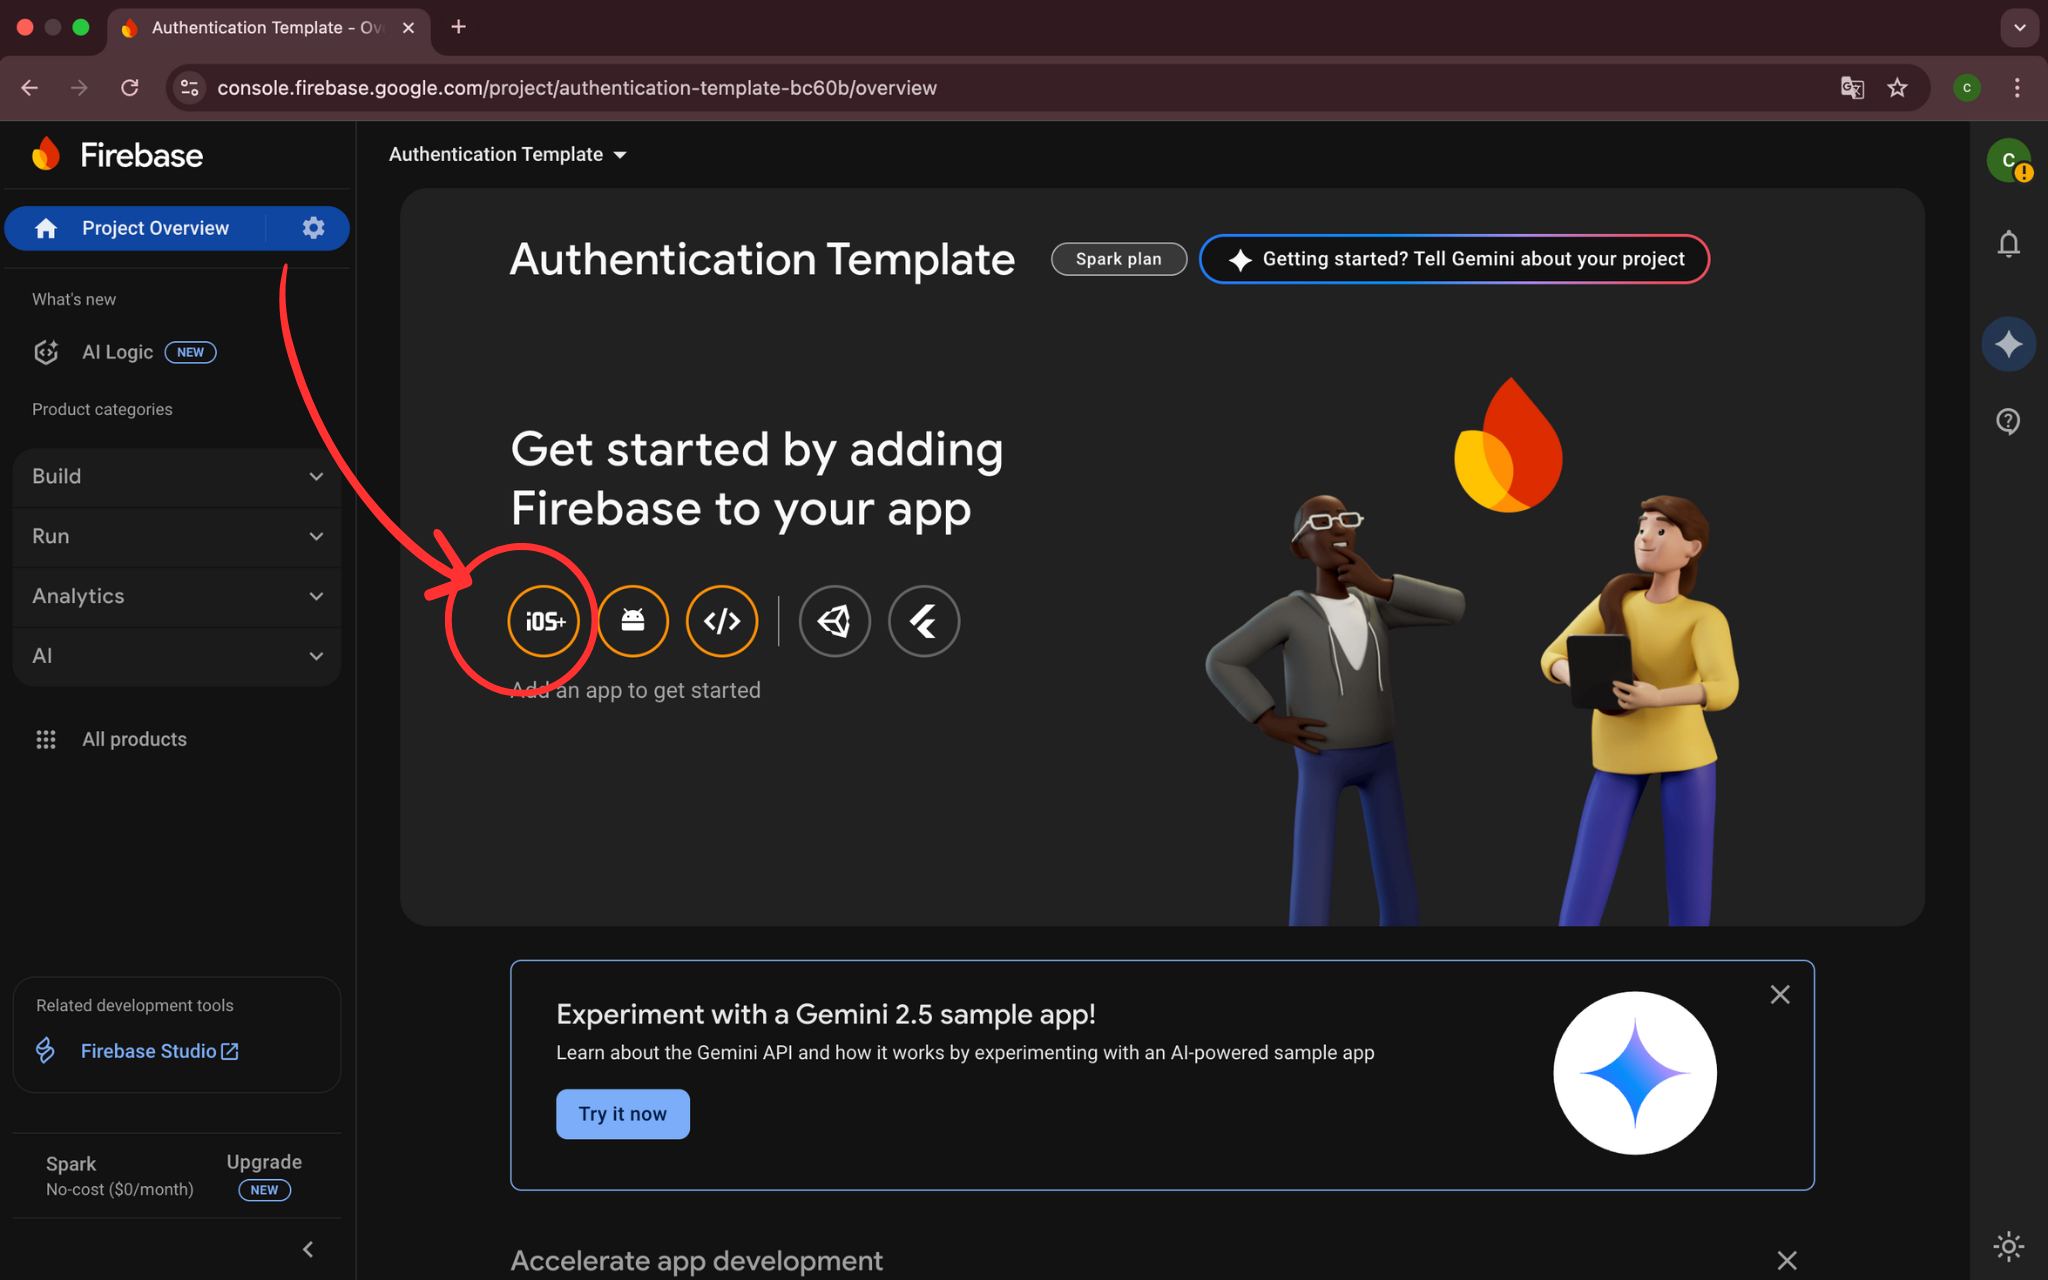
- Go to https://console.firebase.google.com/ and create a new project
- Click the iOS icon to add an iOS app
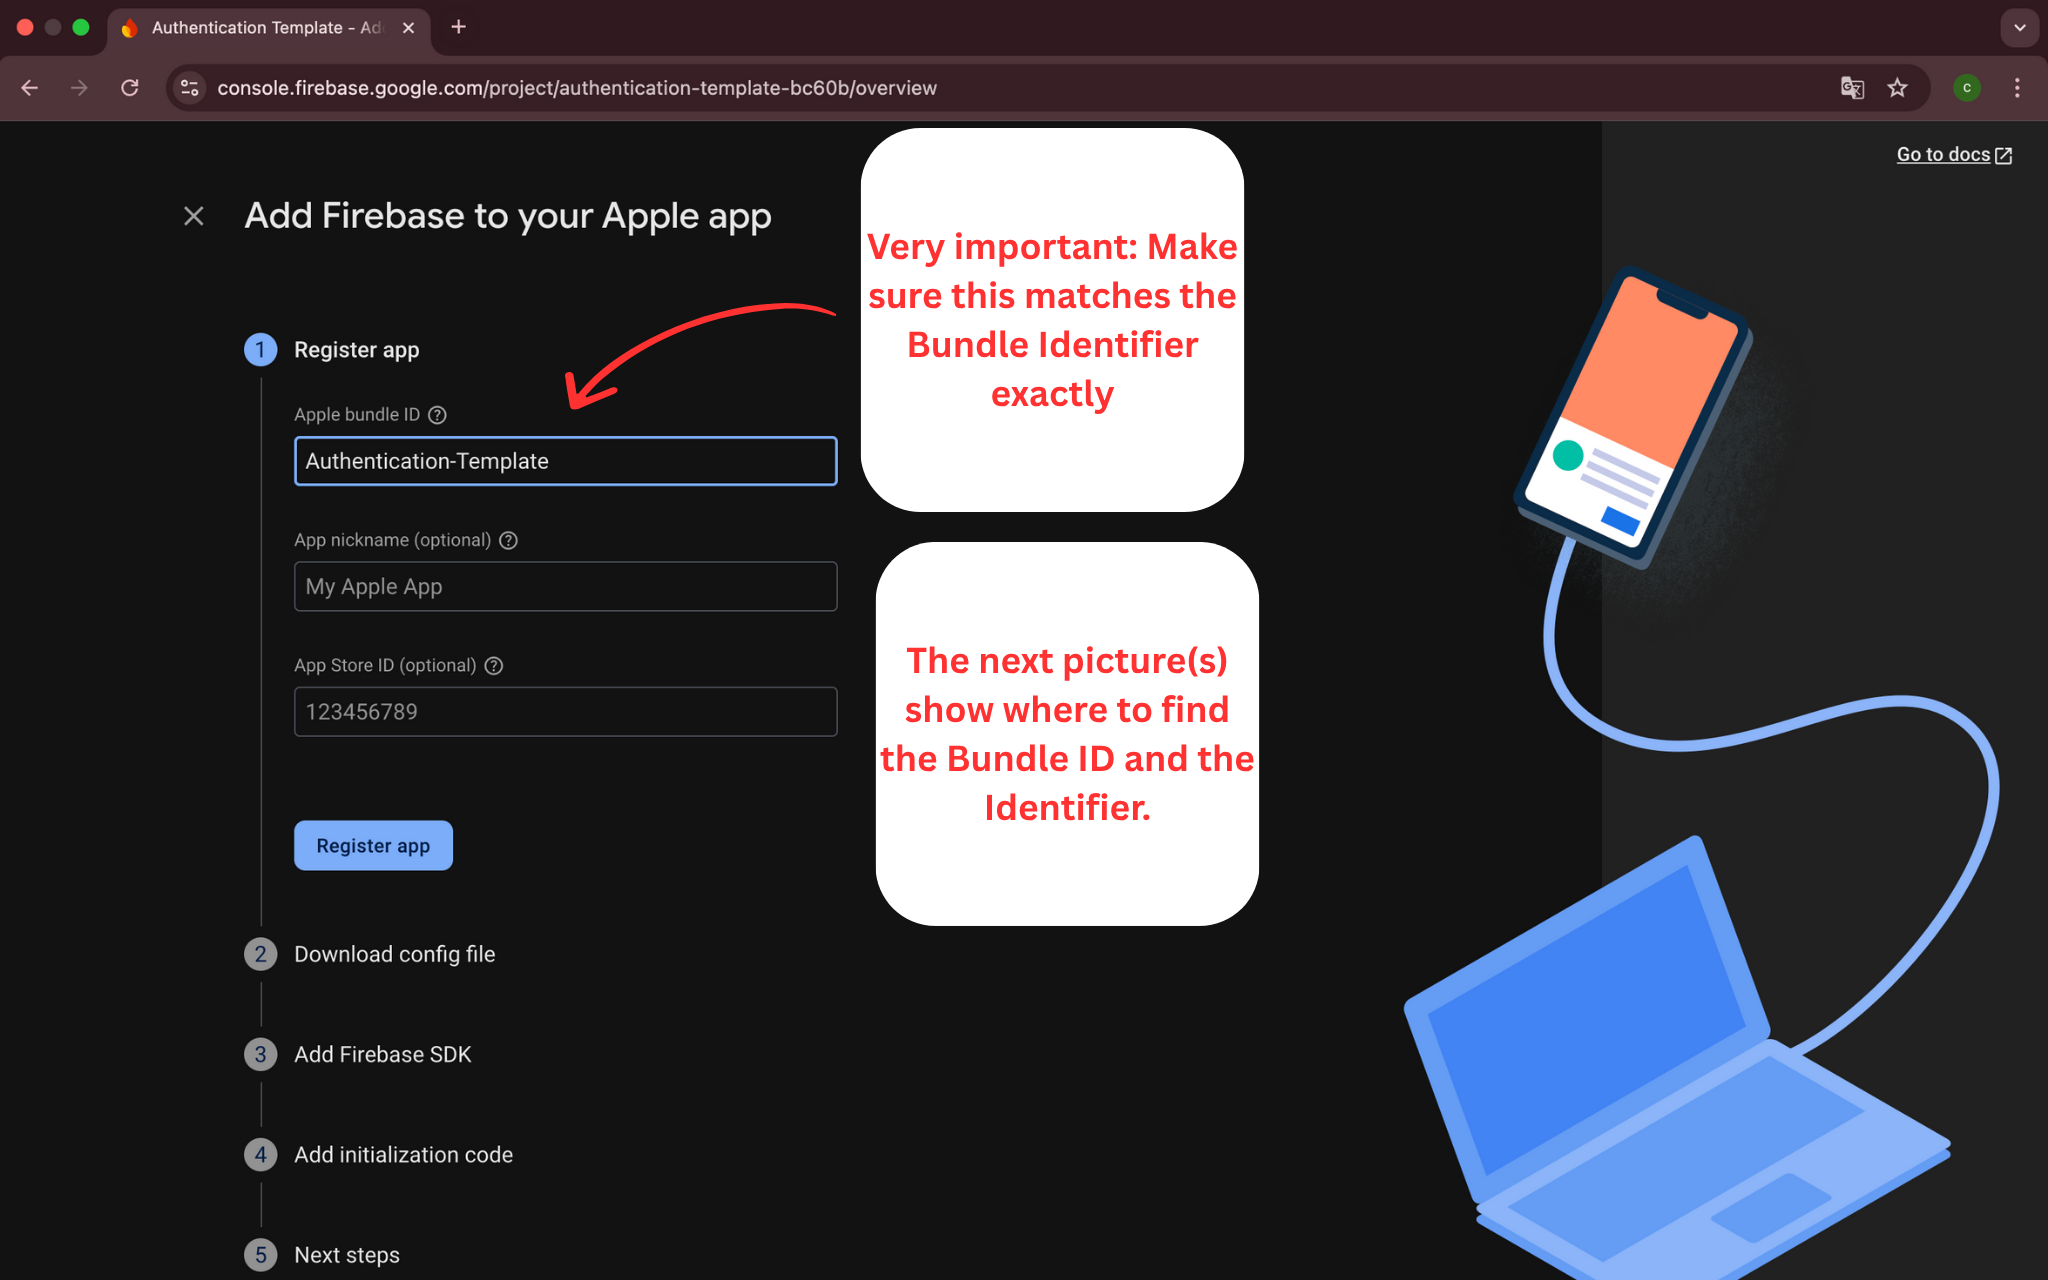
- Enter your Bundle ID exactly as it appears in Xcode
- Make sure the Bundle ID matches perfectly (case-sensitive)
- Click 'Register app' to continue
📝 Critical Note:
The Bundle ID must be identical to your Xcode project's Bundle Identifier!
Step 7: Find Bundle ID in Xcode
🎯 What you'll do:
Locate your app's Bundle Identifier in Xcode to ensure it matches Firebase configuration.
🔧 Detailed Instructions:
- In Xcode, select your project in the navigator
- Click on your target under "TARGETS"
- Go to the "General" tab
- Find "Bundle Identifier" in the Identity section
- Copy this exact value to use in Firebase
📝 Important Note:
This Bundle ID must match exactly between Xcode and Firebase - including capitalization and punctuation.
Step 8: Authentication Methods Overview
🎯 What you will do:
See which authentication methods we will activate in the Firebase Console.
🔧 Detailed Instructions:
- Navigate to Firebase Console → Authentication → Sign-in method
- You will see a list of available authentication providers
- We will activate three main methods: Email/Password, Google, and Apple
- These three methods provide comprehensive authentication options
- Each method will be configured in the following steps
📝 Important Note:
Email/Password provides basic authentication, Google enables easy social sign-in, and Apple Sign-In ensures privacy compliance.

Step 9: Enable Email/Password Authentication
🎯 What you will do:
Enable email and password sign-in for your users.
🔧 Detailed Instructions:
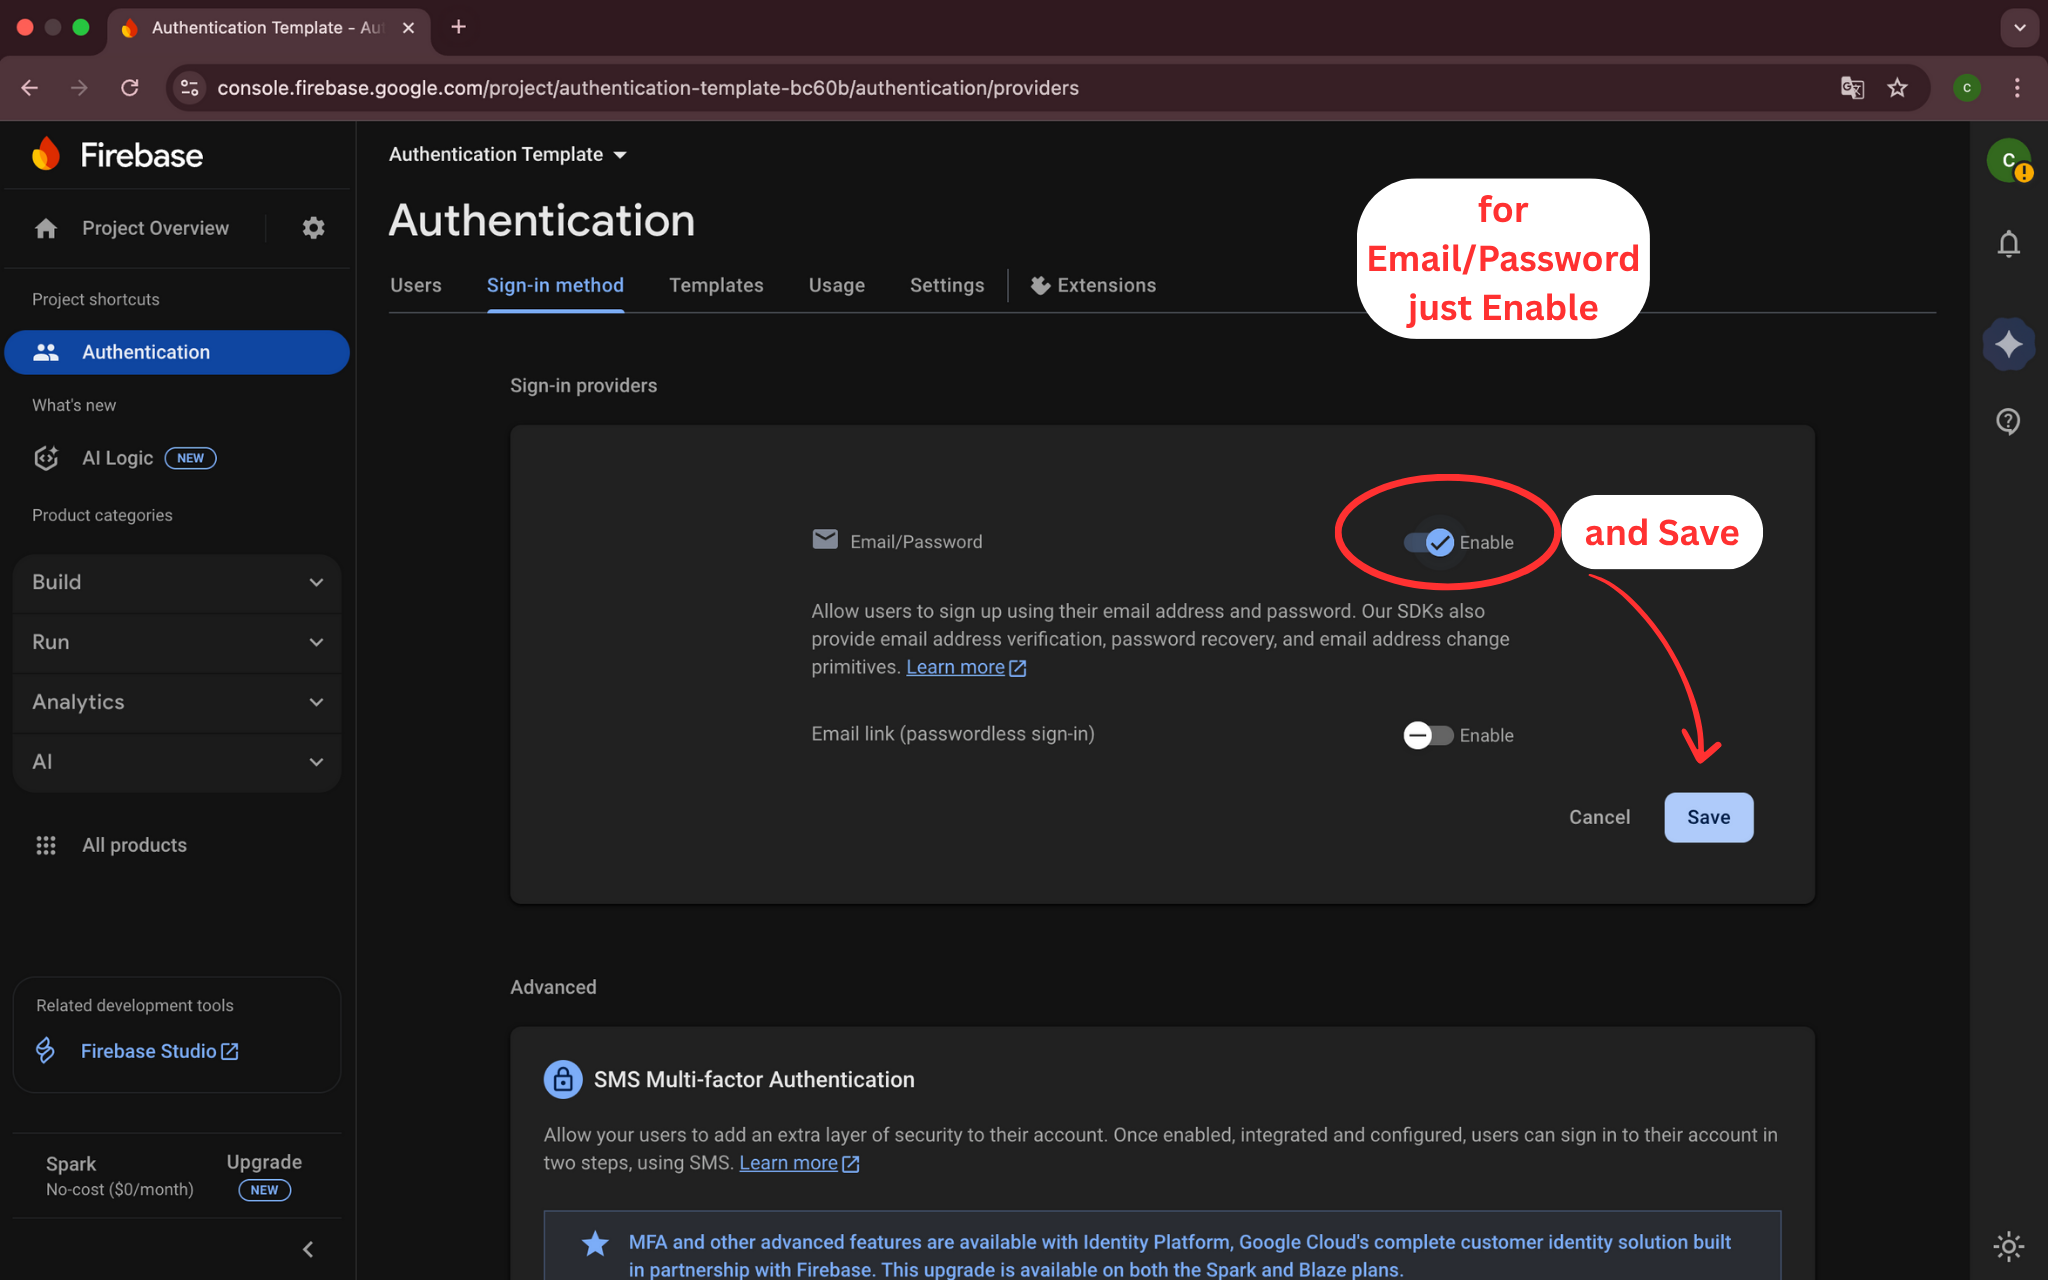
- In the Sign-in method tab, find the 'Email/Password' provider
- Click on 'Email/Password' to configure it
- Turn on the 'Enable' switch
- Optionally enable 'Email link' for passwordless sign-in
- Click 'Save' to apply the changes
📝 Important Note:
Email/Password is the most basic authentication method and works on all platforms.
Step 10: Enable Google Sign-In
🎯 What you will do:
Configure Google Sign-In provider for easy user authentication.
🔧 Detailed Instructions:
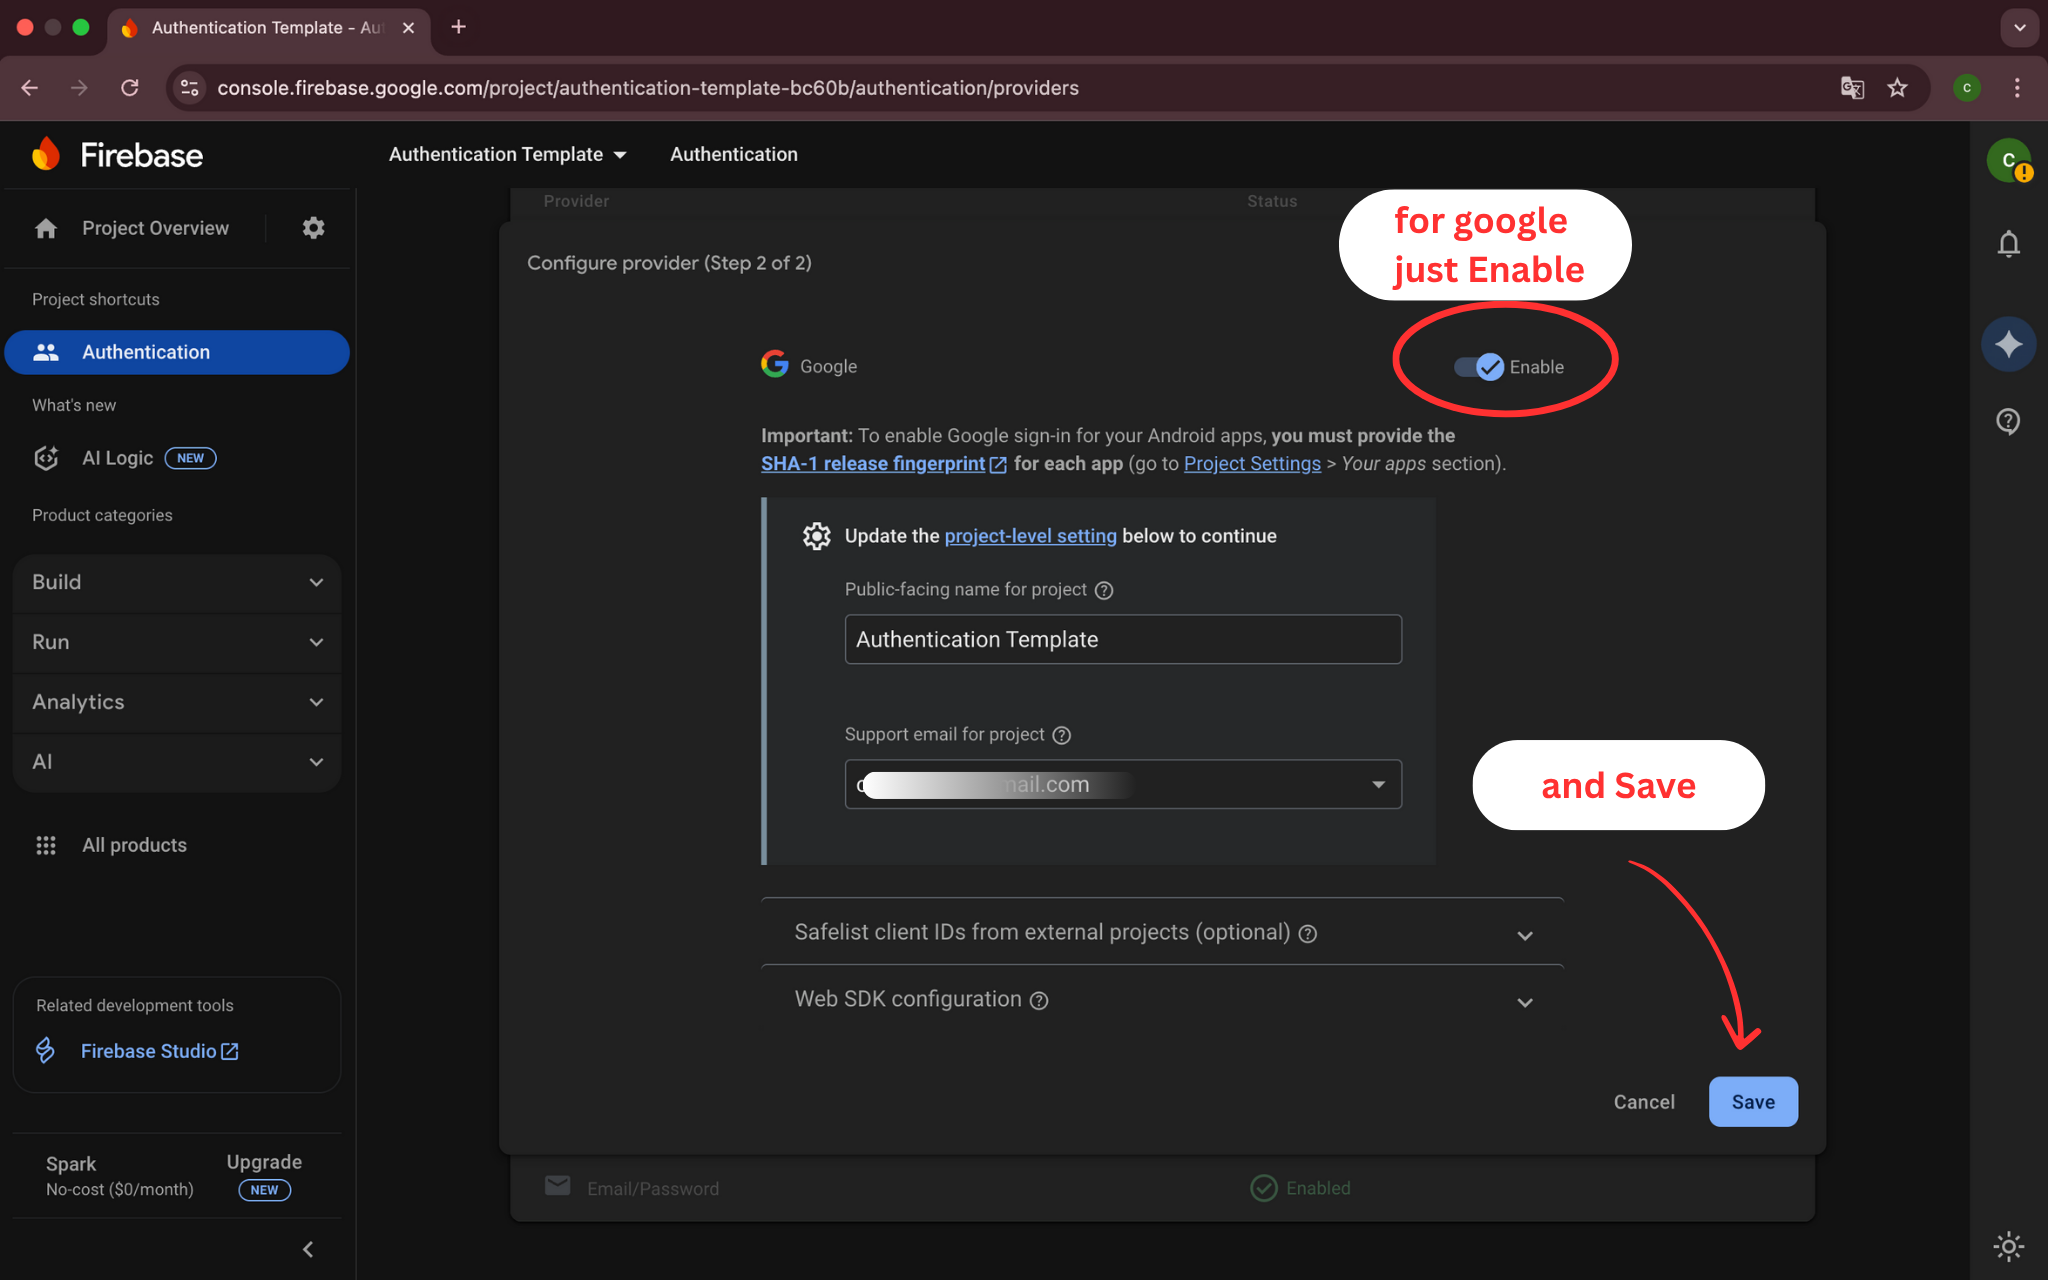
- Find 'Google' in the Sign-in provider list
- Click on 'Google' to configure it
- Turn on the 'Enable' switch
- Set your project support email address
- Click 'Save' to activate Google Sign-In
📝 Important Note:
Google Sign-In requires additional setup in Xcode with URL schemes.
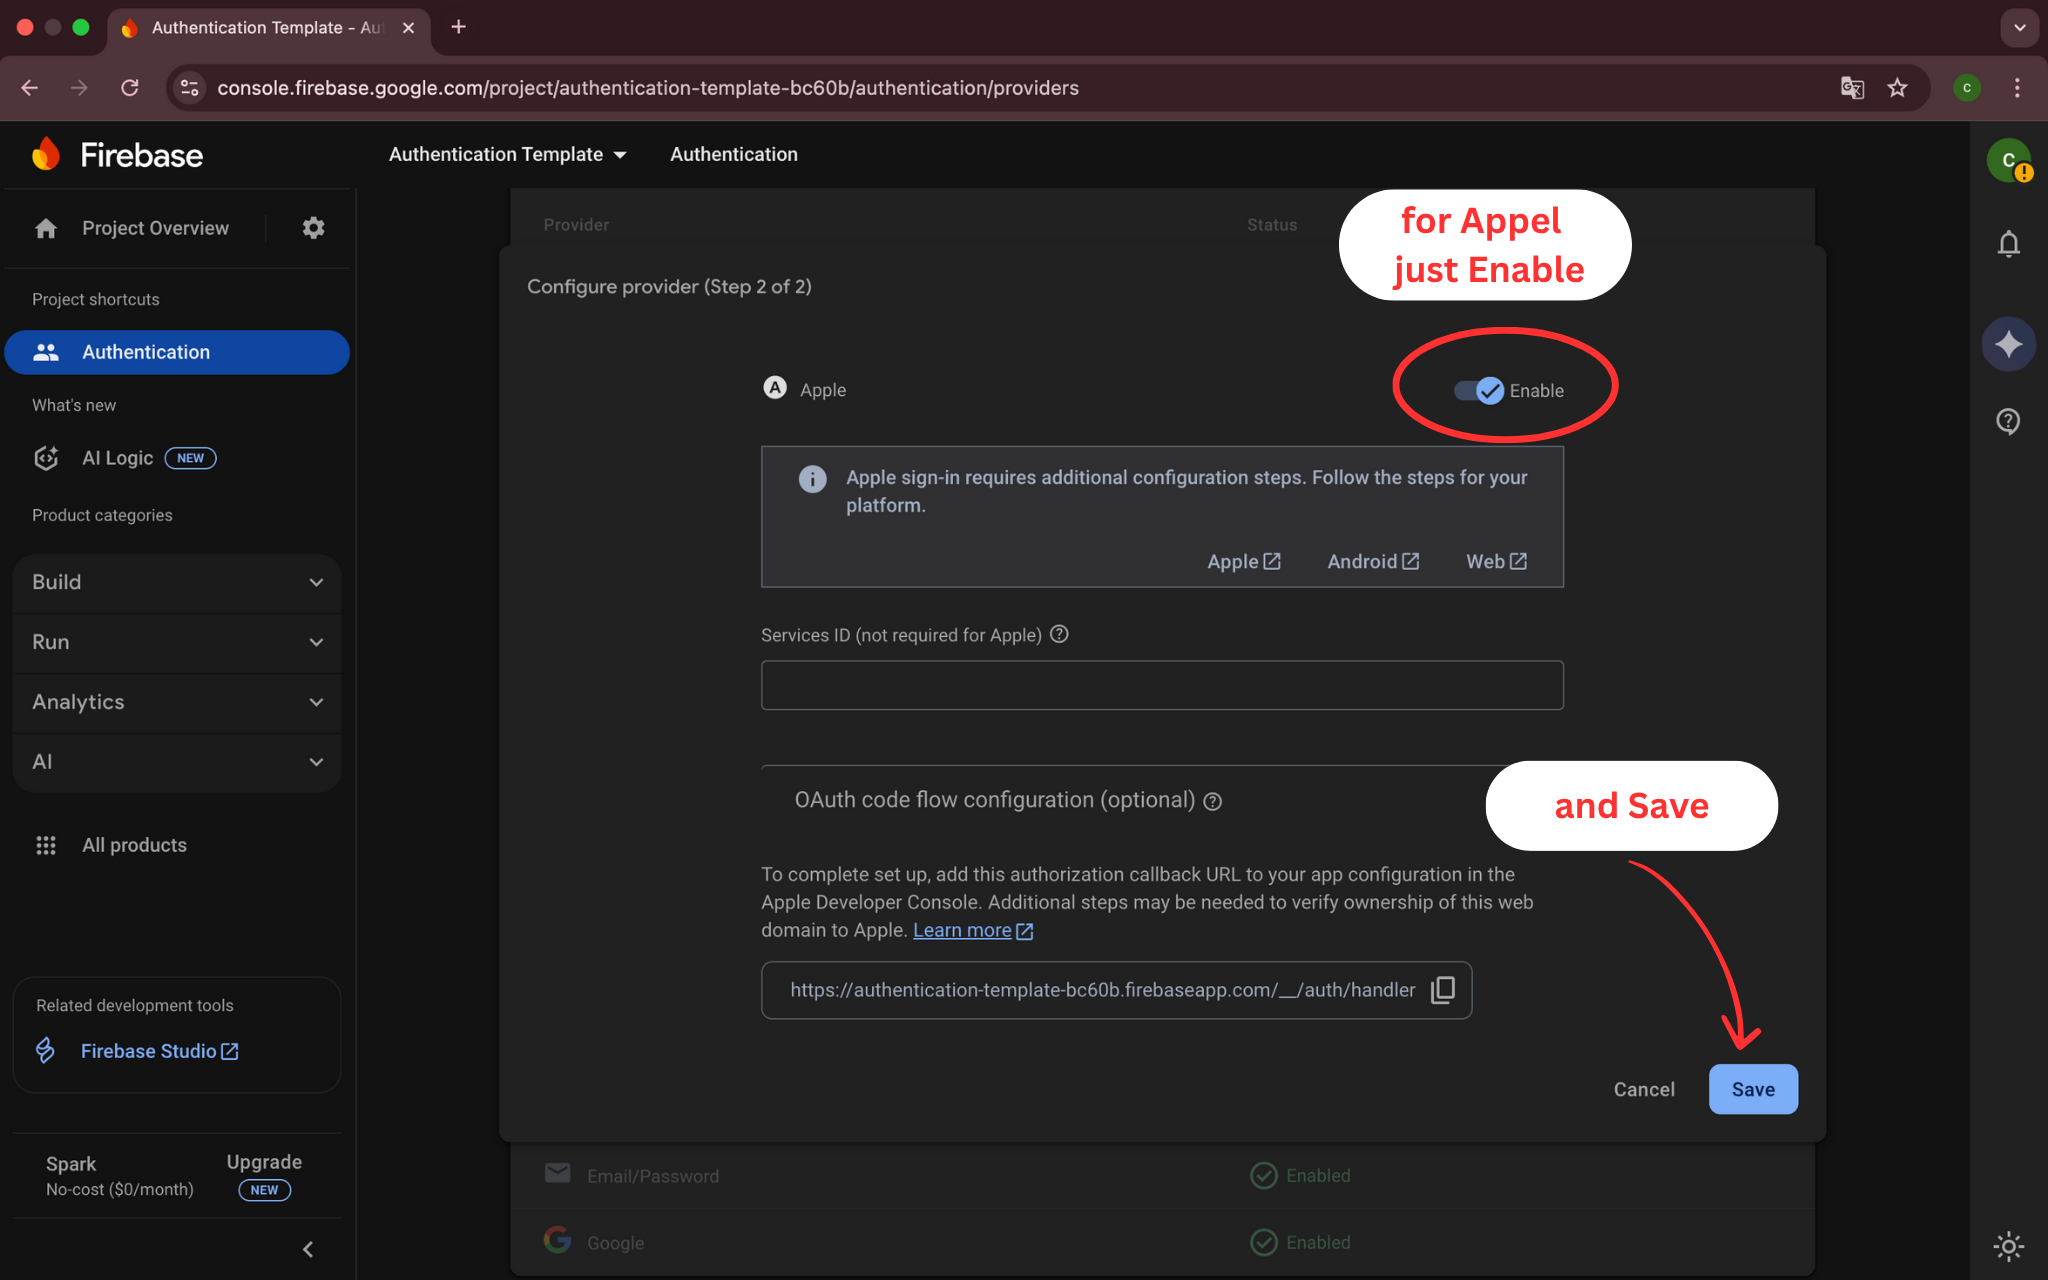
Step 11: Enable Apple Sign-In
🎯 What you will do:
Configure Apple as a sign-in provider in the Firebase Console.
🔧 Detailed Instructions:
- Find 'Apple' in the provider list and click on it
- Turn on the 'Enable' switch to activate Apple Sign-In
- Configure your App ID and Team ID from the Apple Developer Portal
- Click 'Save' to activate Apple Sign-In authentication
📝 Important Note:
Apple Sign-In provides the highest level of user privacy and security.
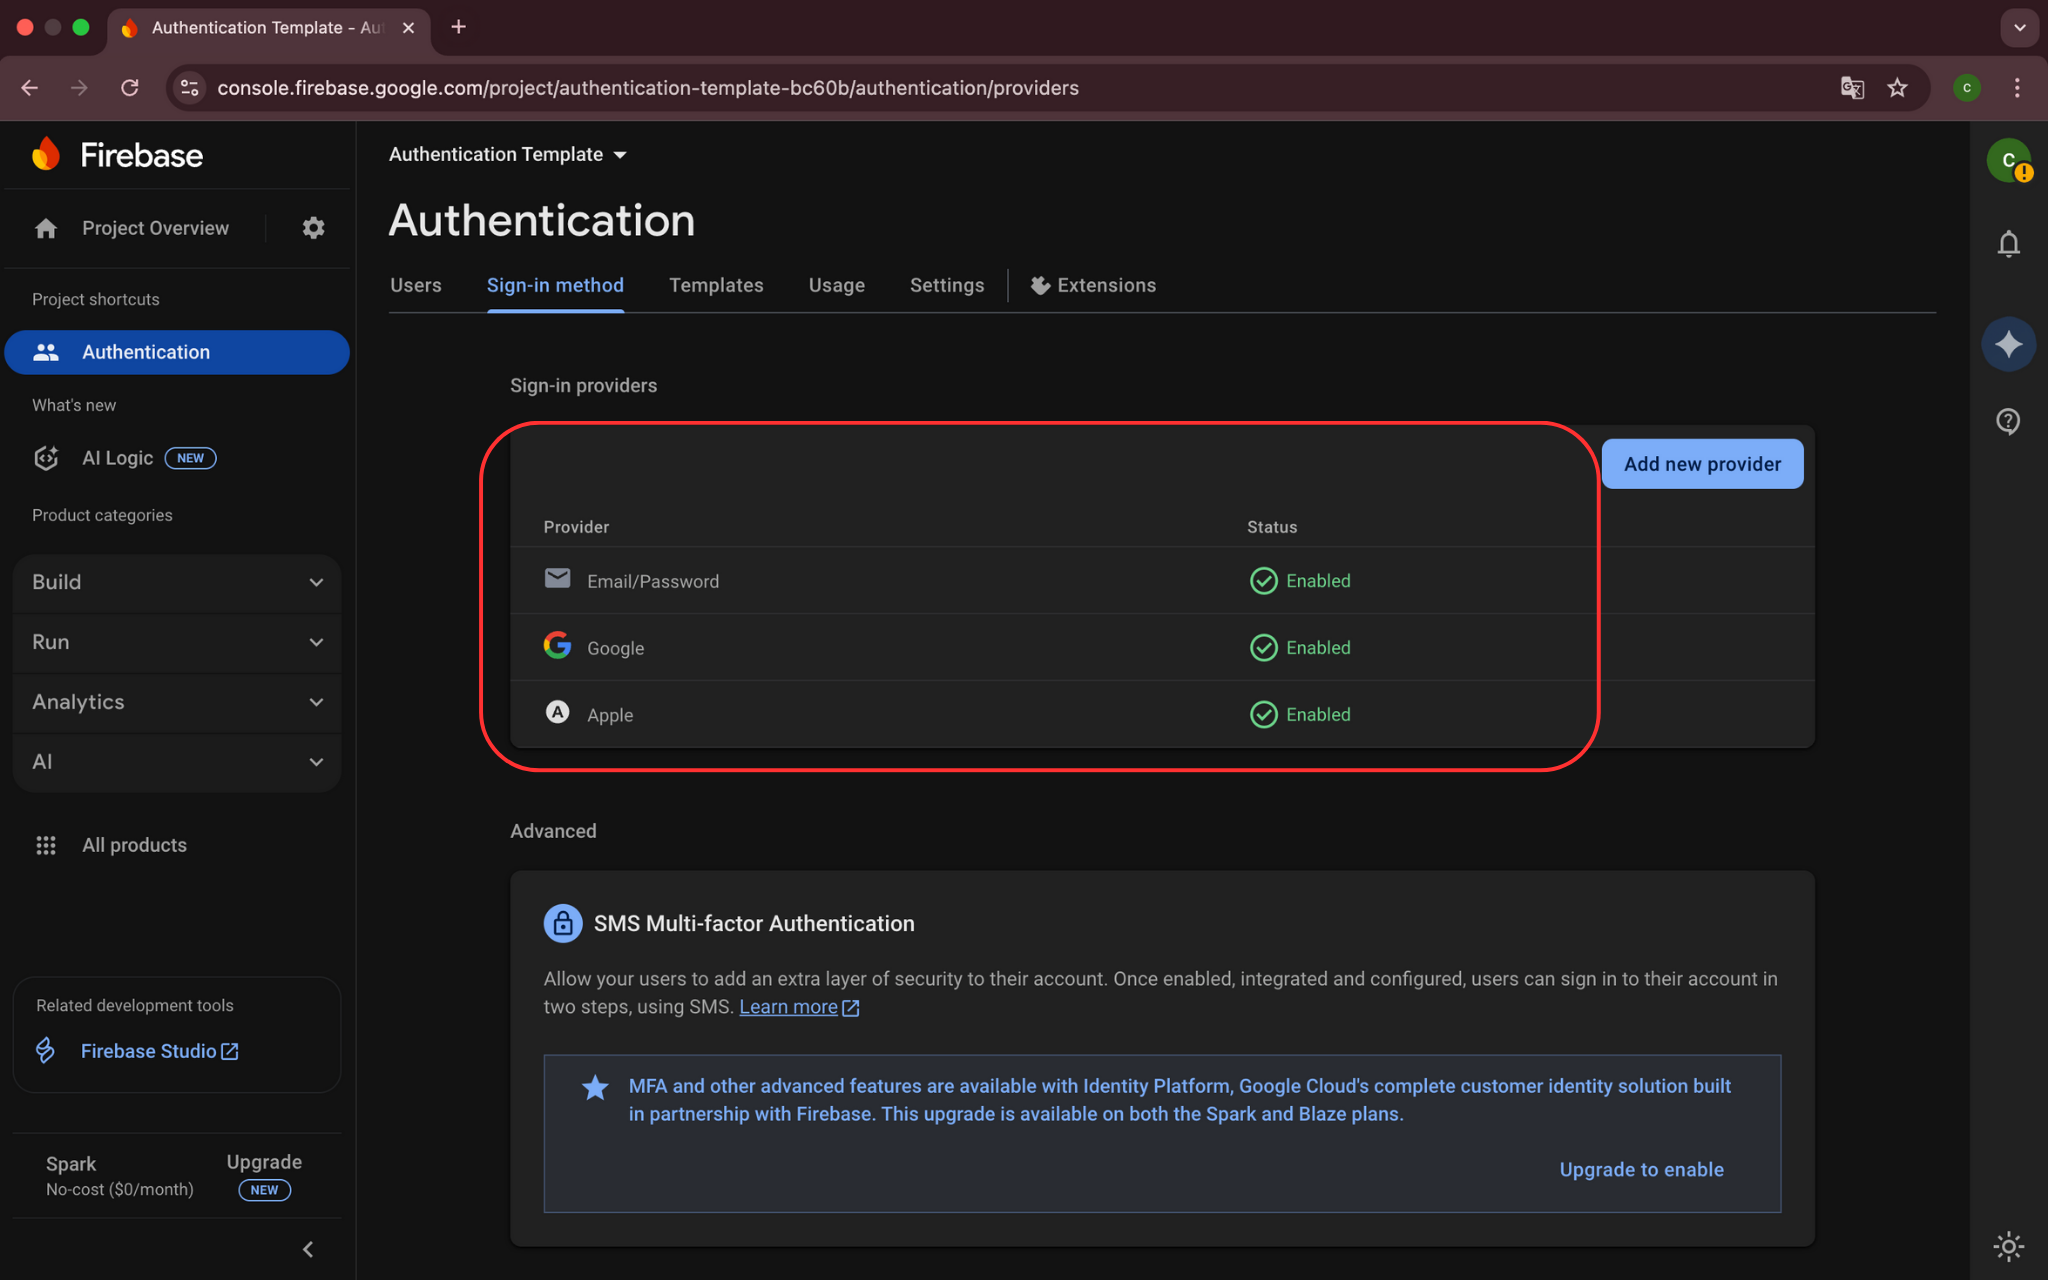
Step 12: Verify Authentication Methods
🎯 What you will do:
Confirm that all three authentication methods are properly enabled.
🔧 Detailed Instructions:
- Check that Email/Password shows 'Enabled' status
- Verify that Google Sign-In shows 'Enabled' status
- Confirm that Apple Sign-In shows 'Enabled' status
- All three methods should have green checkmarks
- Your authentication setup is now ready
📝 Important Note:
Multiple authentication options give users flexibility when signing in.
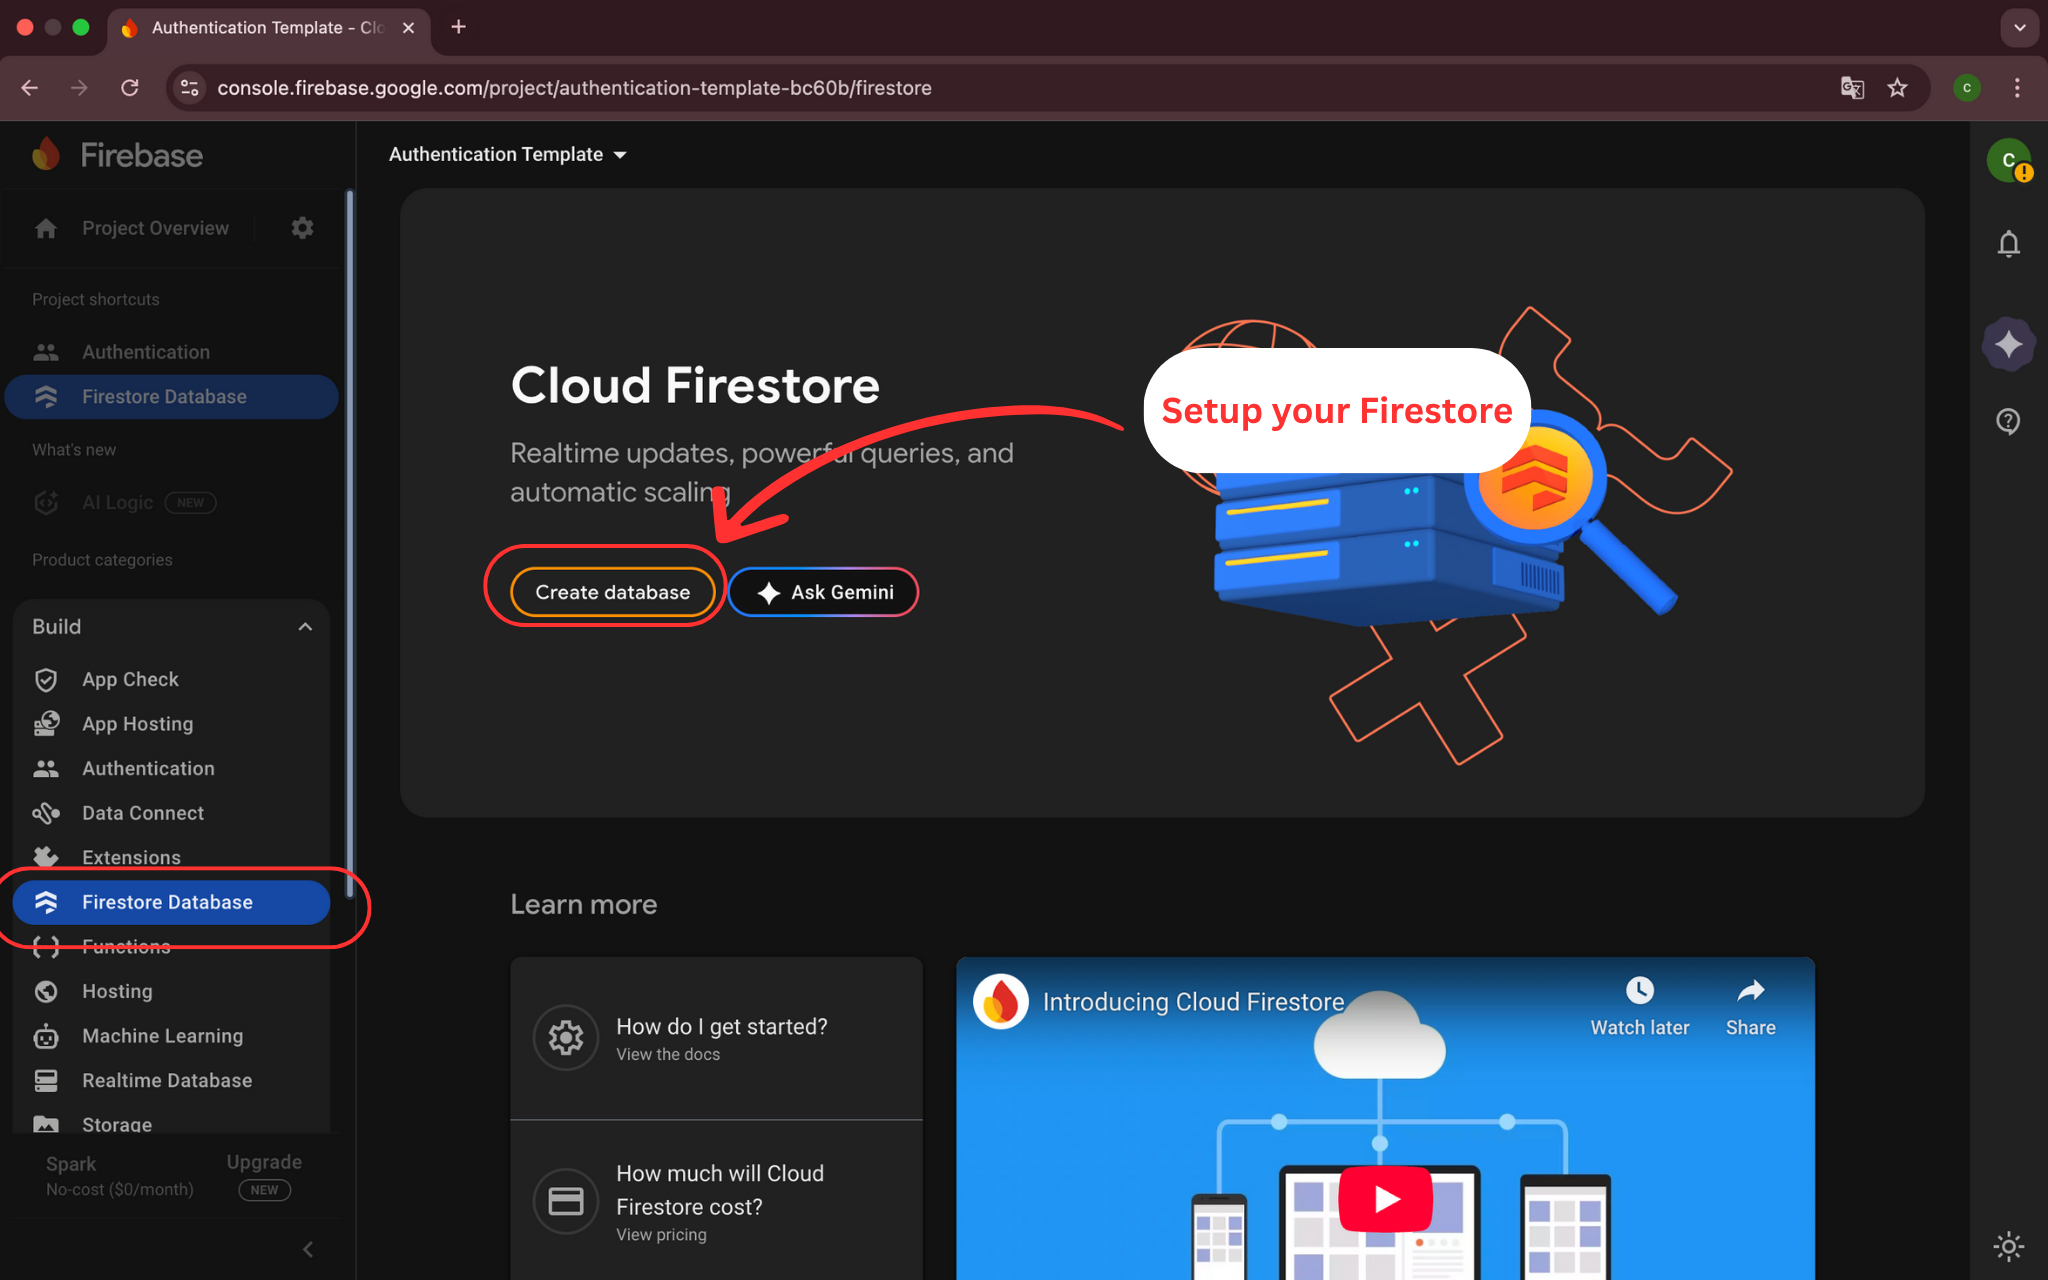
Step 13: Create Firestore Database
🎯 What you will do:
Set up Firestore database to store user data and app information.
🔧 Detailed Instructions:
- In the Firebase Console sidebar, click 'Firestore Database'
- Click 'Create database' button to start the setup
- You will be guided through the database creation process
- This database will store user profiles and usernames
- Continue to the next step for security mode selection
📝 Important Note:
Firestore will securely store user profiles, usernames, and other app data.
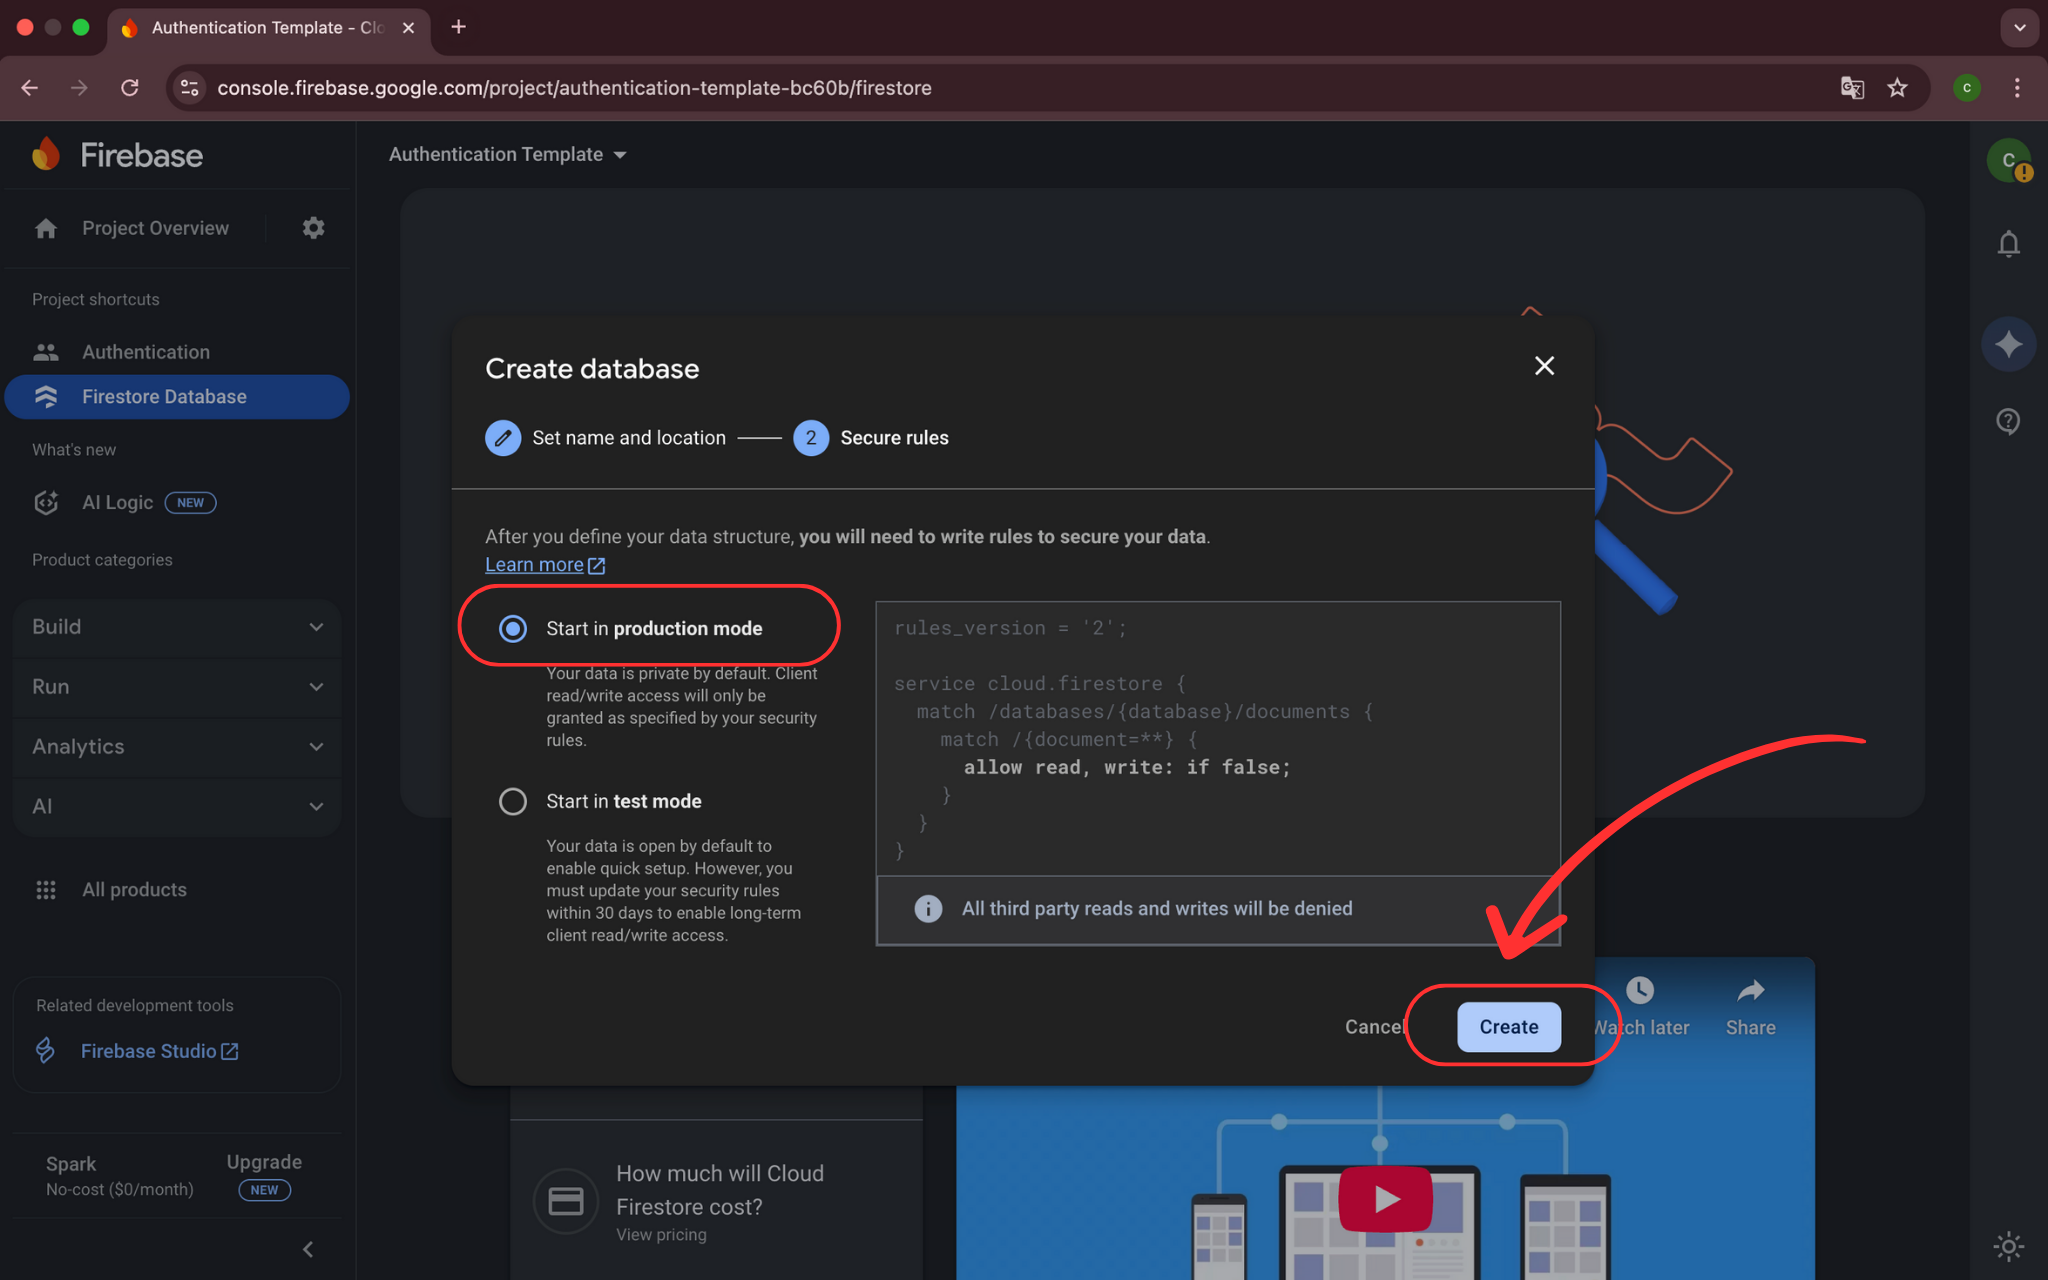
Step 14: Select Production Mode
🎯 What you will do:
Choose production mode for better security in your Firestore database.
🔧 Detailed Instructions:
- Select 'Start in production mode' for better security
- This ensures your database starts with secure default rules
- You can adjust rules later as needed
- Click 'Next' to continue to location selection
- Production mode is recommended for live applications
📝 Important Note:
Production mode provides secure defaults that you can customize later.
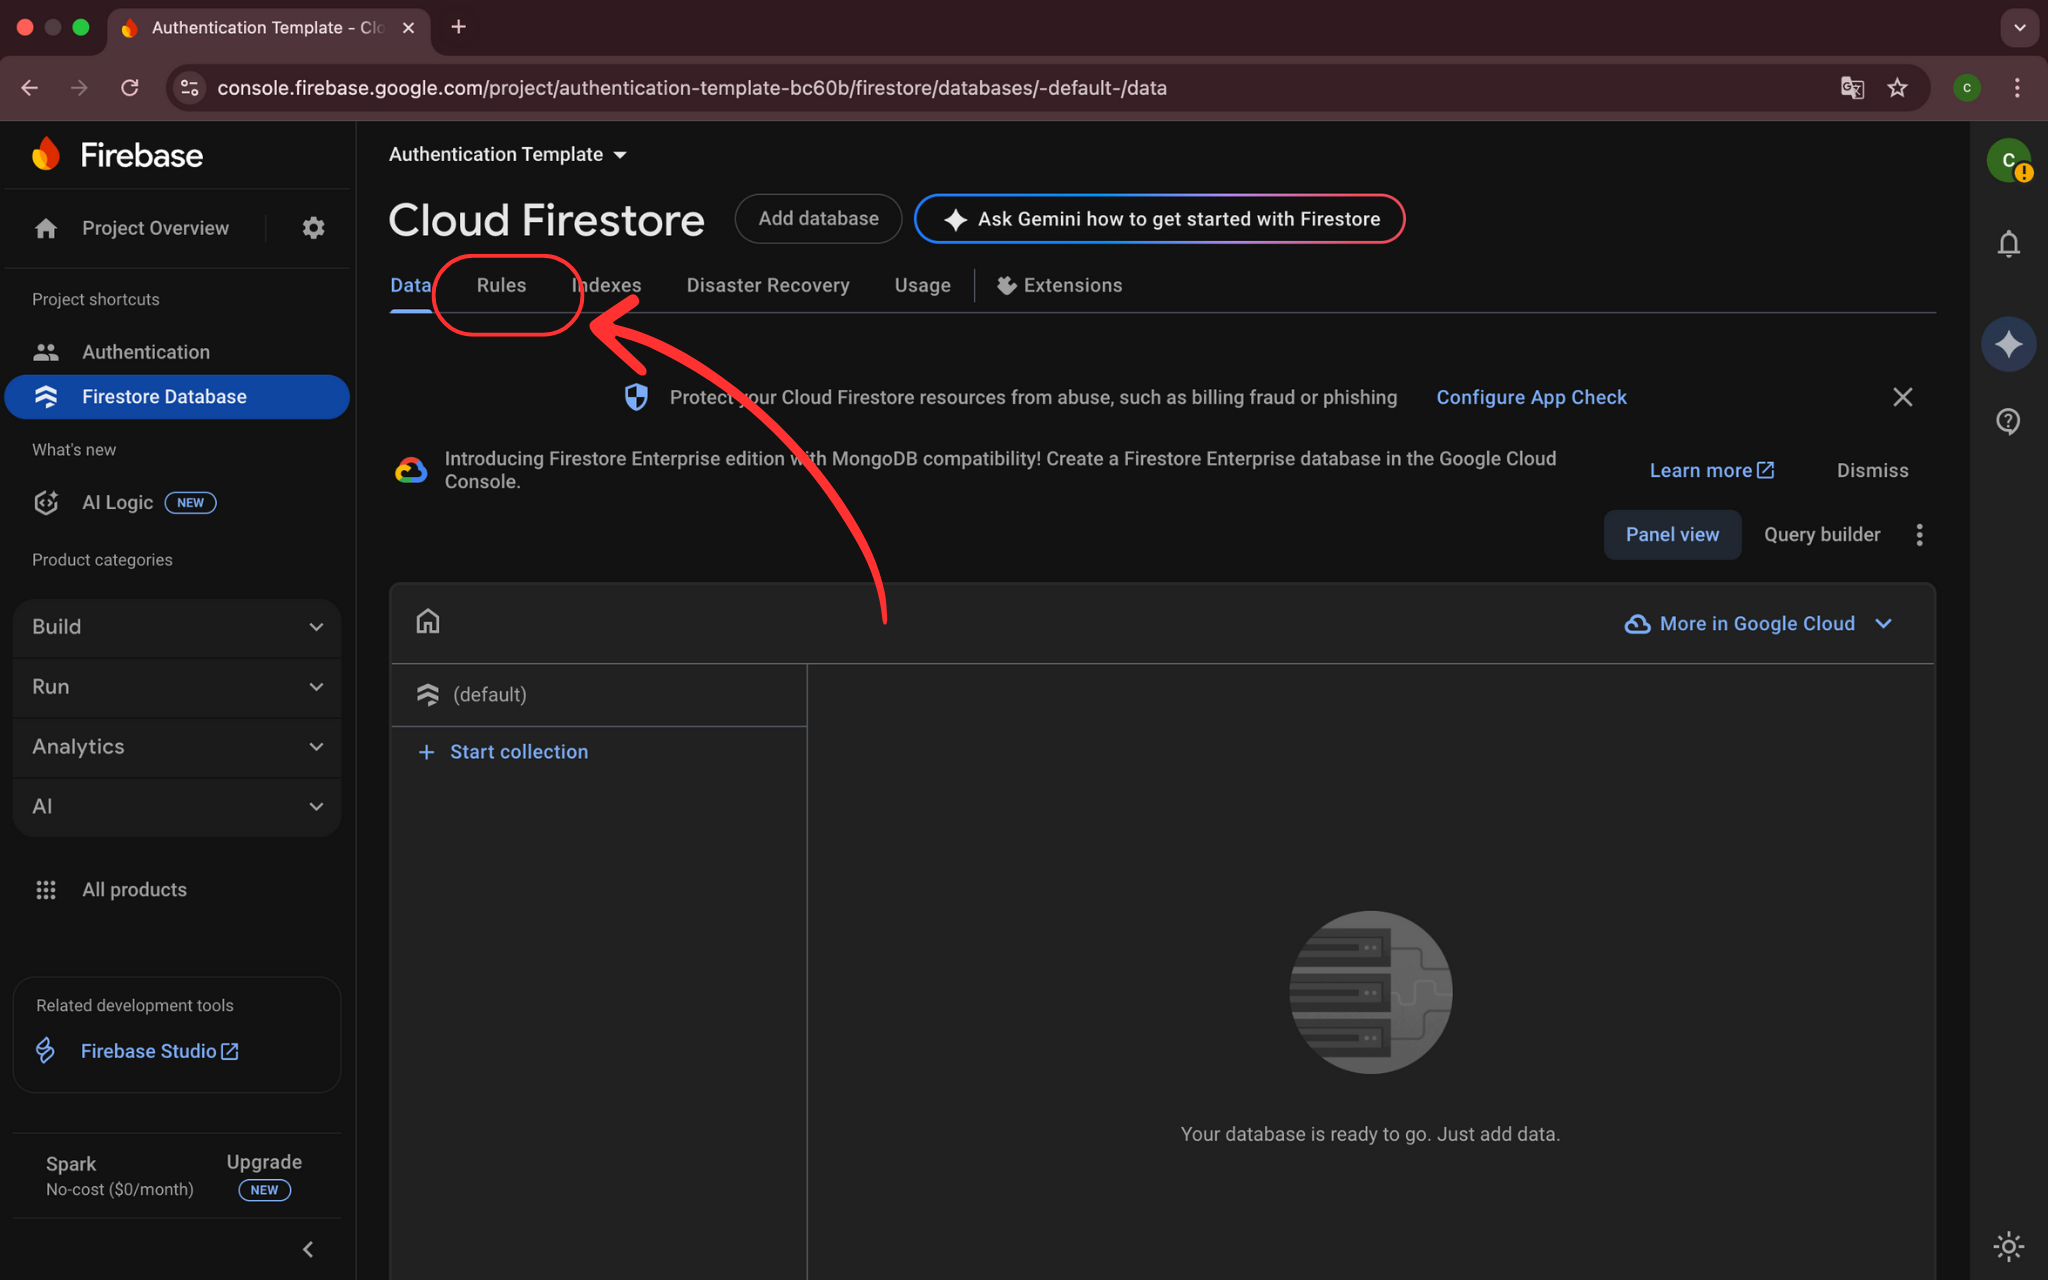
Step 15: Access Firestore Rules
🎯 What you will do:
Navigate to the rules section to configure database security.
🔧 Detailed Instructions:
- After database creation, click on the 'Rules' tab
- Here you will configure who can access your data
- You will see the default security rules editor
- We need to modify these rules for authentication
- Continue to the next step to update the rules
📝 Important Note:
Proper security rules are essential for protecting user data.
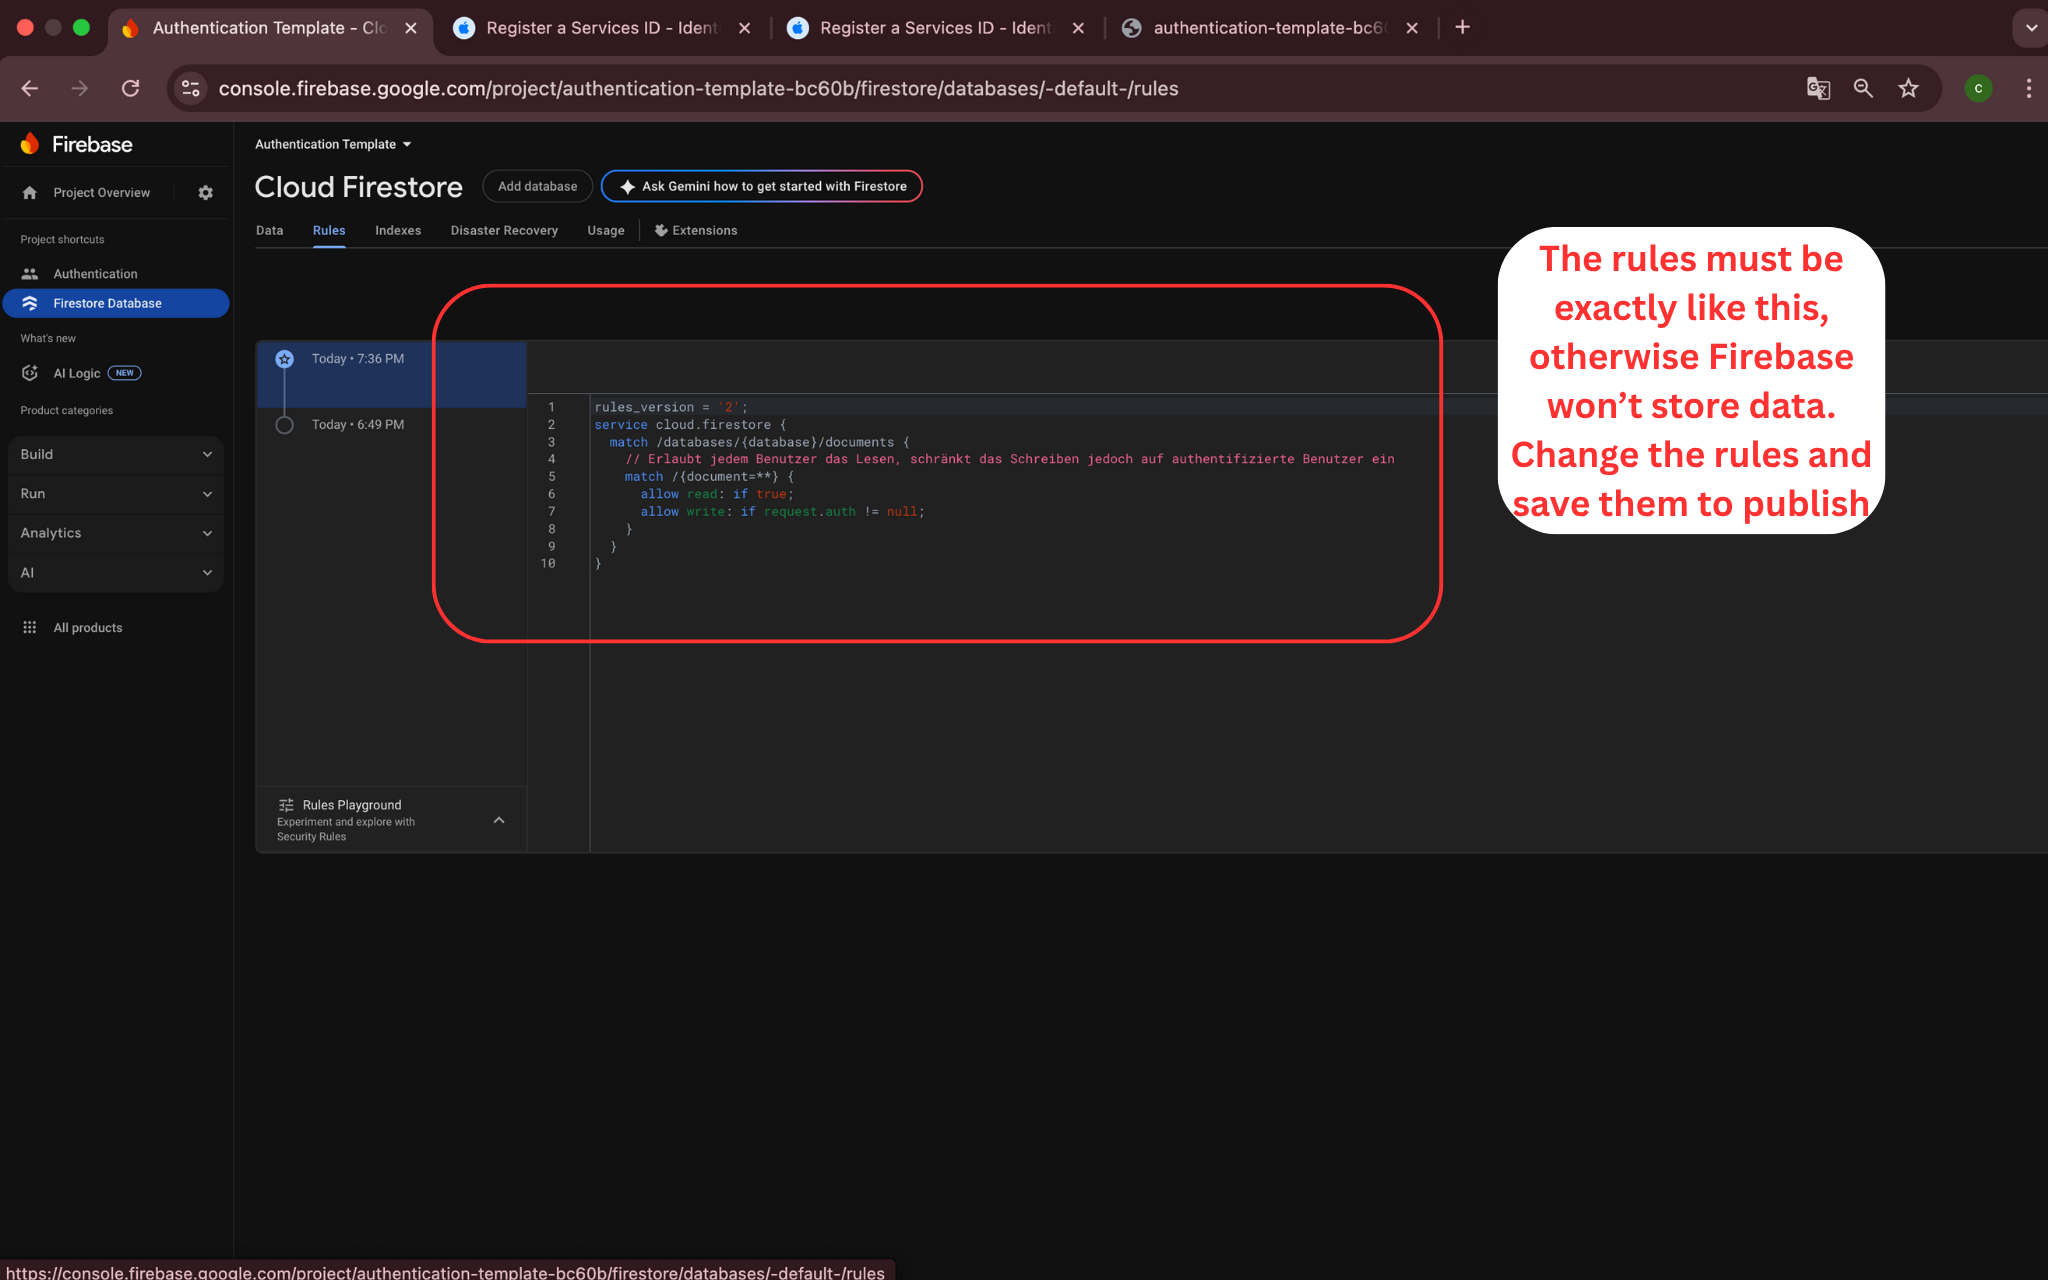
Step 16: Configure Firestore Security Rules
🎯 What you will do:
Set up security rules to protect user data in Firestore.
🔧 Detailed Instructions:
- Replace the default rules with authentication-based rules
- Copy the security rules provided below
- Paste them into the rules editor
- Ensure users can only read/write their own data
- Click 'Publish' to apply the new security rules
📝 Important Note:
These rules ensure that only authenticated users can access their own data.
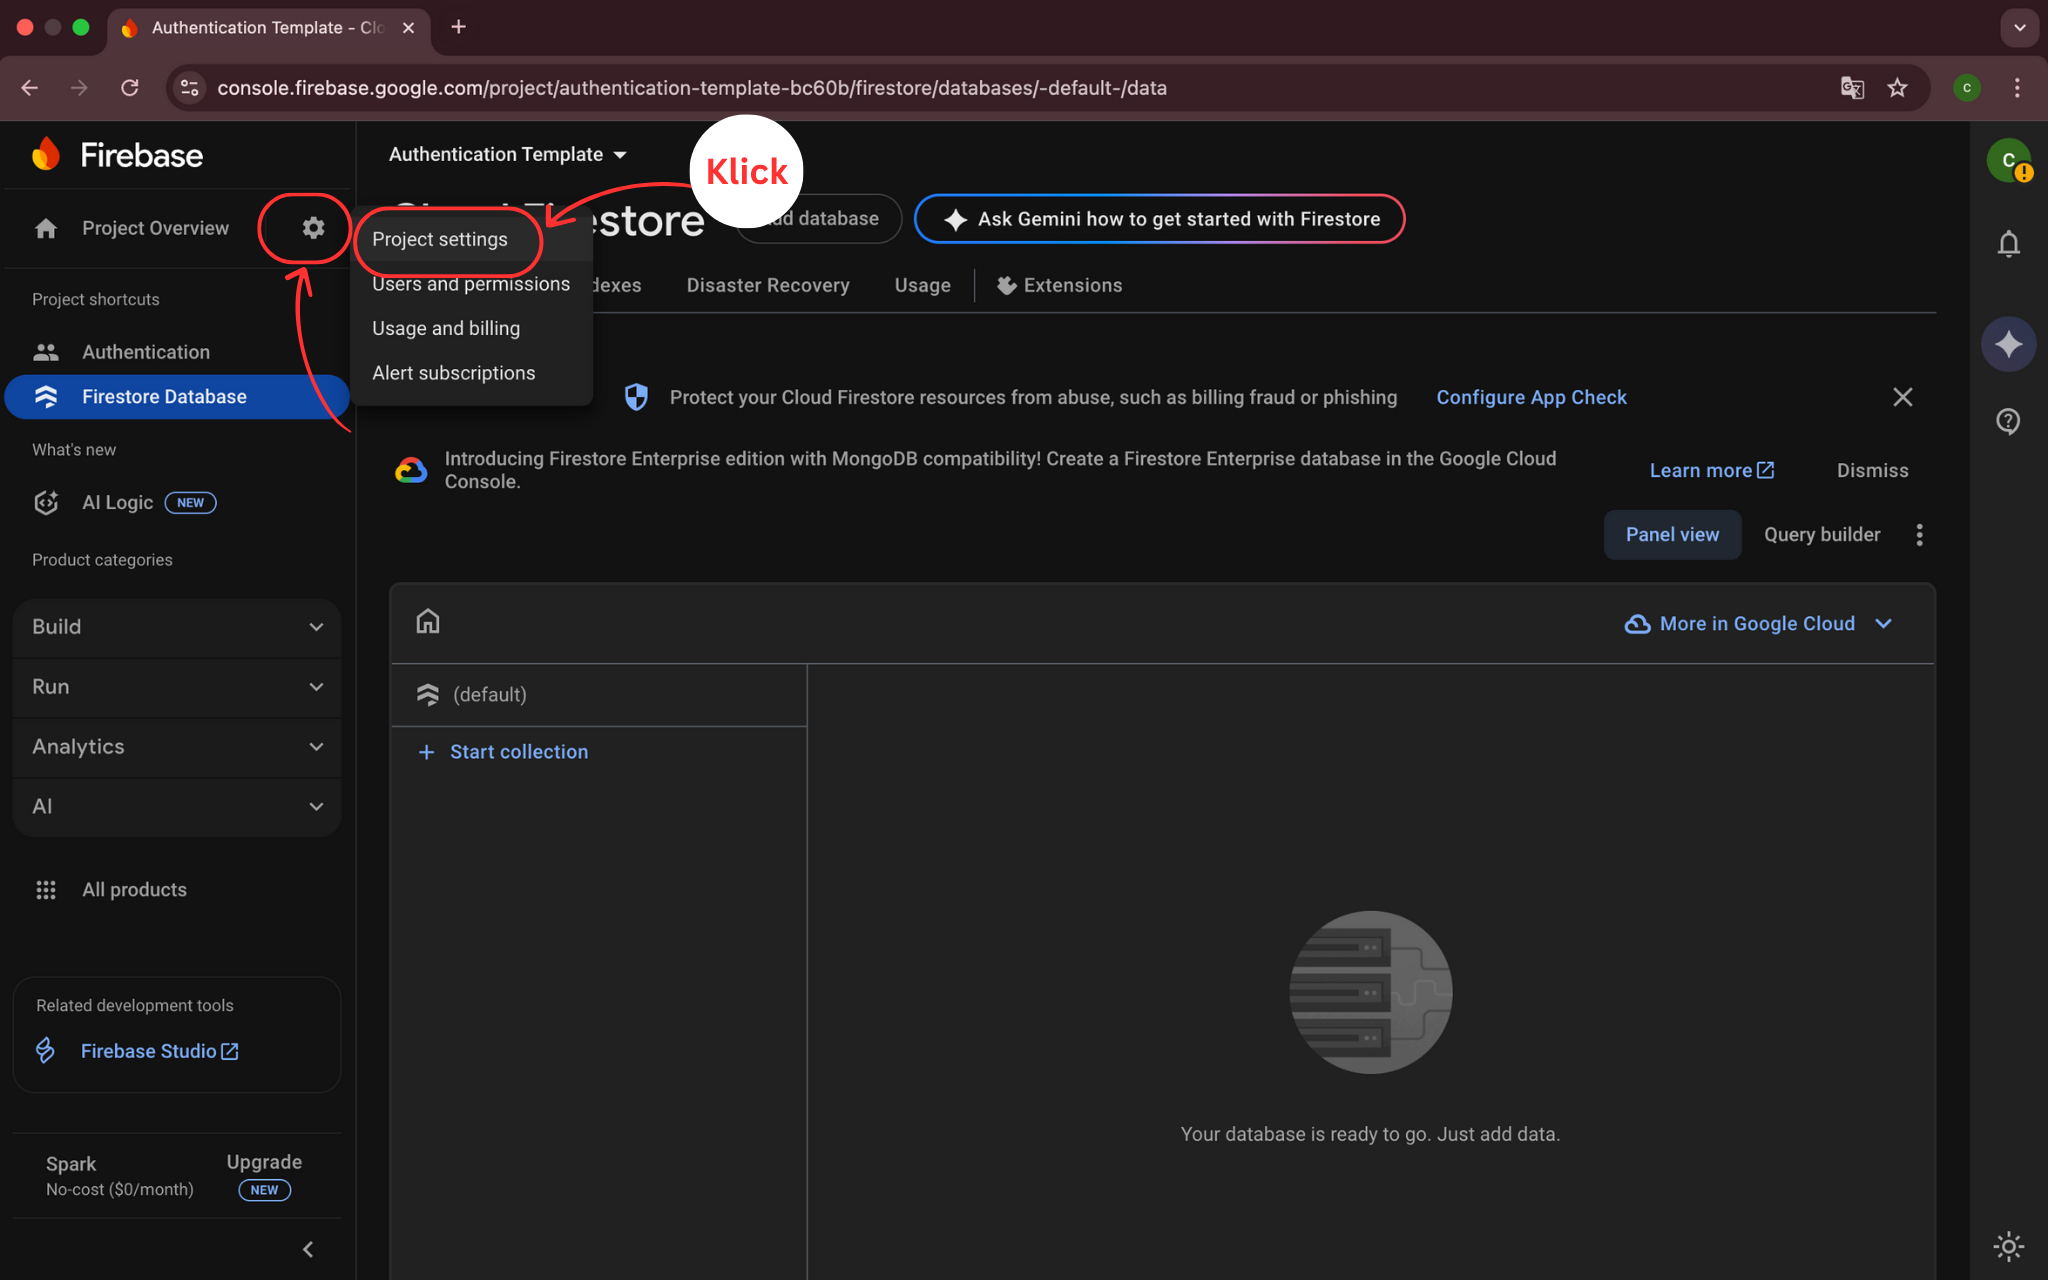
Step 17: Access Project Settings
🎯 What you will do:
Navigate to project settings to download the configuration file.
🔧 Detailed Instructions:
- In the Firebase Console, click the gear icon next to 'Project Overview'
- Select 'Project settings' from the dropdown menu
- Scroll down to the 'Your apps' section
- Find your iOS app in the list
- Here you will download the GoogleService-Info.plist file
📝 Important Note:
Project settings contain all your app configurations and download links.
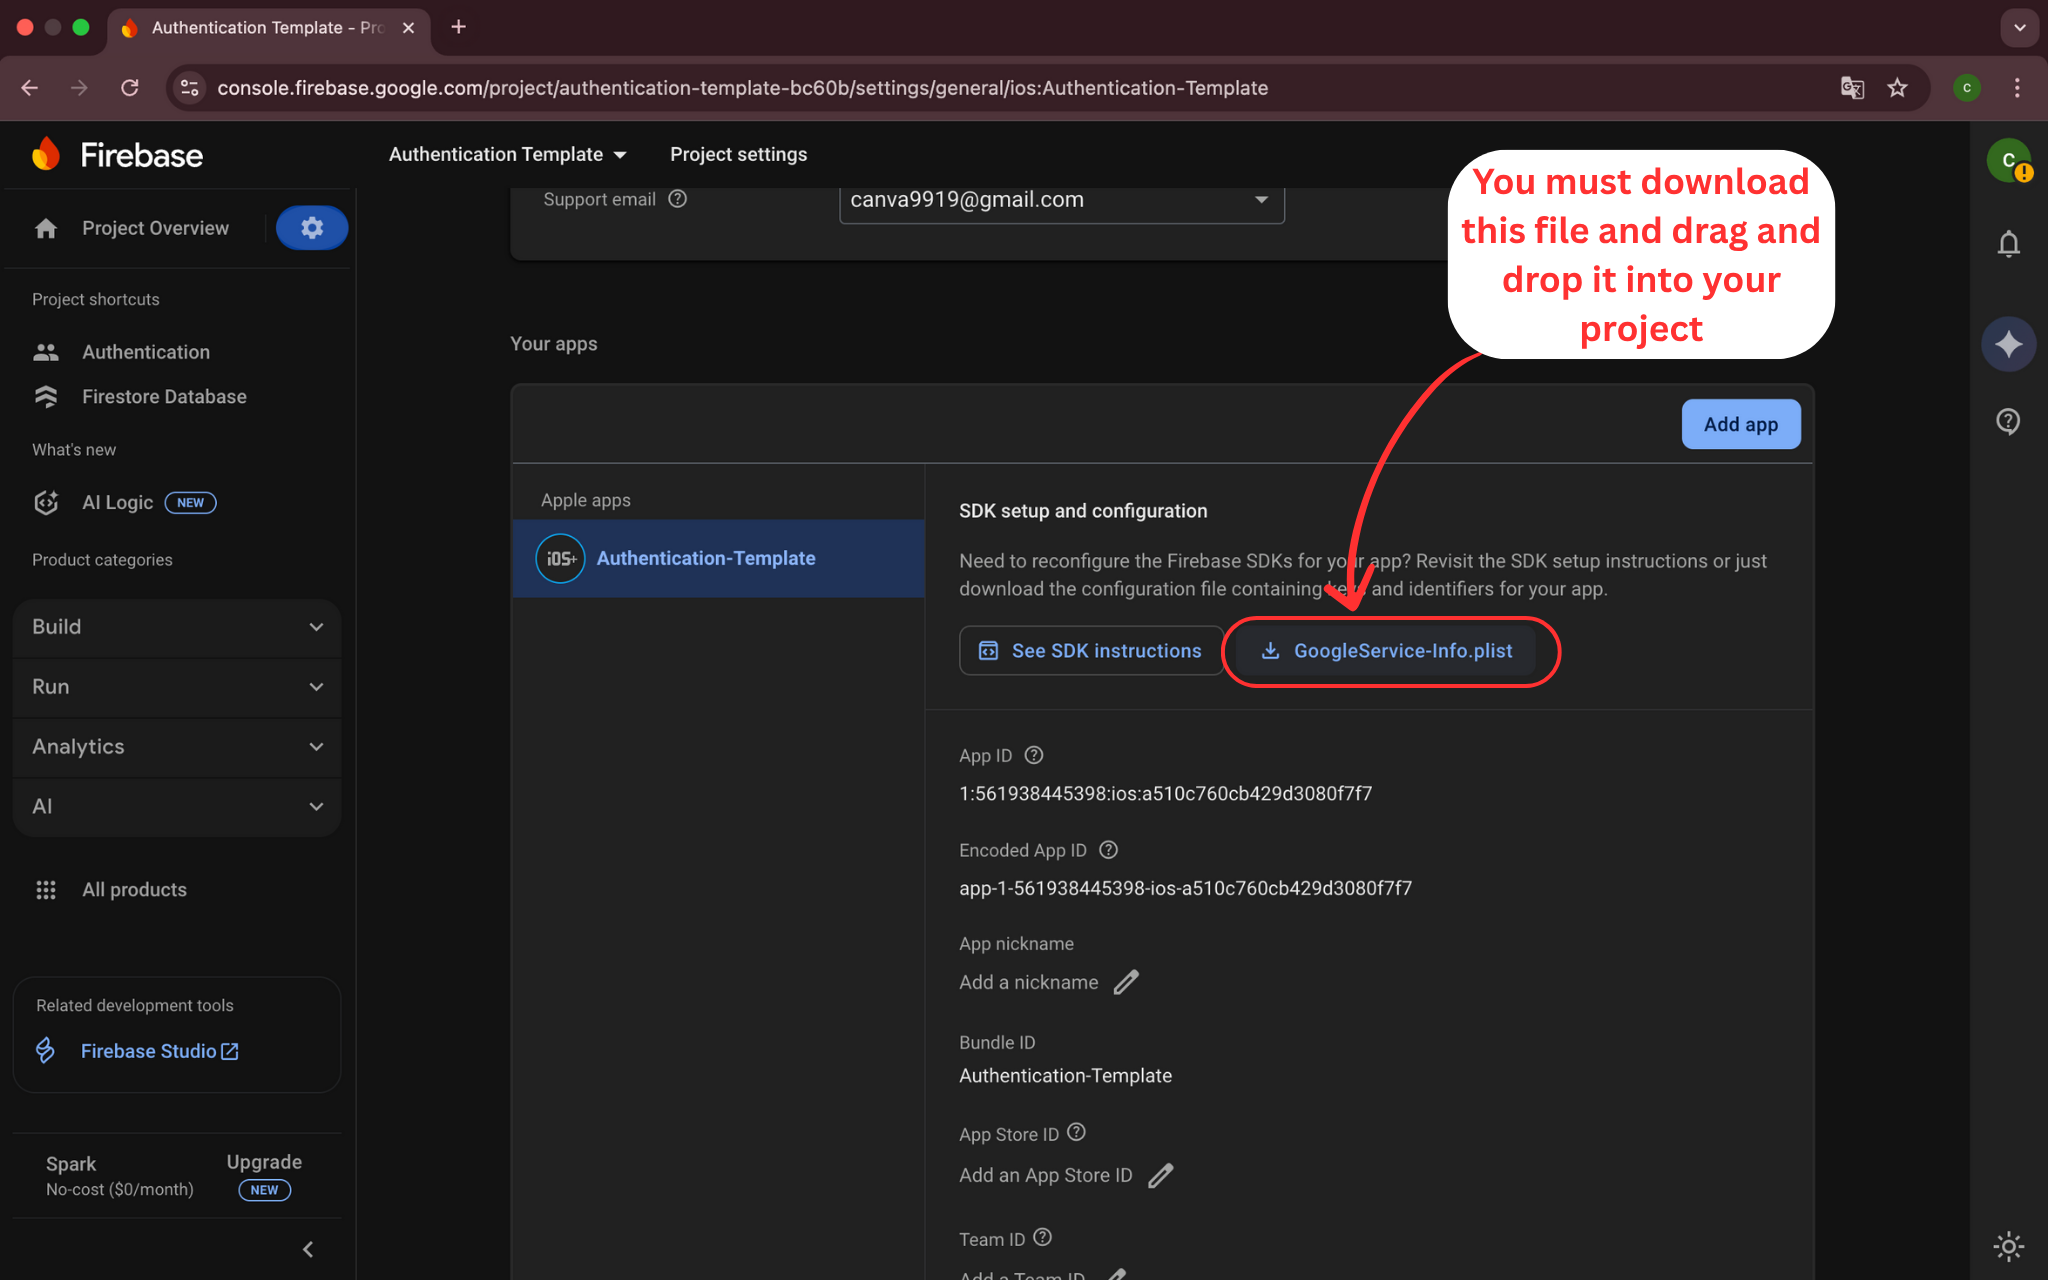
Step 18: Download Configuration File
🎯 What you will do:
Download the GoogleService-Info.plist file for your iOS app.
🔧 Detailed Instructions:
- In the 'Your apps' section, find your iOS app
- Click the 'GoogleService-Info.plist' download button
- Save the file to your Downloads folder
- This file contains your Firebase project configuration
- Keep this file secure as it contains API keys
📝 Important Note:
This file is required for your iOS app to connect to Firebase services.
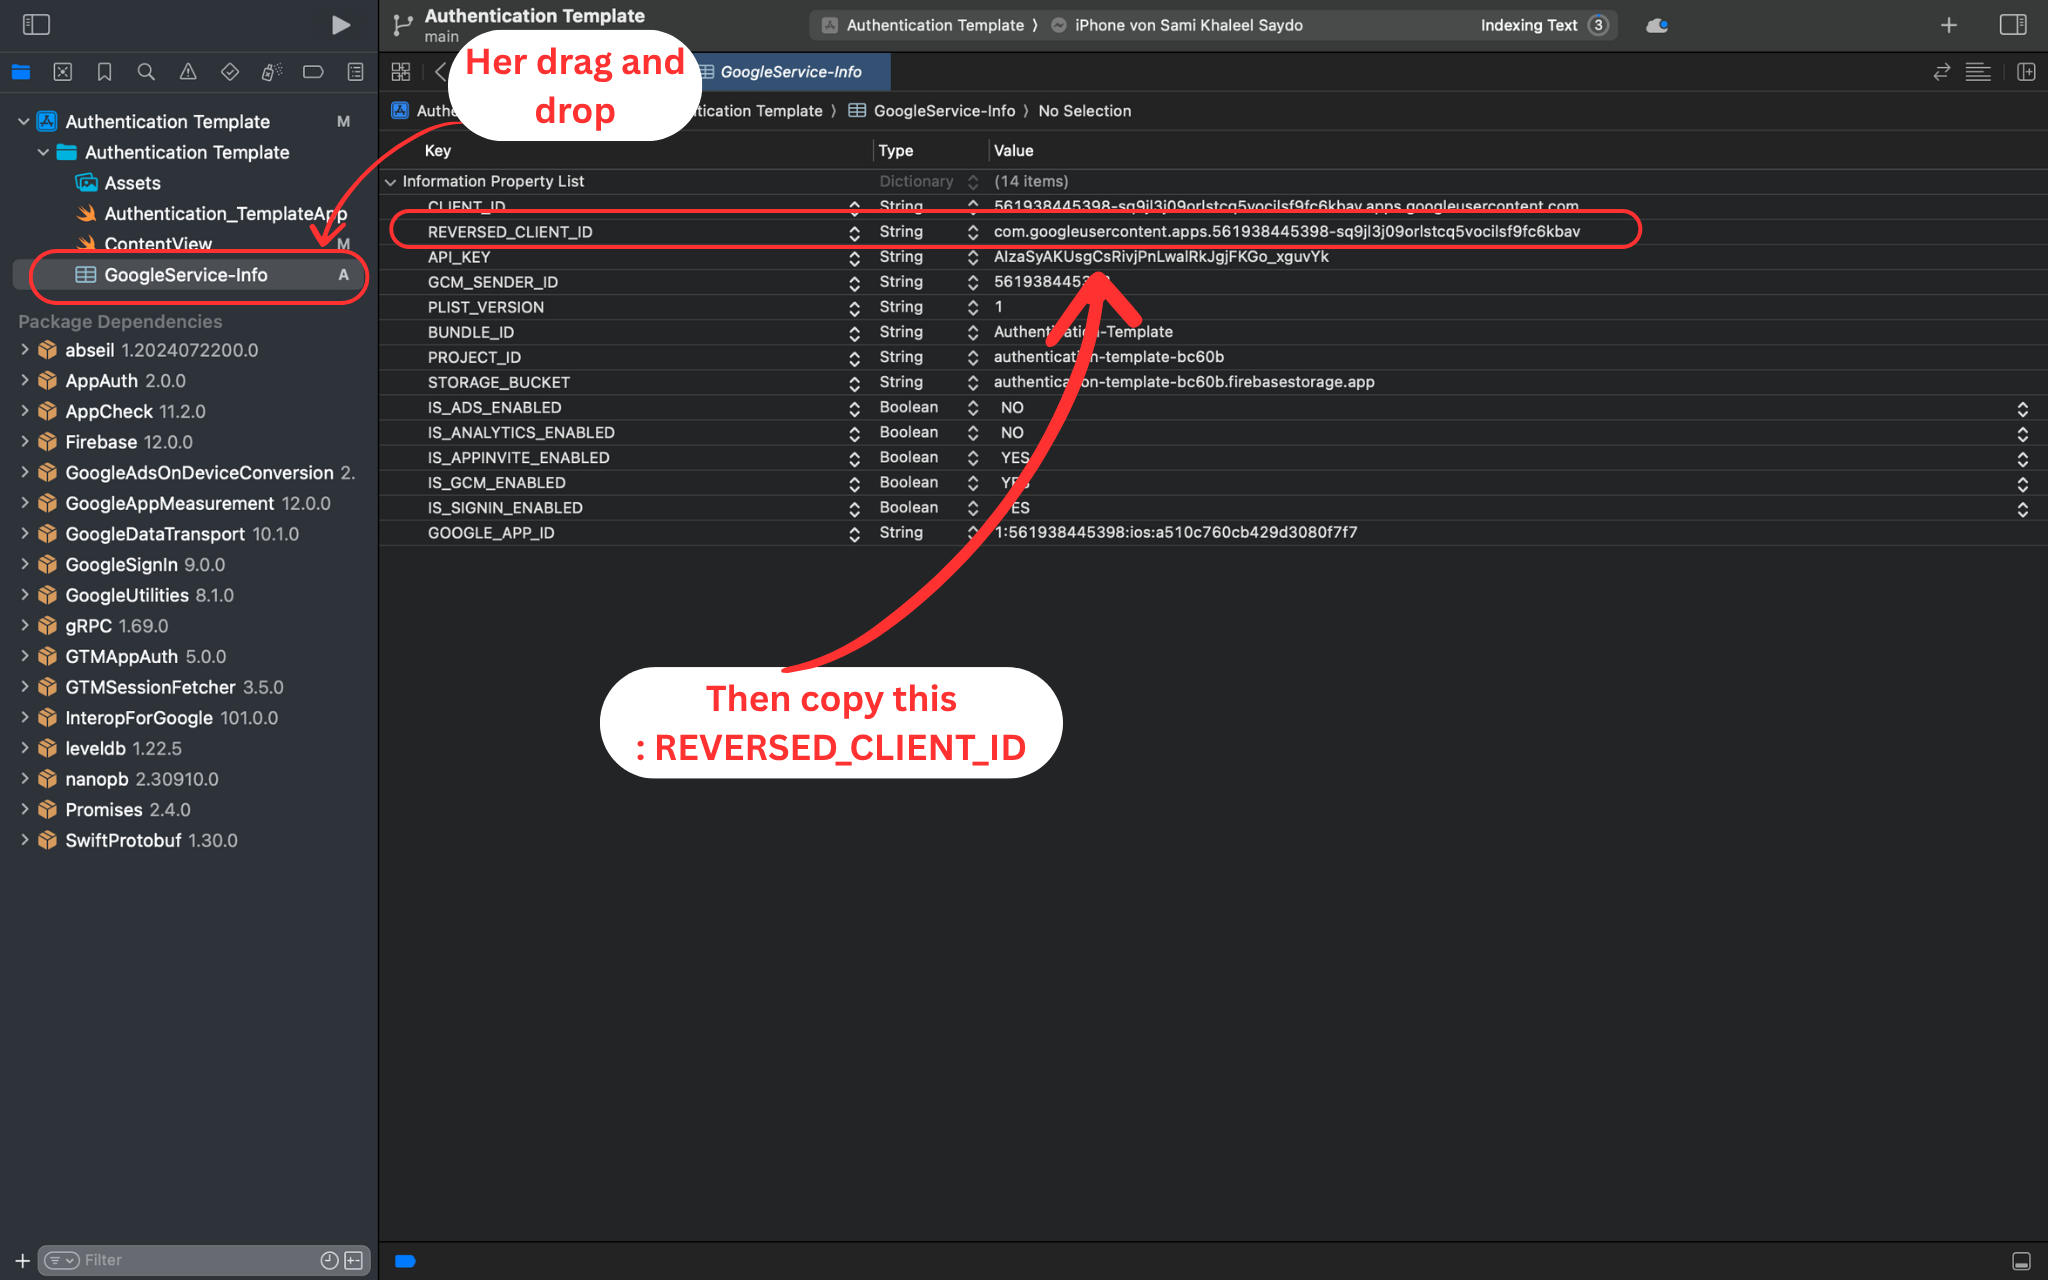
Step 19: Add GoogleService-Info.plist to Xcode
🎯 What you will do:
Add the Firebase configuration file to your Xcode project and copy the REVERSED_CLIENT_ID.
🔧 Detailed Instructions:
- Drag GoogleService-Info.plist from Downloads into the Xcode Project Navigator
- Make sure 'Add to target' is checked for your app target
- Open the GoogleService-Info.plist file in Xcode
- Find and copy the 'REVERSED_CLIENT_ID' value
- Keep this value - you'll need it for URL scheme configuration
📝 Important Note:
The REVERSED_CLIENT_ID is essential for Google Sign-In to work properly.
Step 20: Configure URL Scheme for Google Sign-In
🎯 What you will do:
Set up URL scheme in Xcode to handle Google Sign-In callbacks.
🔧 Detailed Instructions:
- In Xcode, select your project, then your target
- Go to the 'Info' tab and scroll down to 'URL Types'
- Click '+' to add a new URL Type
- In 'URL Schemes', paste your REVERSED_CLIENT_ID
- In 'Identifier', enter 'google signin' as description
📝 Important Note:
This URL scheme allows Google Sign-In to return to your app after authentication.

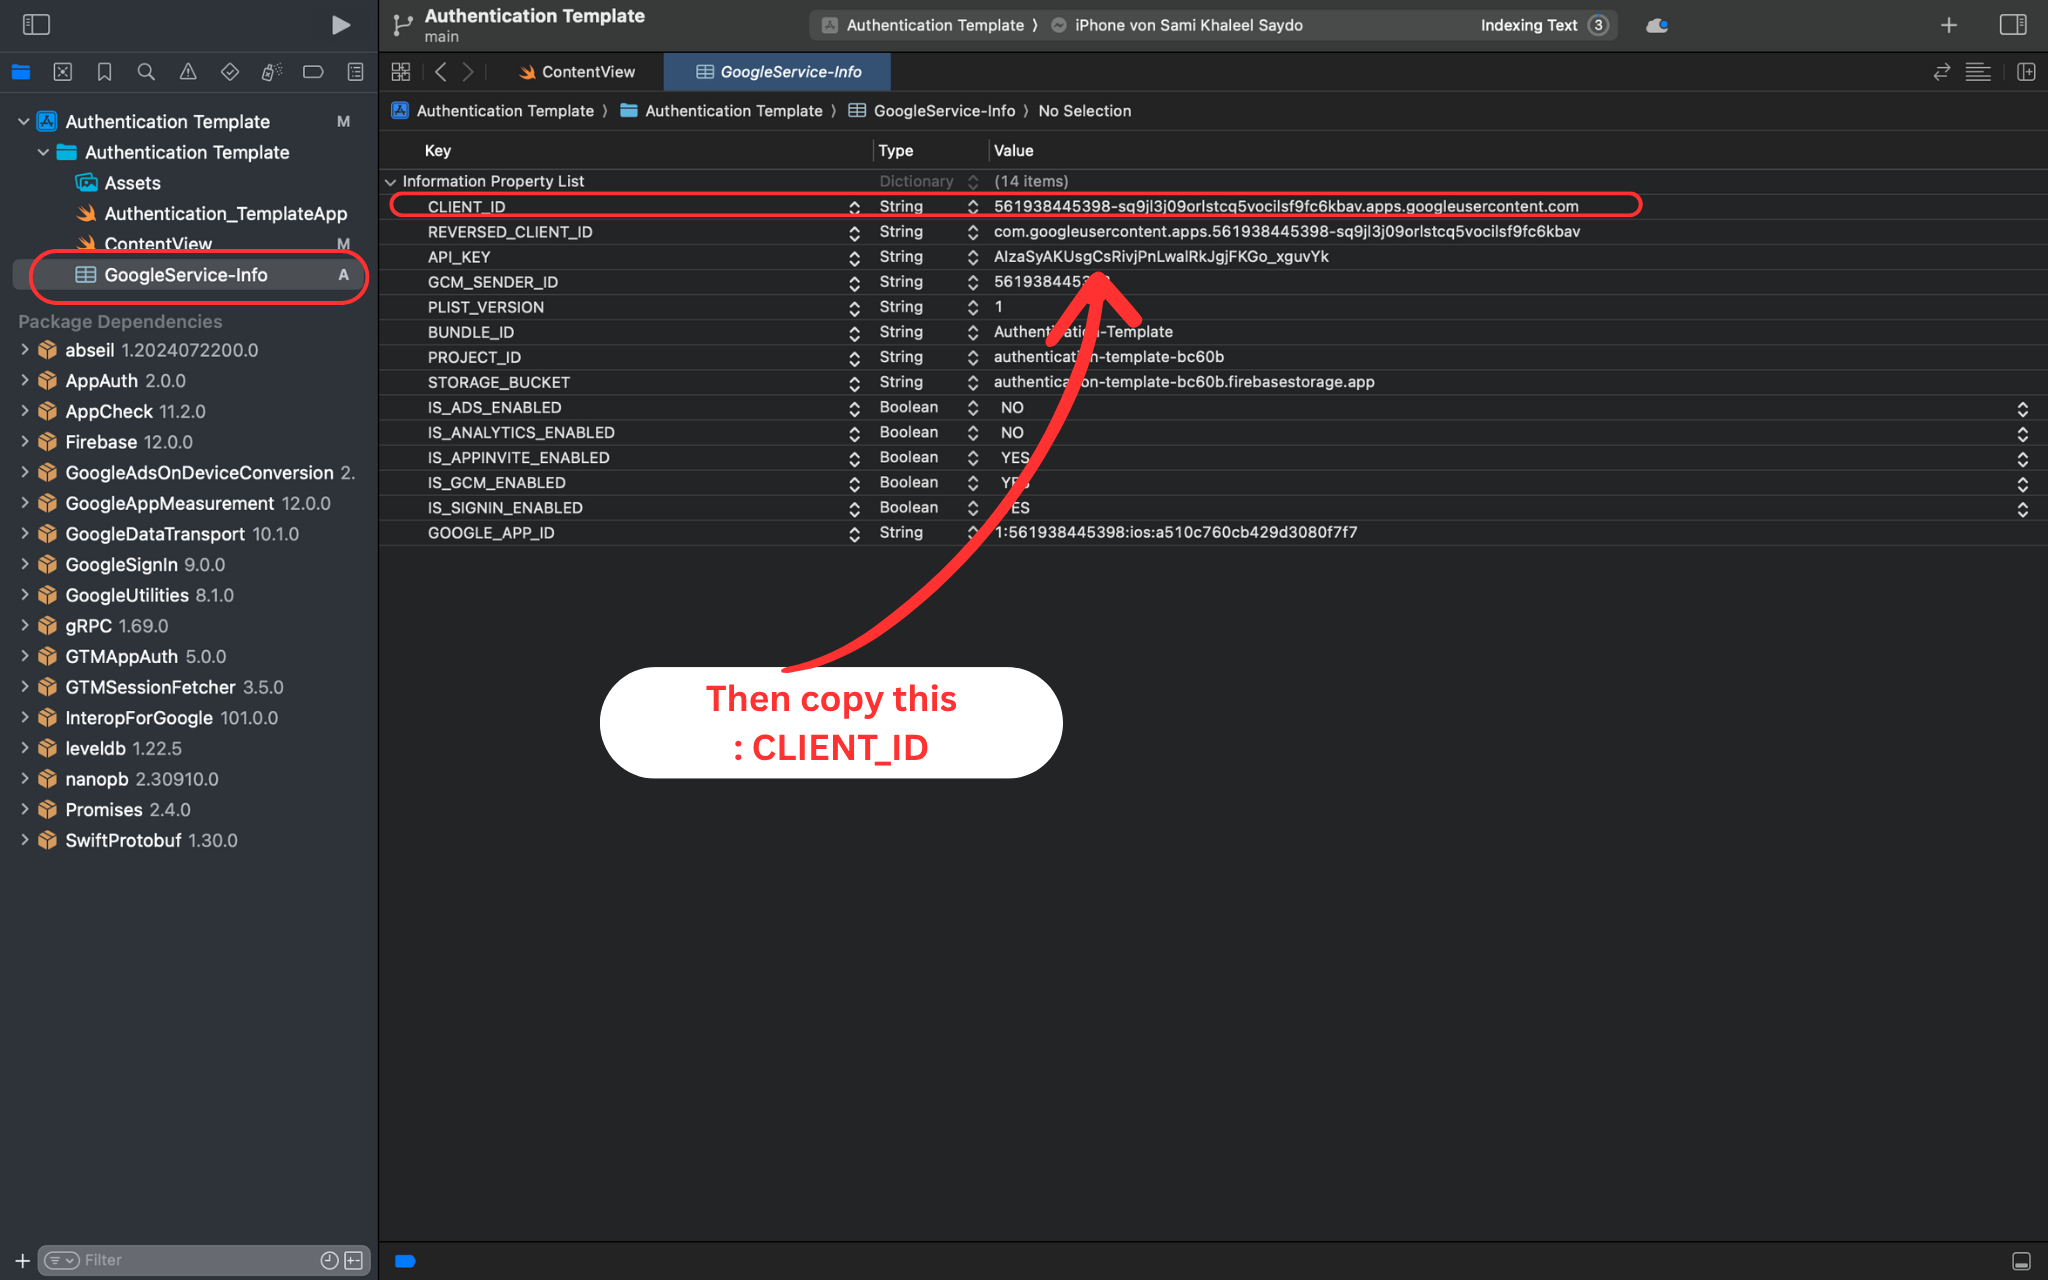
Step 21: Copy CLIENT_ID from GoogleService-Info.plist
🎯 What you will do:
Find and copy the CLIENT_ID value for Firebase configuration.
🔧 Detailed Instructions:
- Go back to GoogleService-Info.plist in Xcode
- Find the 'CLIENT_ID' key (different from REVERSED_CLIENT_ID)
- Copy the CLIENT_ID value
- This will be used for Firebase Google Sign-In configuration
- Keep this value for the next step
📝 Important Note:
CLIENT_ID and REVERSED_CLIENT_ID are different values for different purposes.
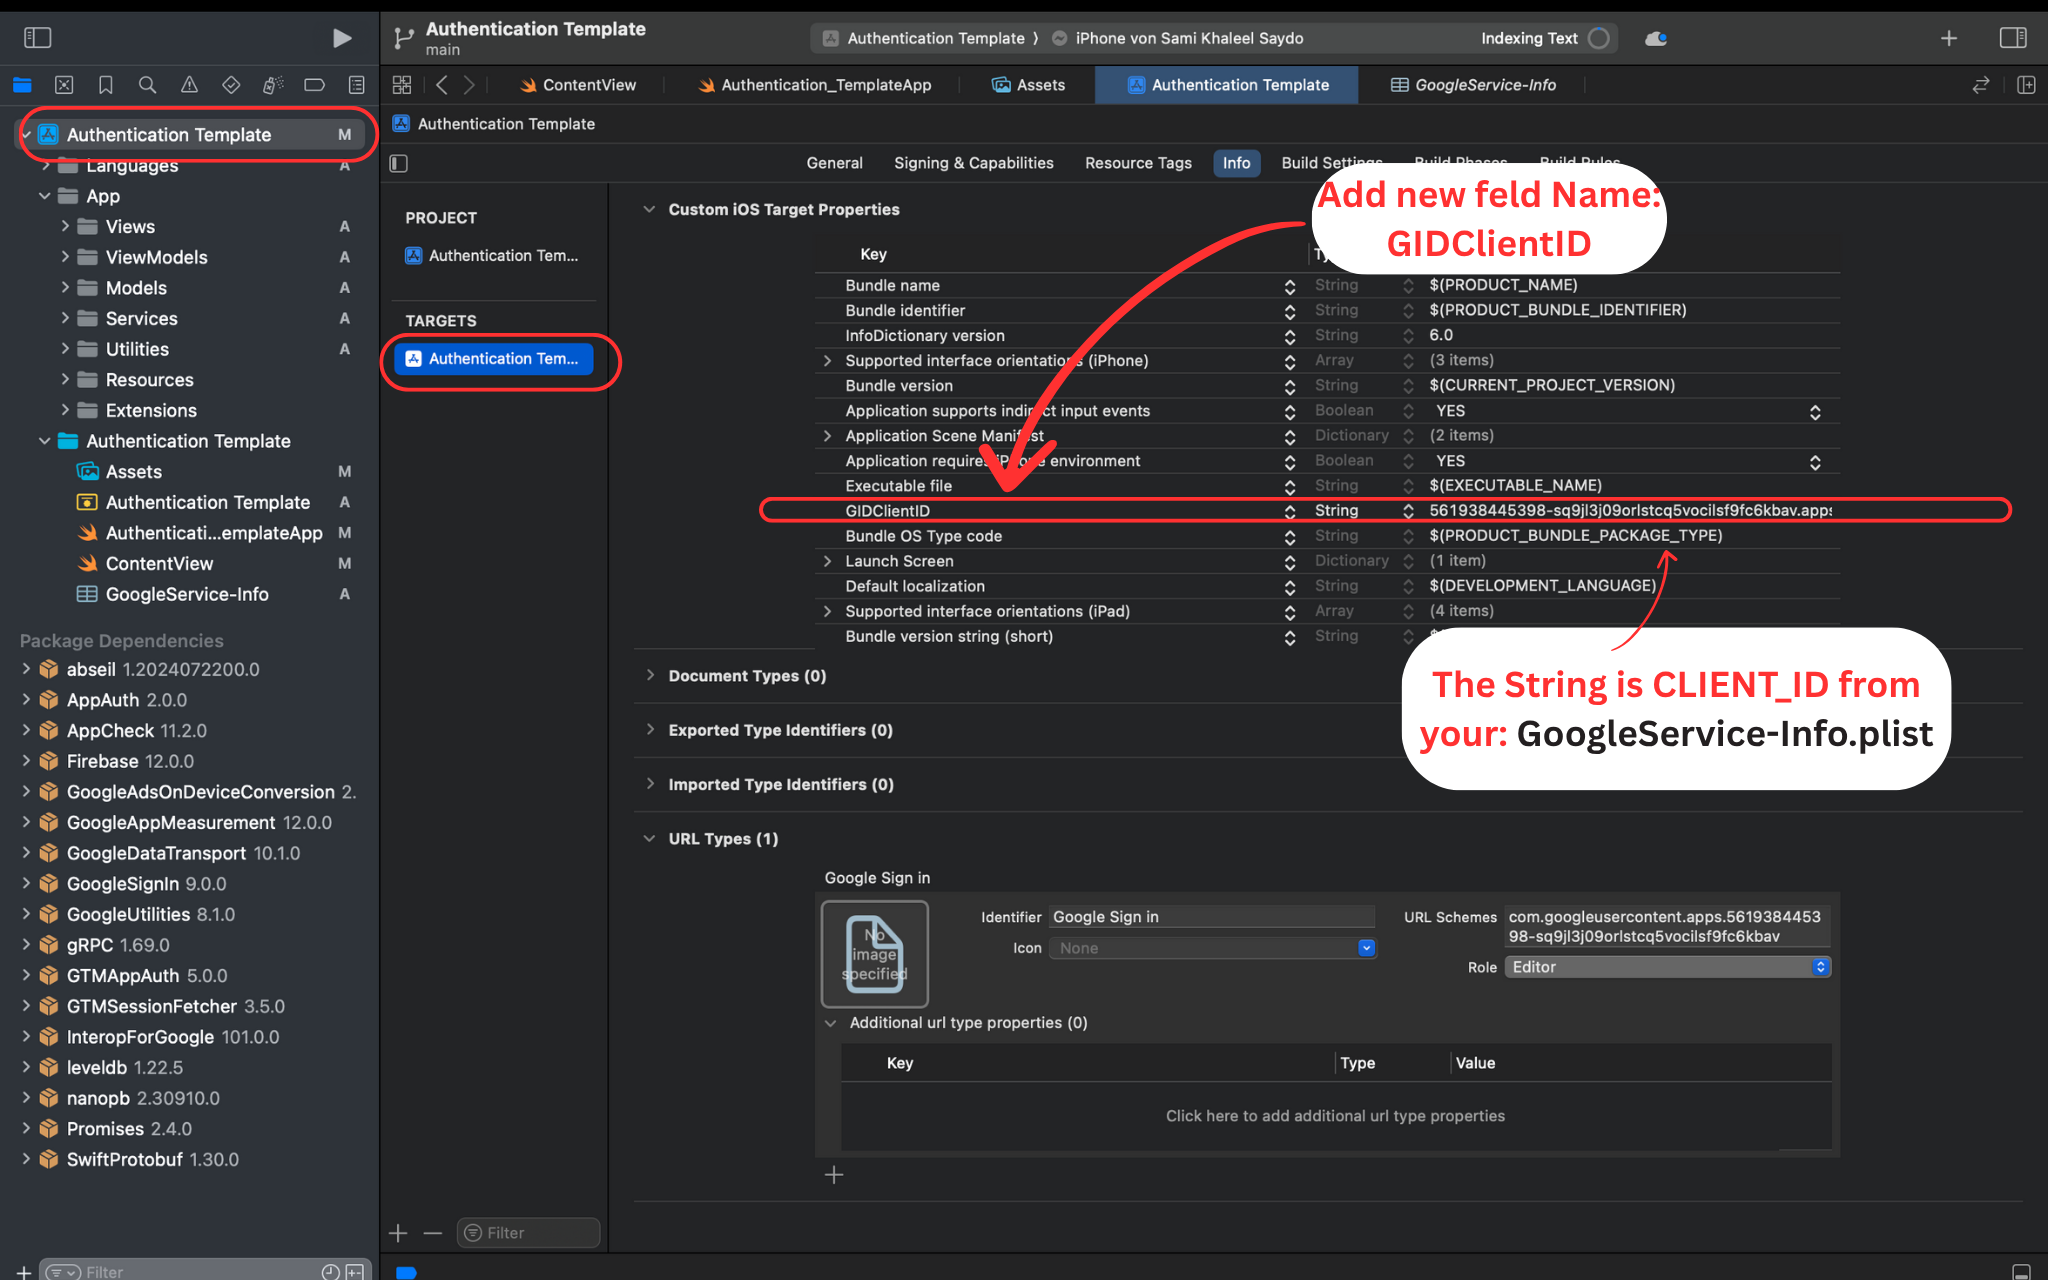
Step 22: Add CLIENT_ID to Firebase Configuration
🎯 What you will do:
Configure CLIENT_ID in your app target for Firebase Google Sign-In.
🔧 Detailed Instructions:
- In Xcode, select your target and go to the 'Info' tab
- Find or add 'GG Client ID' in the configuration
- Paste the CLIENT_ID value you copied from GoogleService-Info.plist
- This connects your app with Google Sign-In services
- Verify that the CLIENT_ID was entered correctly
📝 Important Note:
This CLIENT_ID is required for Firebase to authenticate with Google services.
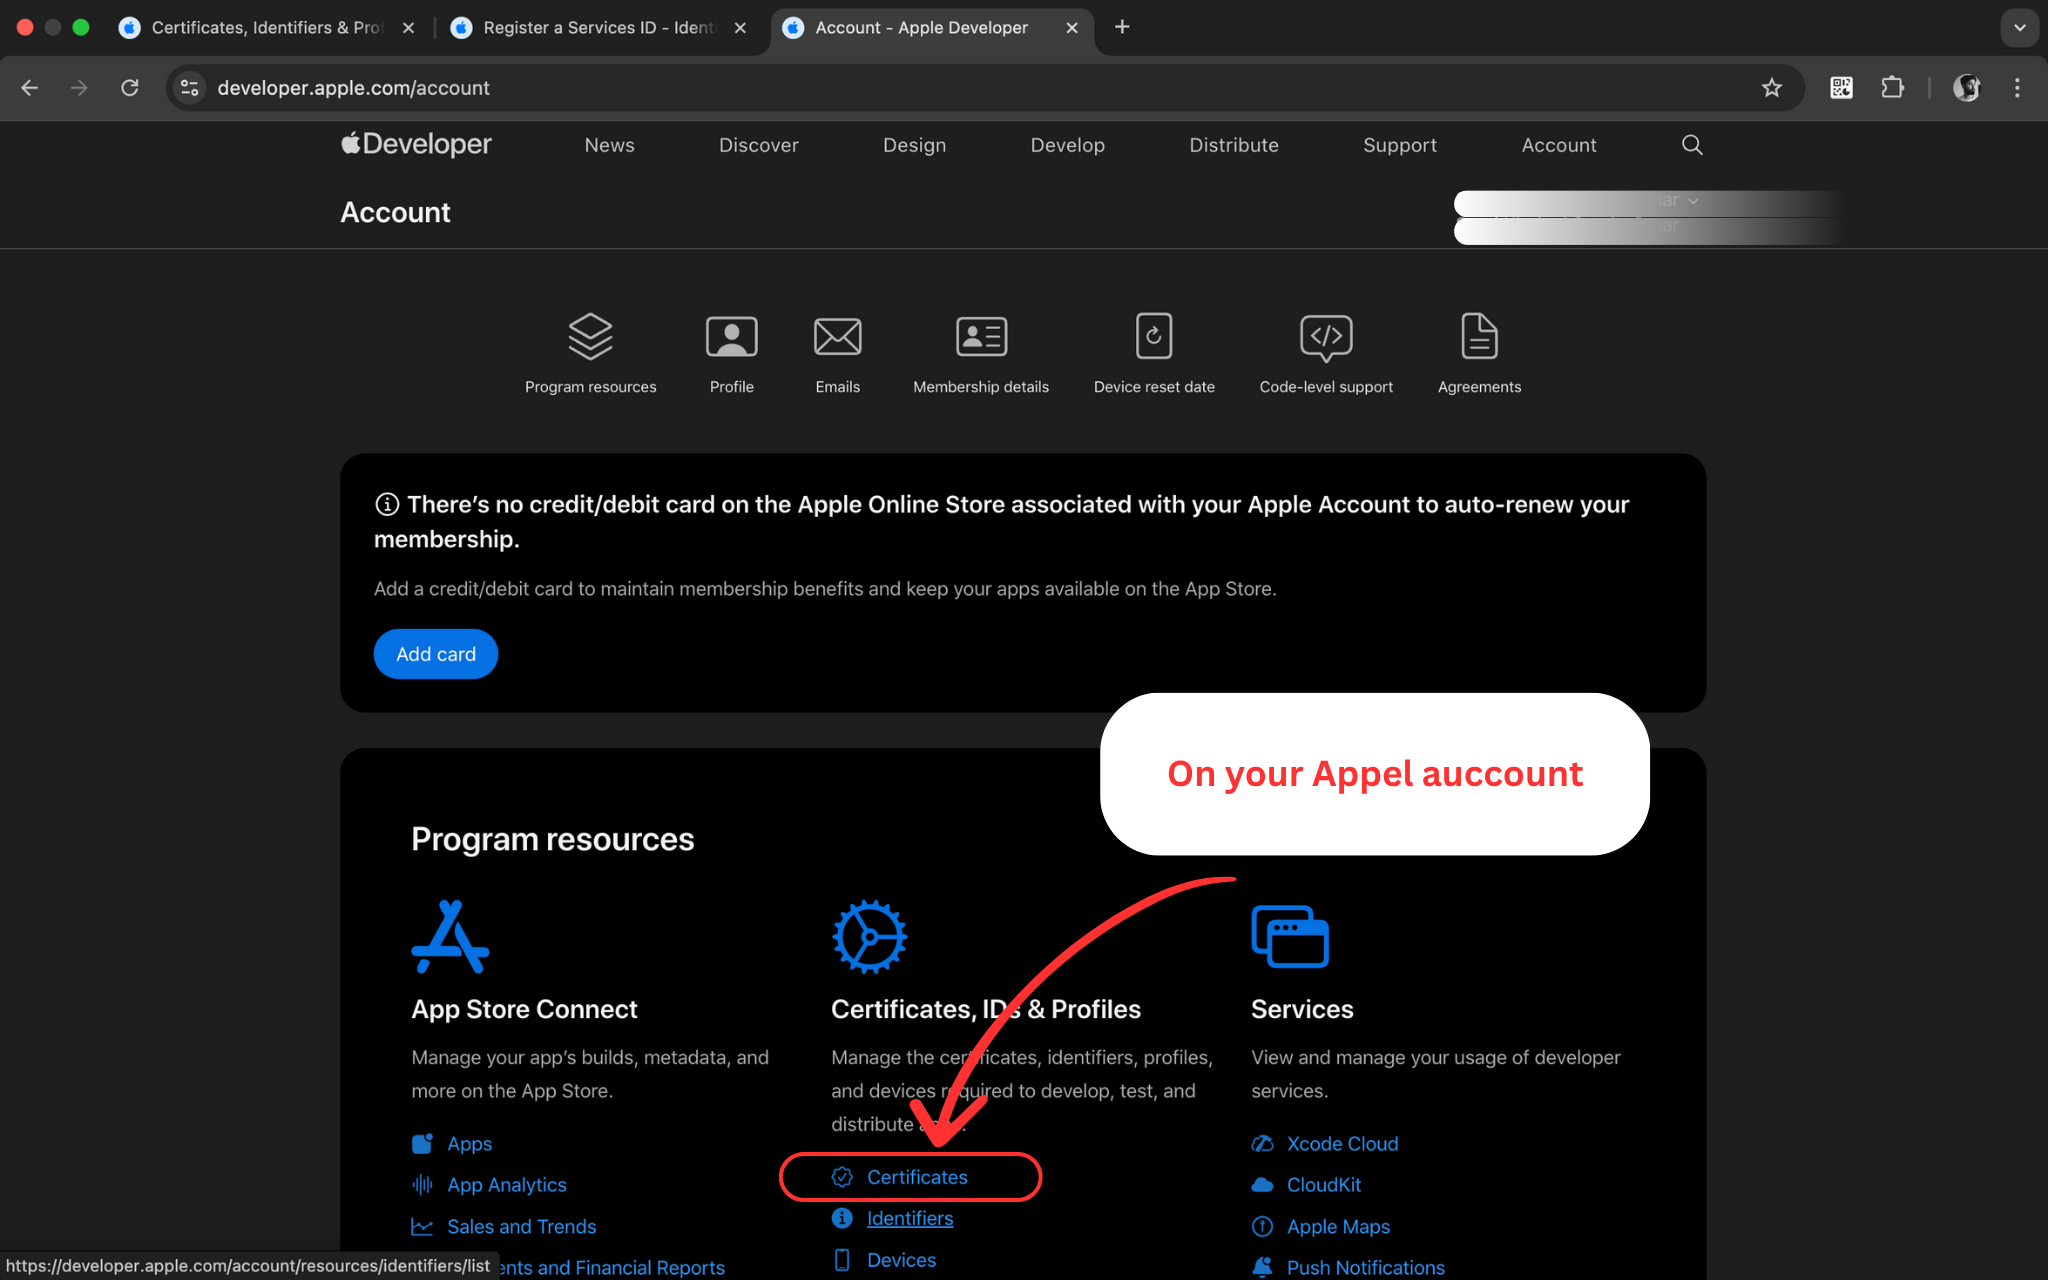
Step 23: Access Apple Developer Portal
🎯 What you'll do:
Navigate to Apple Developer Portal to configure App ID for Sign in with Apple.
🔧 Detailed Instructions:
- Open https://developer.apple.com in your browser
- Sign in with your Apple Developer account
- Navigate to 'Certificates, Identifiers & Profiles'
- Click on 'Identifiers' in the sidebar
- This is where you'll configure your App ID for Apple Sign-In
📝 Important Note:
You need an active Apple Developer Program membership to access these settings.
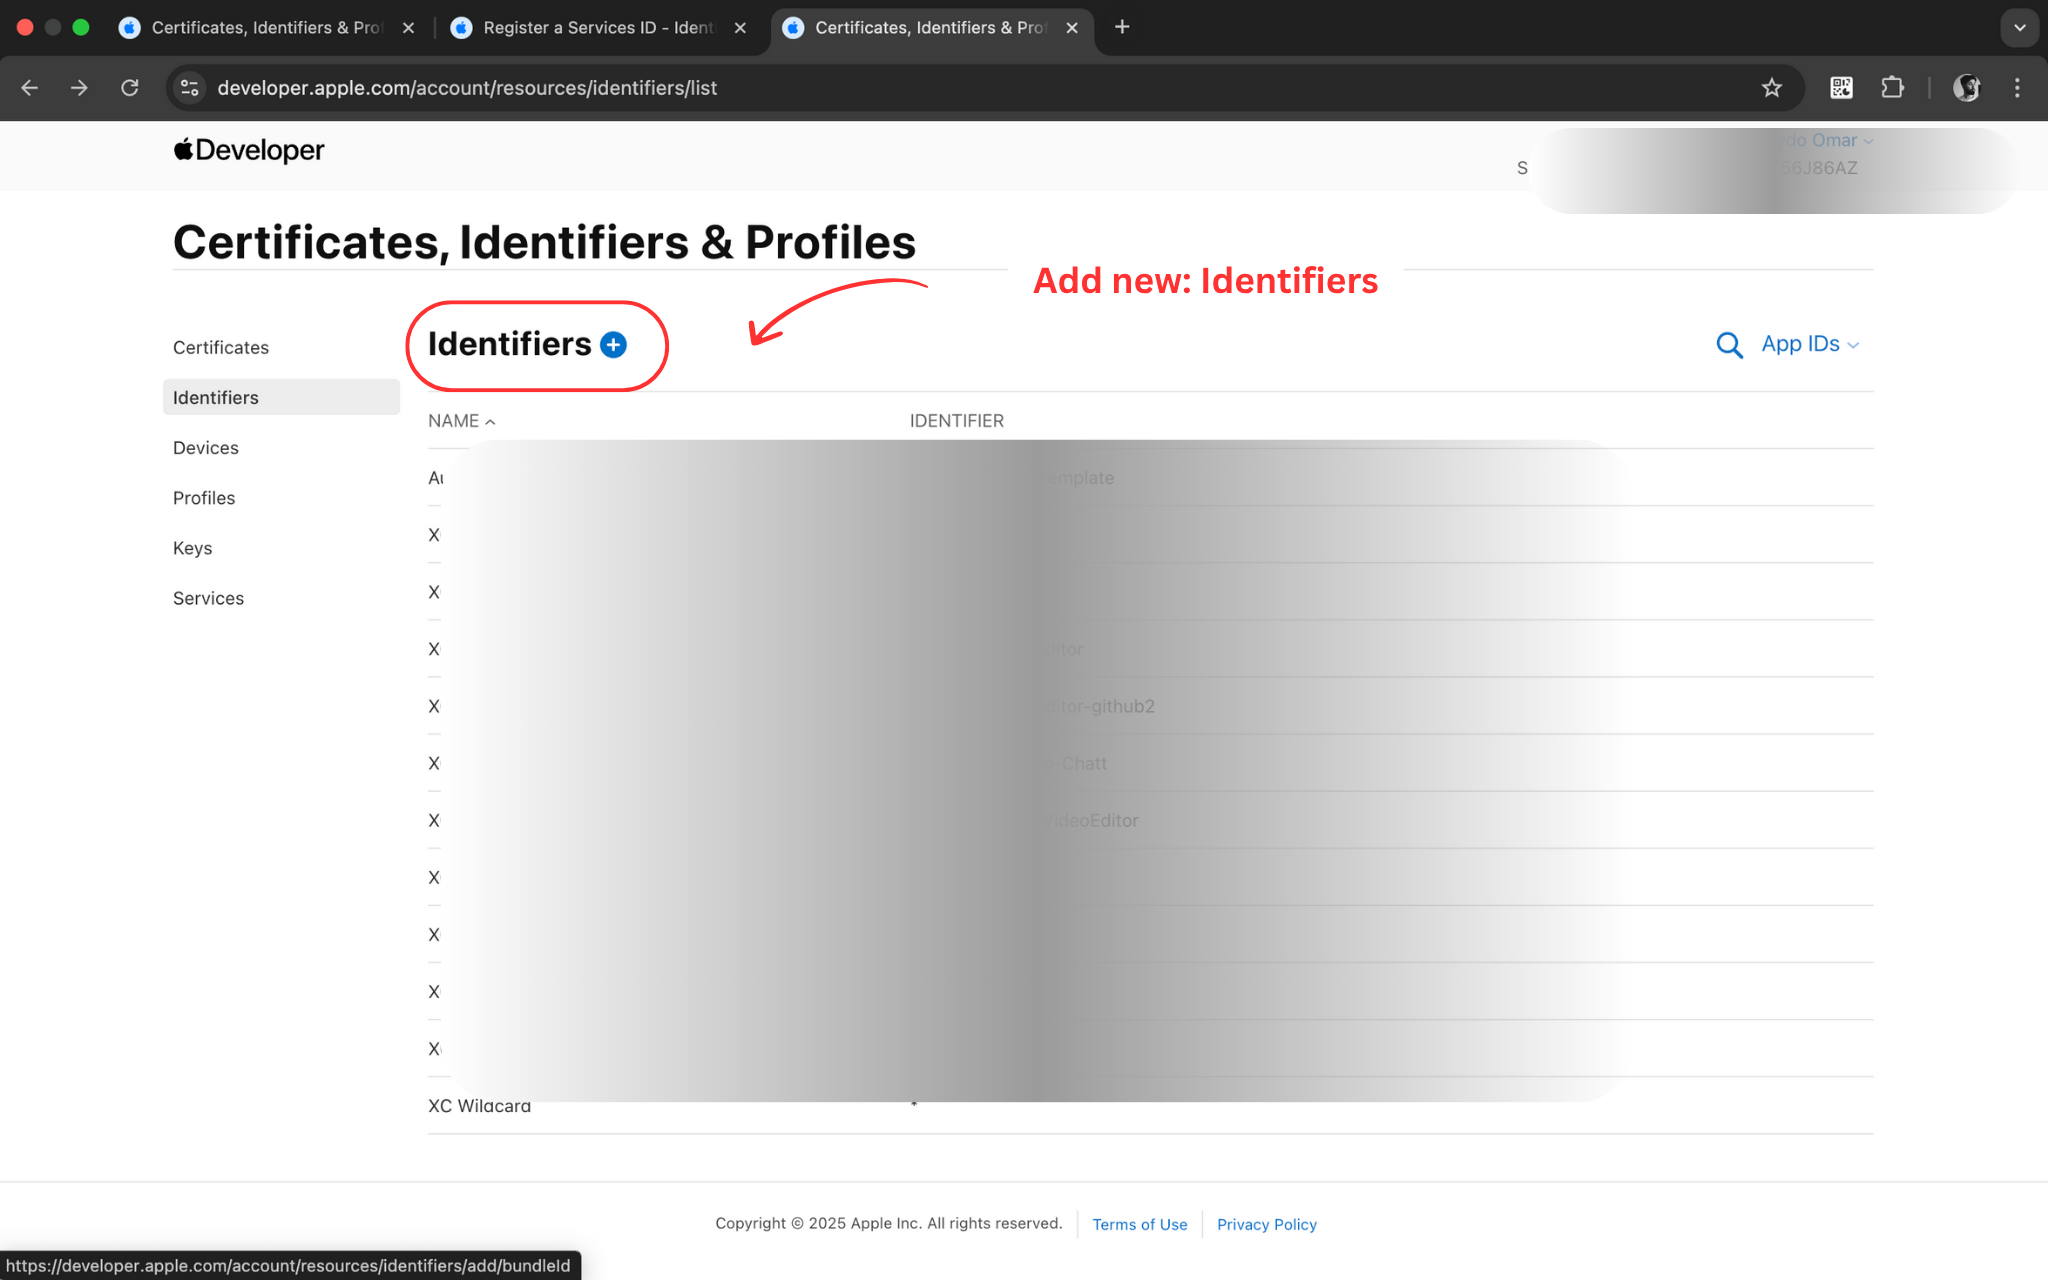
Step 24: Create New Identifier
🎯 What you'll do:
Add a new App ID identifier for your iOS application.
🔧 Detailed Instructions:
- Click the '+' button to add a new identifier
- You'll see different identifier types available
- Select 'App IDs' to create an identifier for your app
- This identifier will be used for Apple Sign-In configuration
- Click 'Continue' to proceed
📝 Important Note:
App IDs are unique identifiers for your iOS applications in the Apple ecosystem.
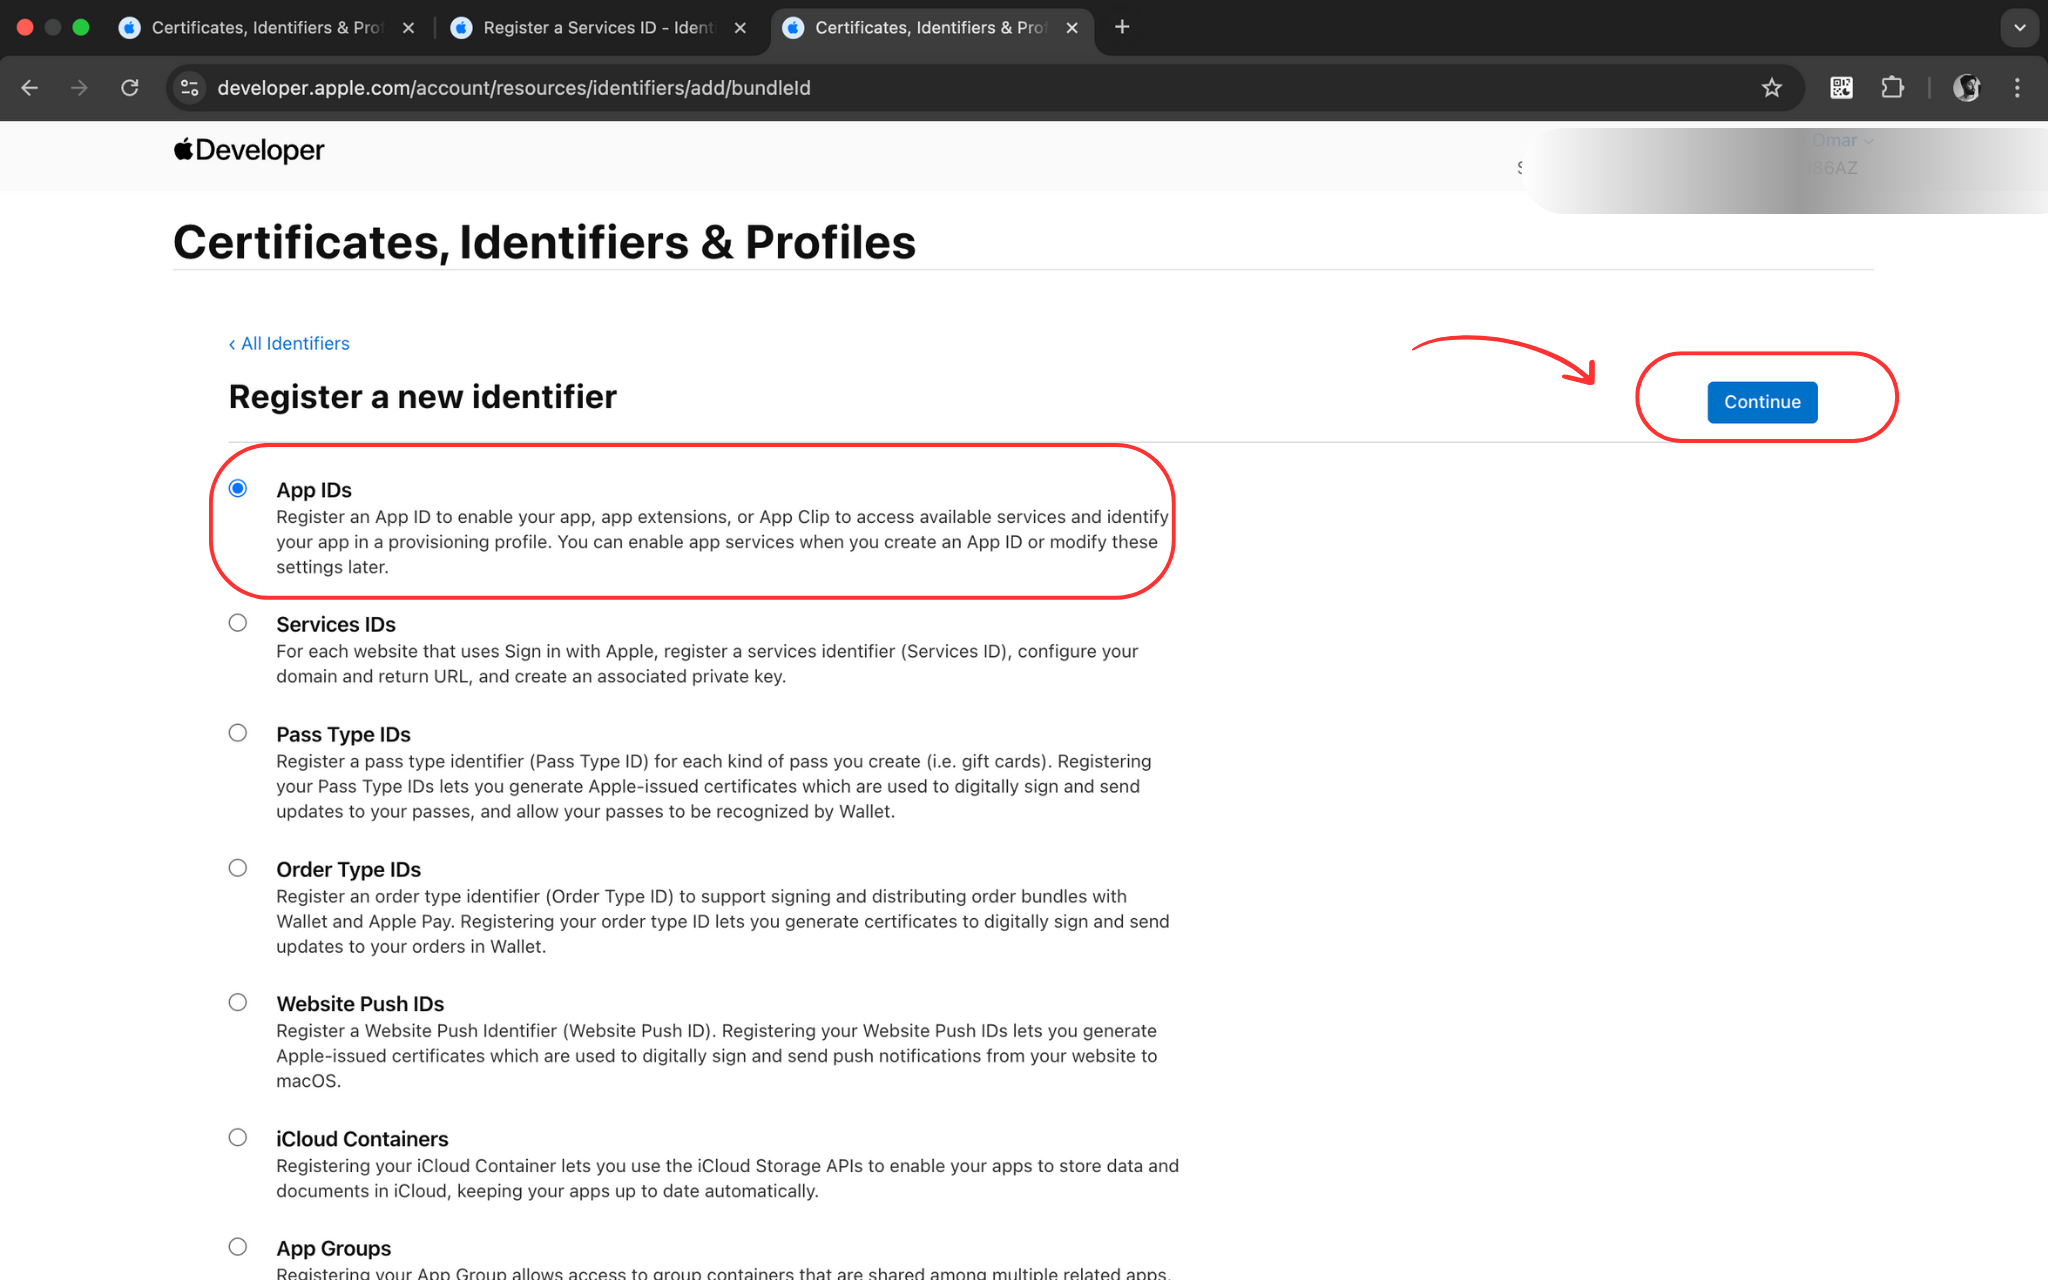
Step 25: Select App ID Type
🎯 What you'll do:
Choose the App ID type for your application.
🔧 Detailed Instructions:
- Select 'App' as the App ID type
- This is the standard type for iOS applications
- App type provides access to most capabilities including Sign in with Apple
- Click 'Continue' to proceed to configuration
- Other types are for specific use cases like App Clips
📝 Important Note:
App type is the most common choice for standard iOS applications.
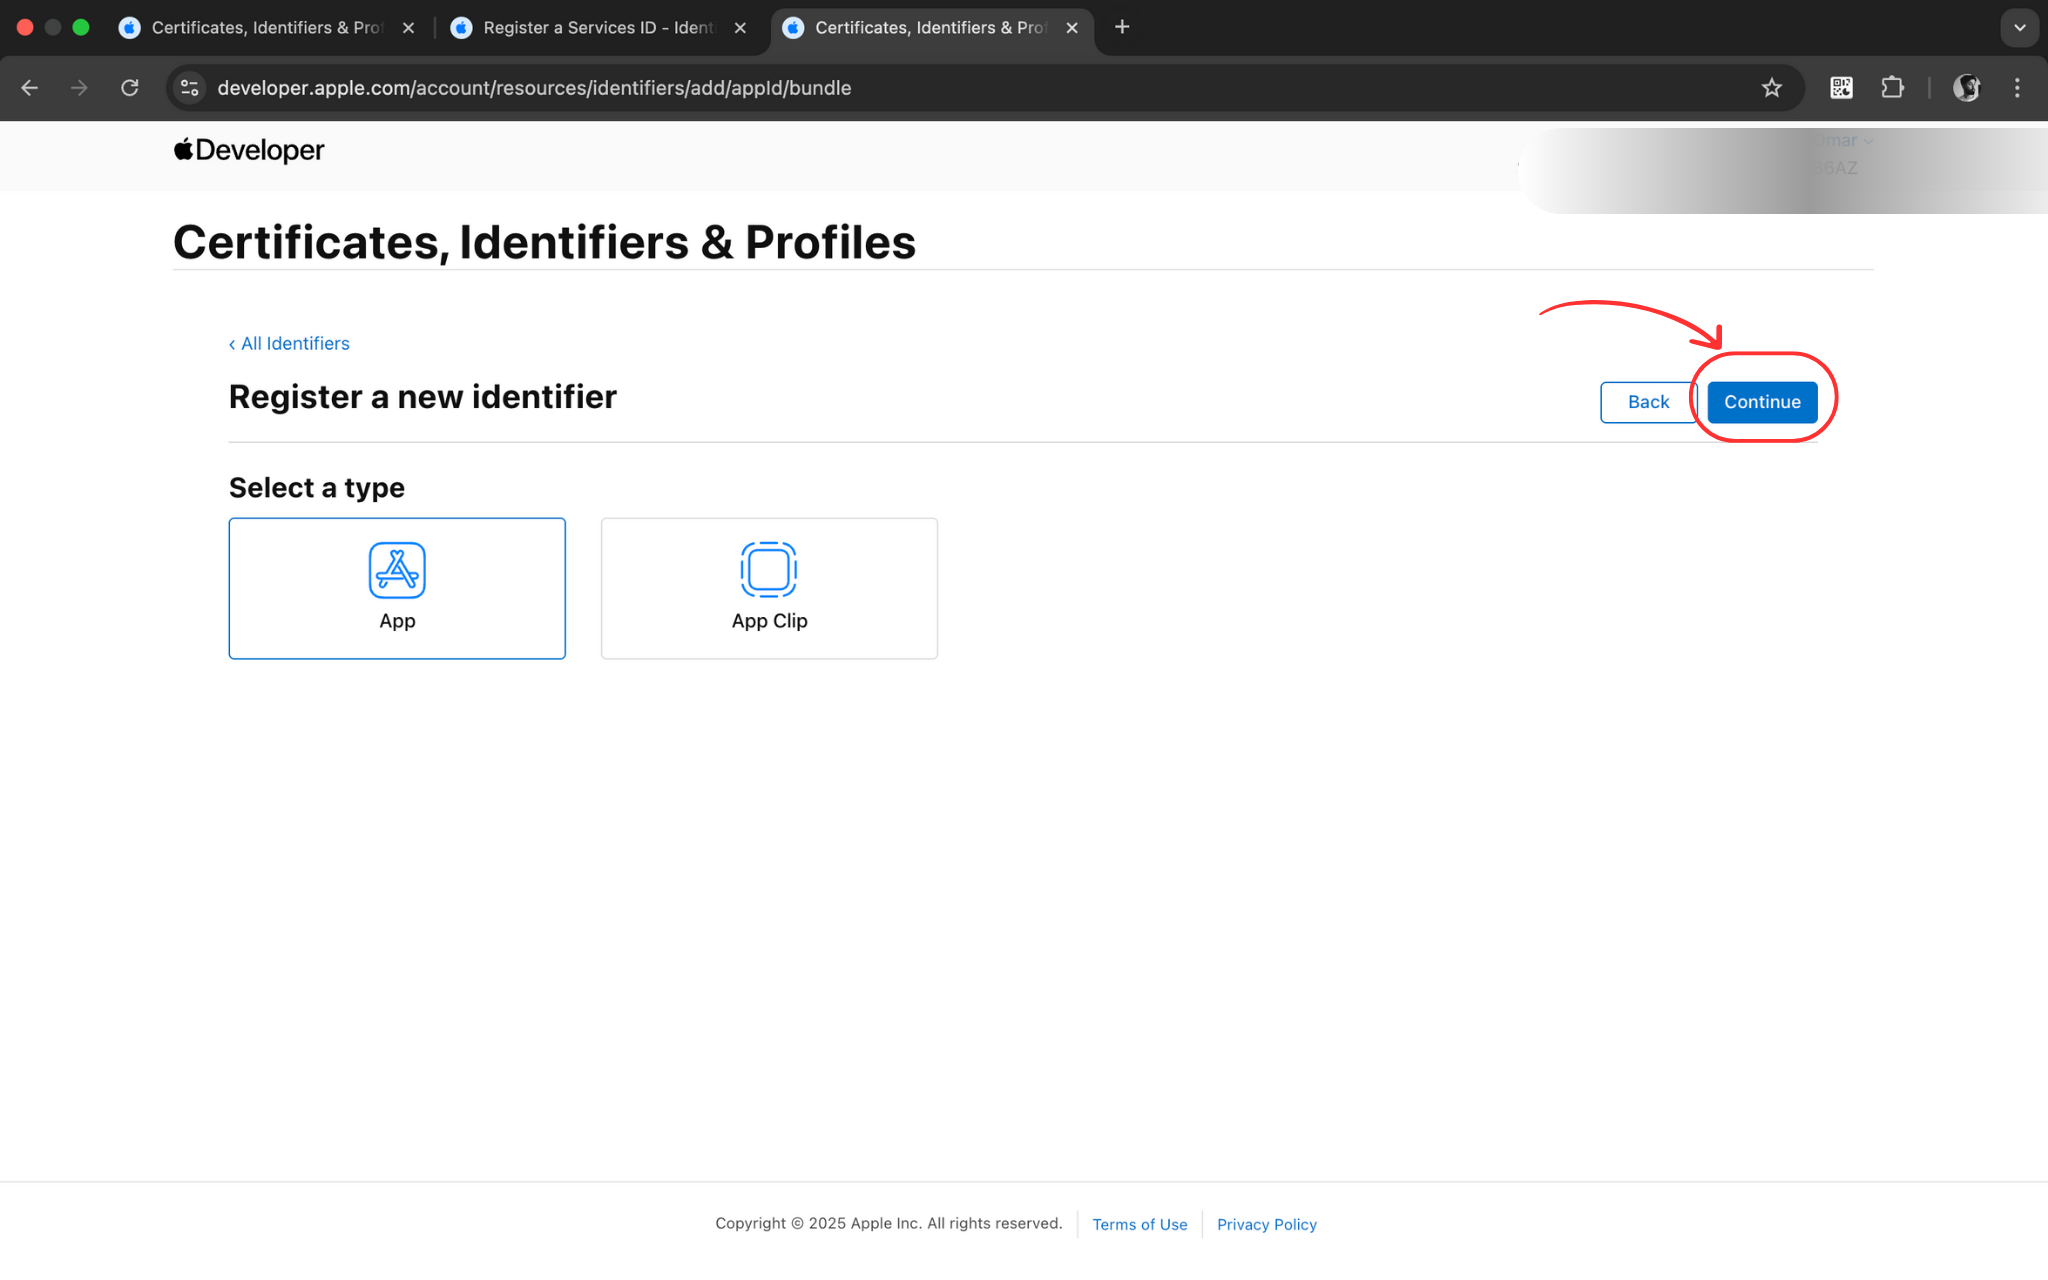
Step 26: Continue App ID Setup
🎯 What you'll do:
Proceed with the App ID configuration process.
🔧 Detailed Instructions:
- Review your App ID type selection
- Ensure 'App' is selected as the type
- Click 'Continue' to move to the next step
- You'll now configure the specific details for your App ID
- The next step will require your Bundle ID
📝 Important Note:
Double-check your selection before continuing as changes require recreating the App ID.
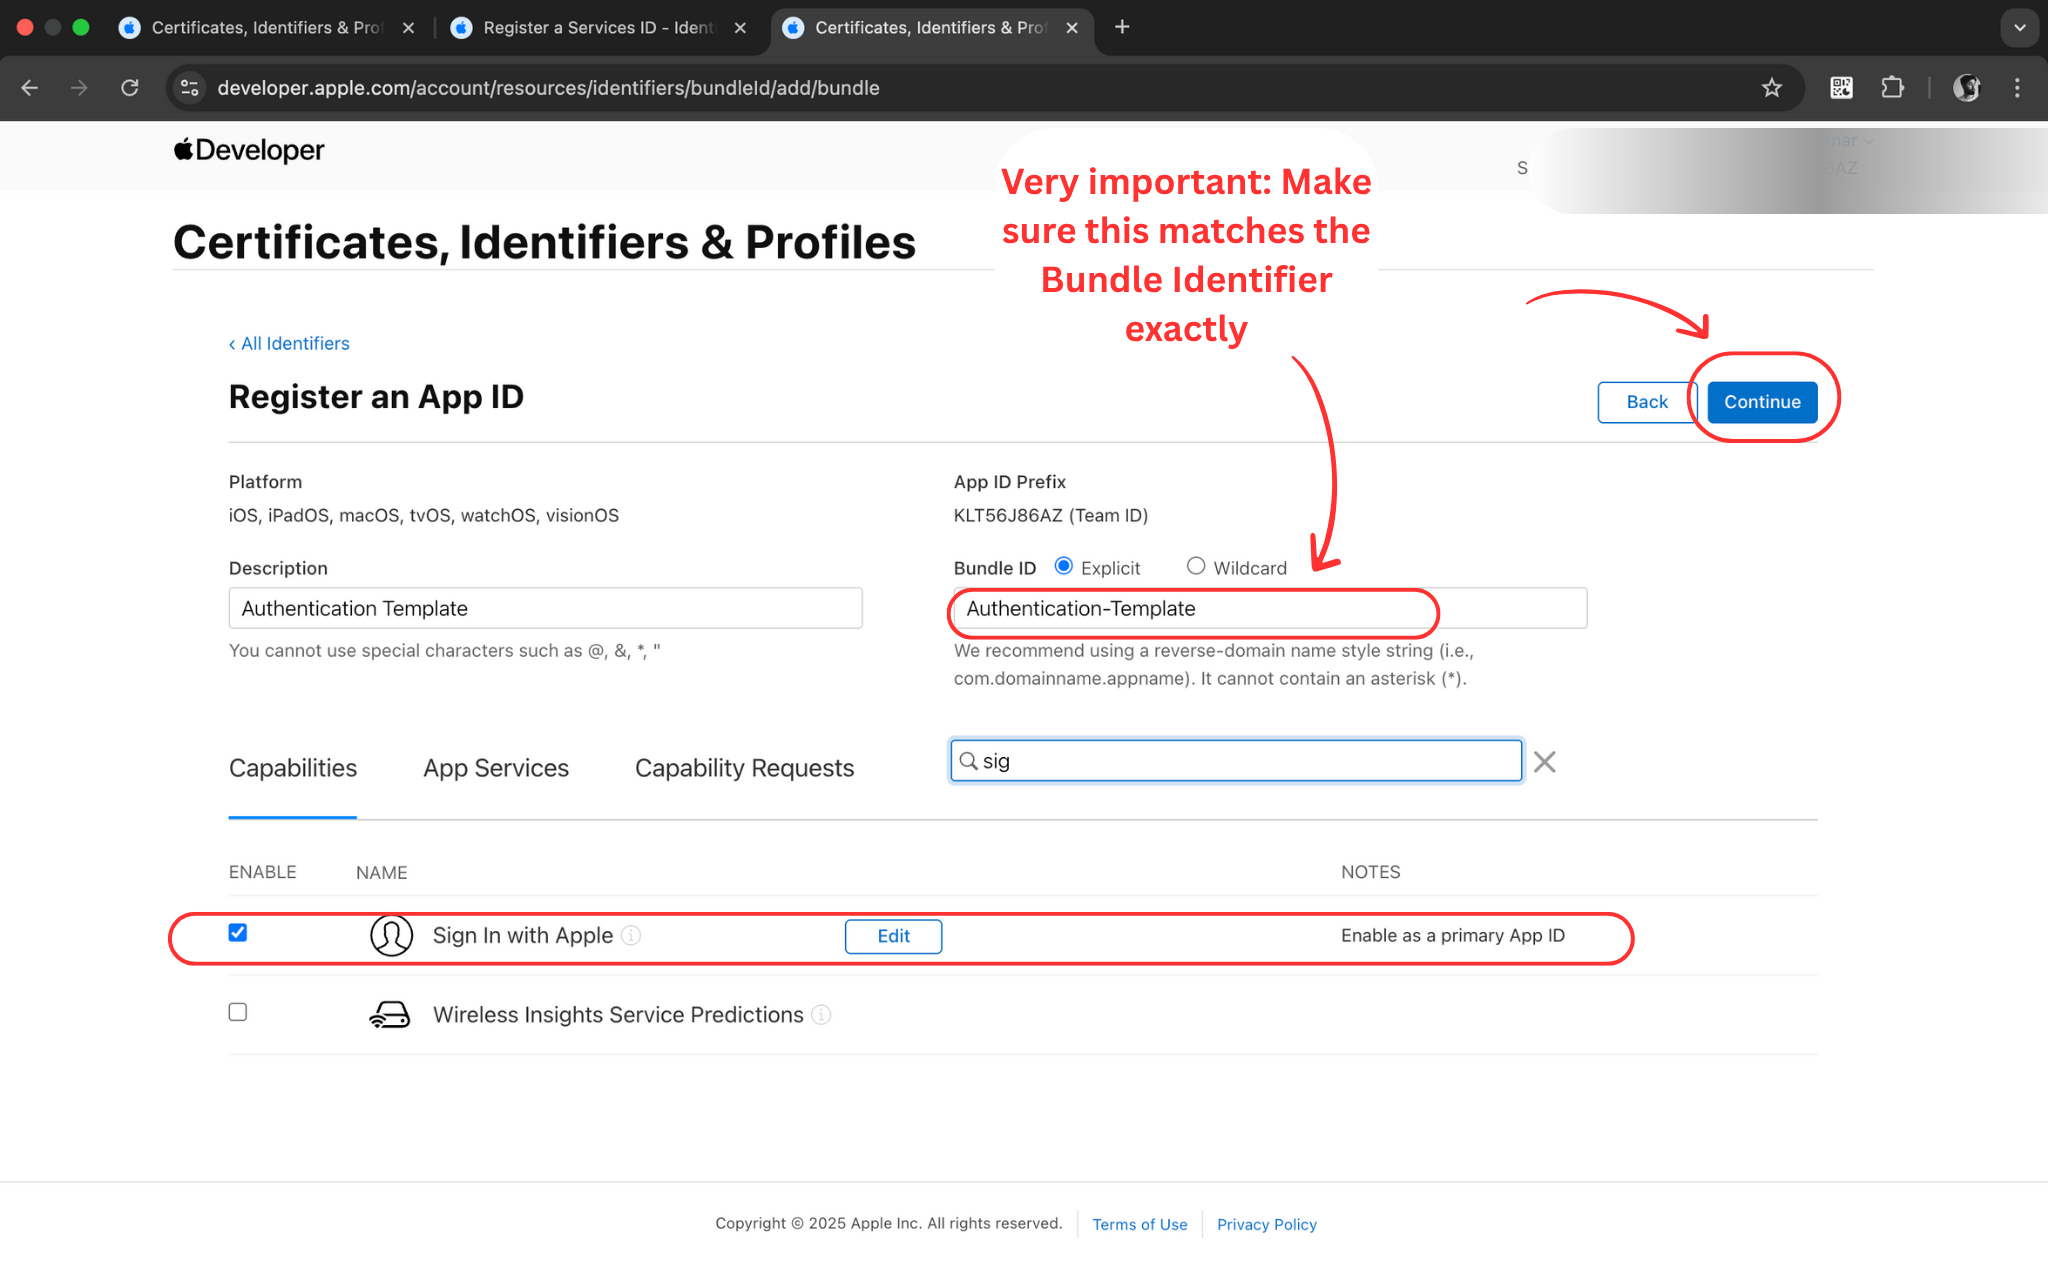
Step 27: Configure Bundle ID
🎯 What you'll do:
Enter your app's Bundle ID exactly as it appears in Xcode.
🔧 Detailed Instructions:
- Enter a description for your App ID (e.g., 'MyApp Auth Template')
- In Bundle ID field, enter your exact Bundle ID from Xcode
- Use the same Bundle ID you used in Firebase setup
- Format should be: com.yourcompany.yourapp
- Ensure there are no typos - this must match exactly
📝 Important Note:
Bundle ID must be identical across Xcode, Firebase, and Apple Developer Portal.
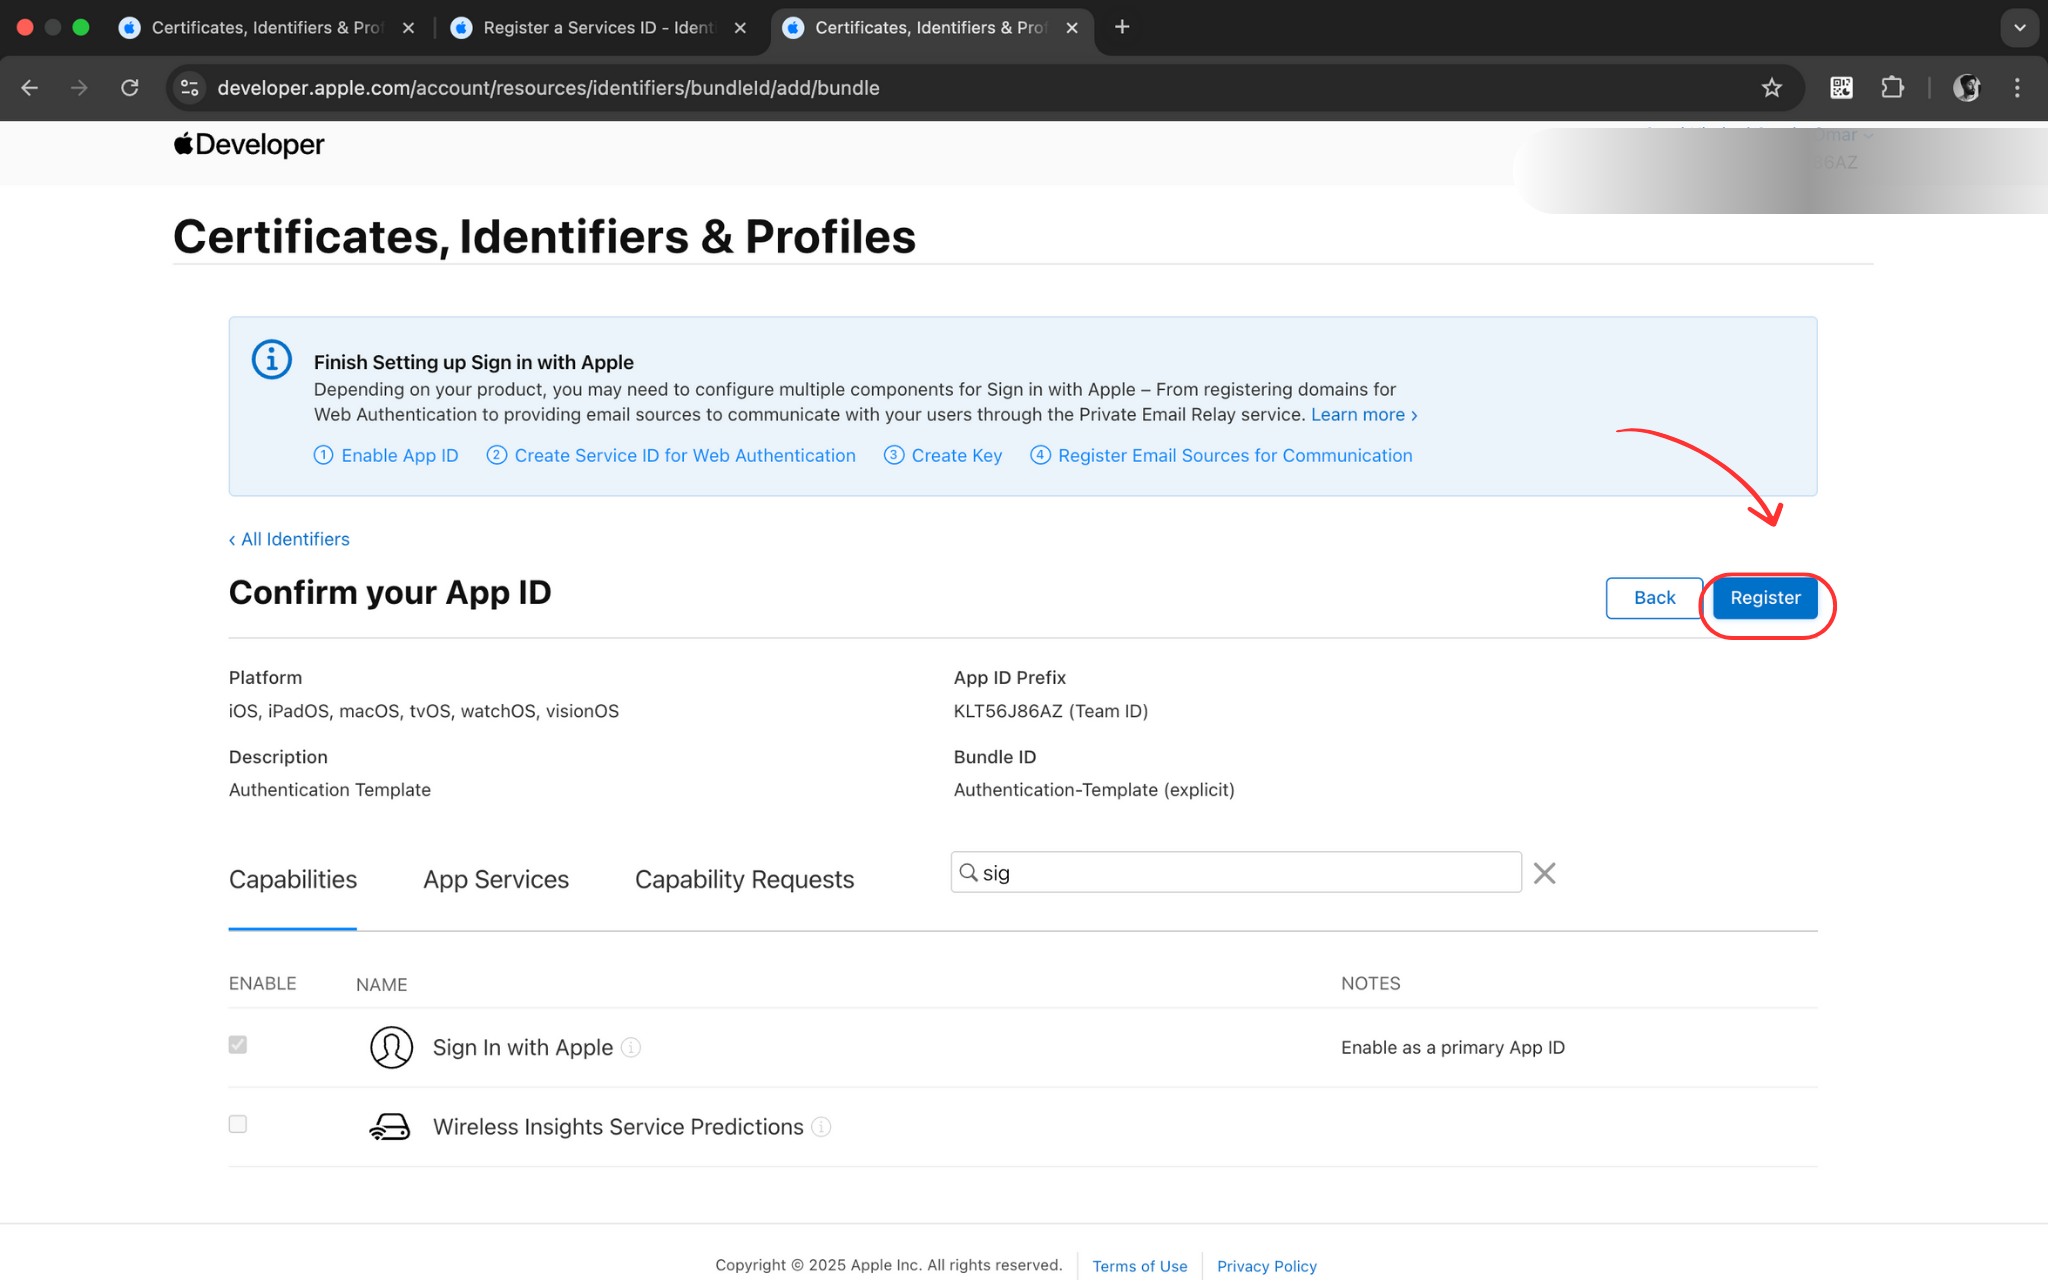
Step 28: Register App ID
🎯 What you'll do:
Complete the App ID registration process.
🔧 Detailed Instructions:
- Review all your App ID configuration details
- Verify the Bundle ID is correct
- Check that all required capabilities are selected
- Click 'Register' to create your App ID
- Wait for the registration to complete
📝 Important Note:
Registration creates your App ID and makes it available for use in your project.
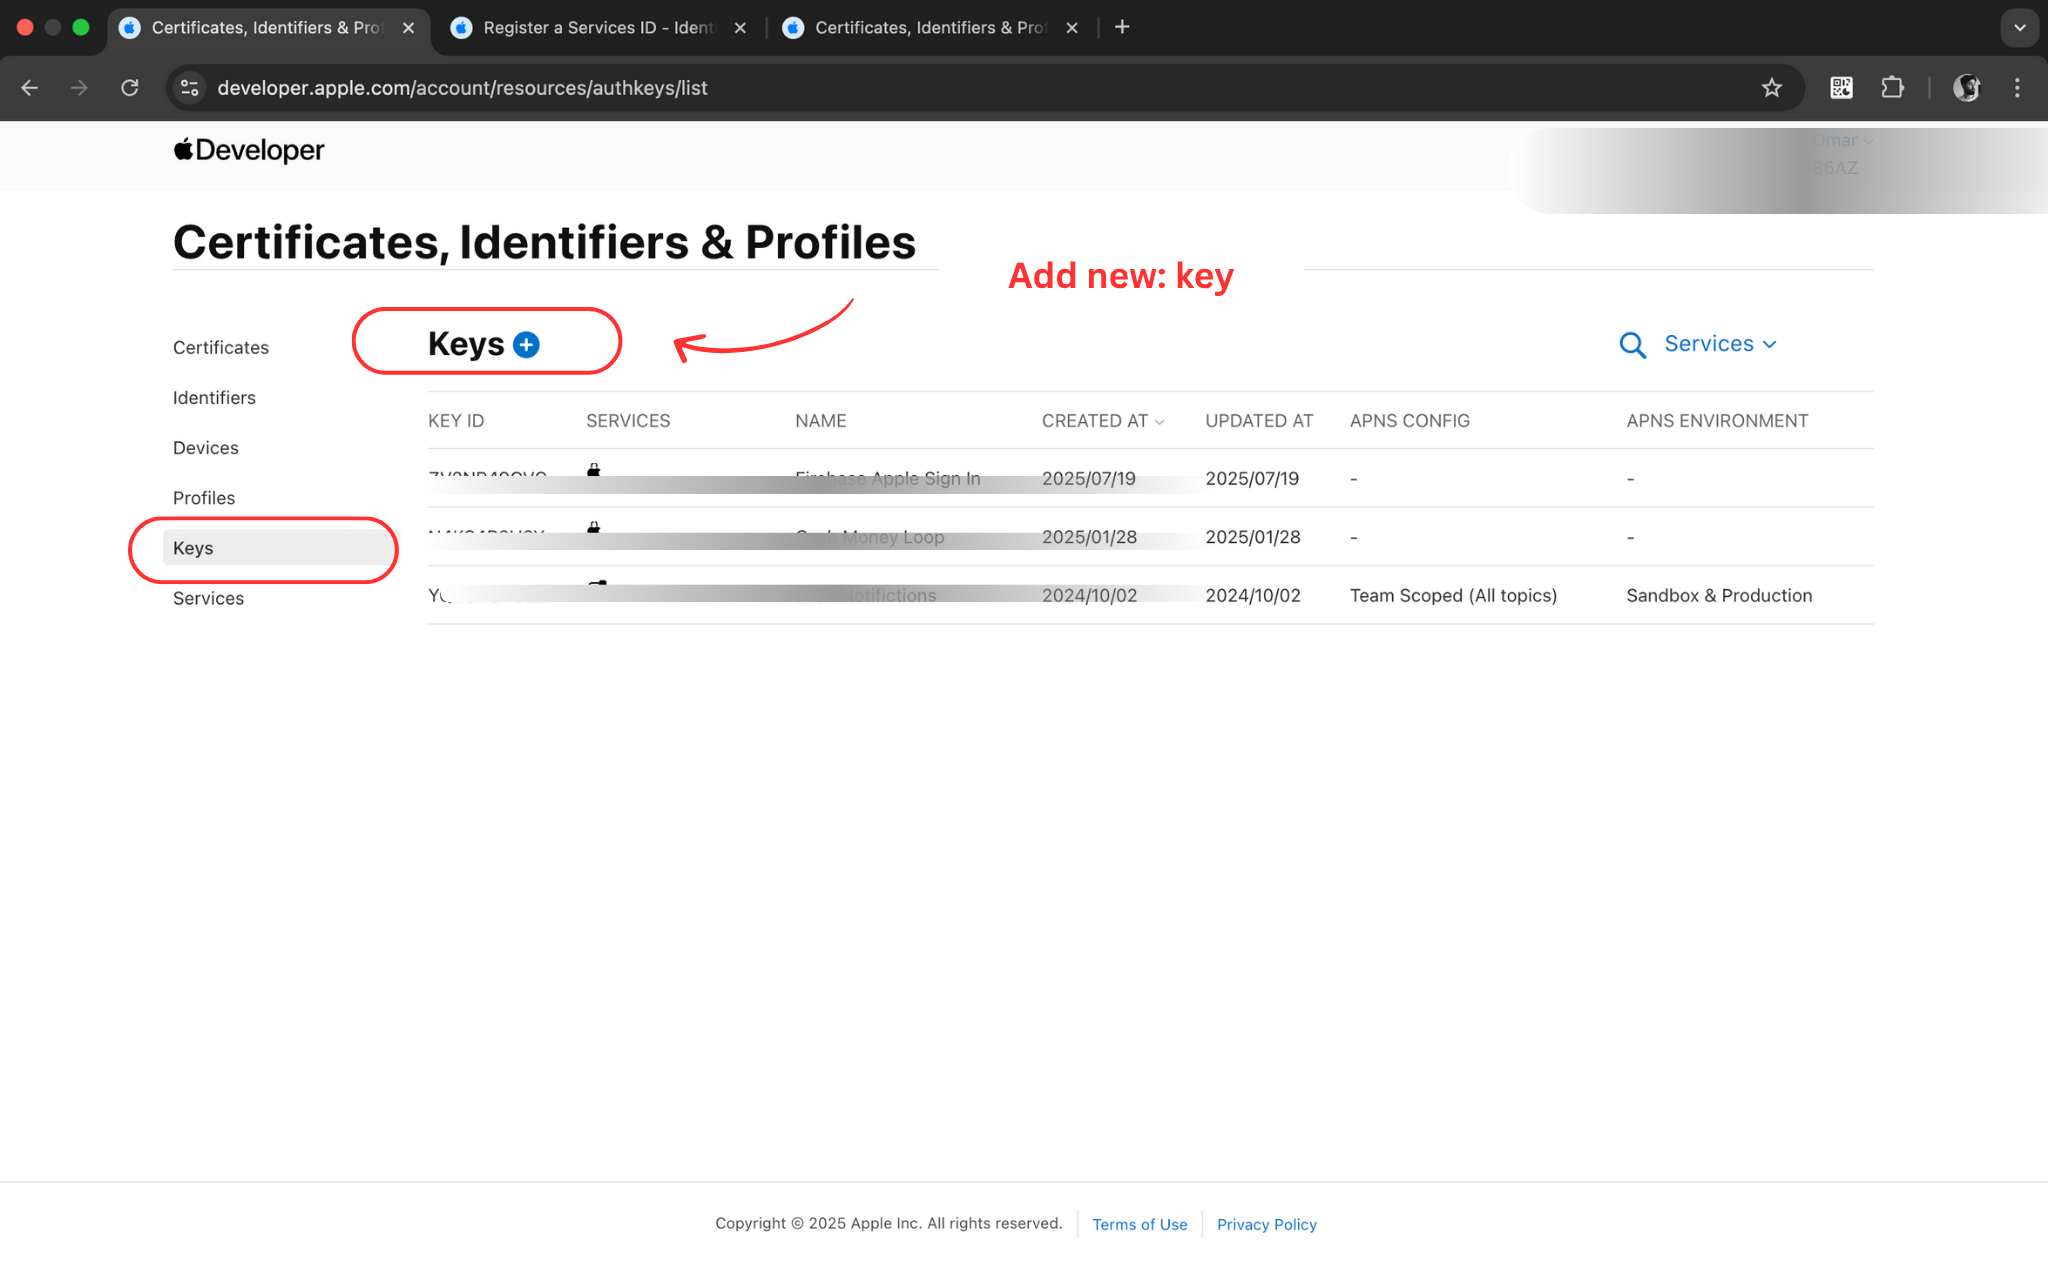
Step 29: Navigate to Keys Section
🎯 What you'll do:
Create a new key for Sign in with Apple authentication.
🔧 Detailed Instructions:
- In the Apple Developer Portal sidebar, click on 'Keys'
- This section manages authentication keys for Apple services
- You'll create a key specifically for Sign in with Apple
- Keys provide secure authentication between your app and Apple services
- Click '+' to create a new key
📝 Important Note:
Keys are used for server-to-server authentication with Apple services.
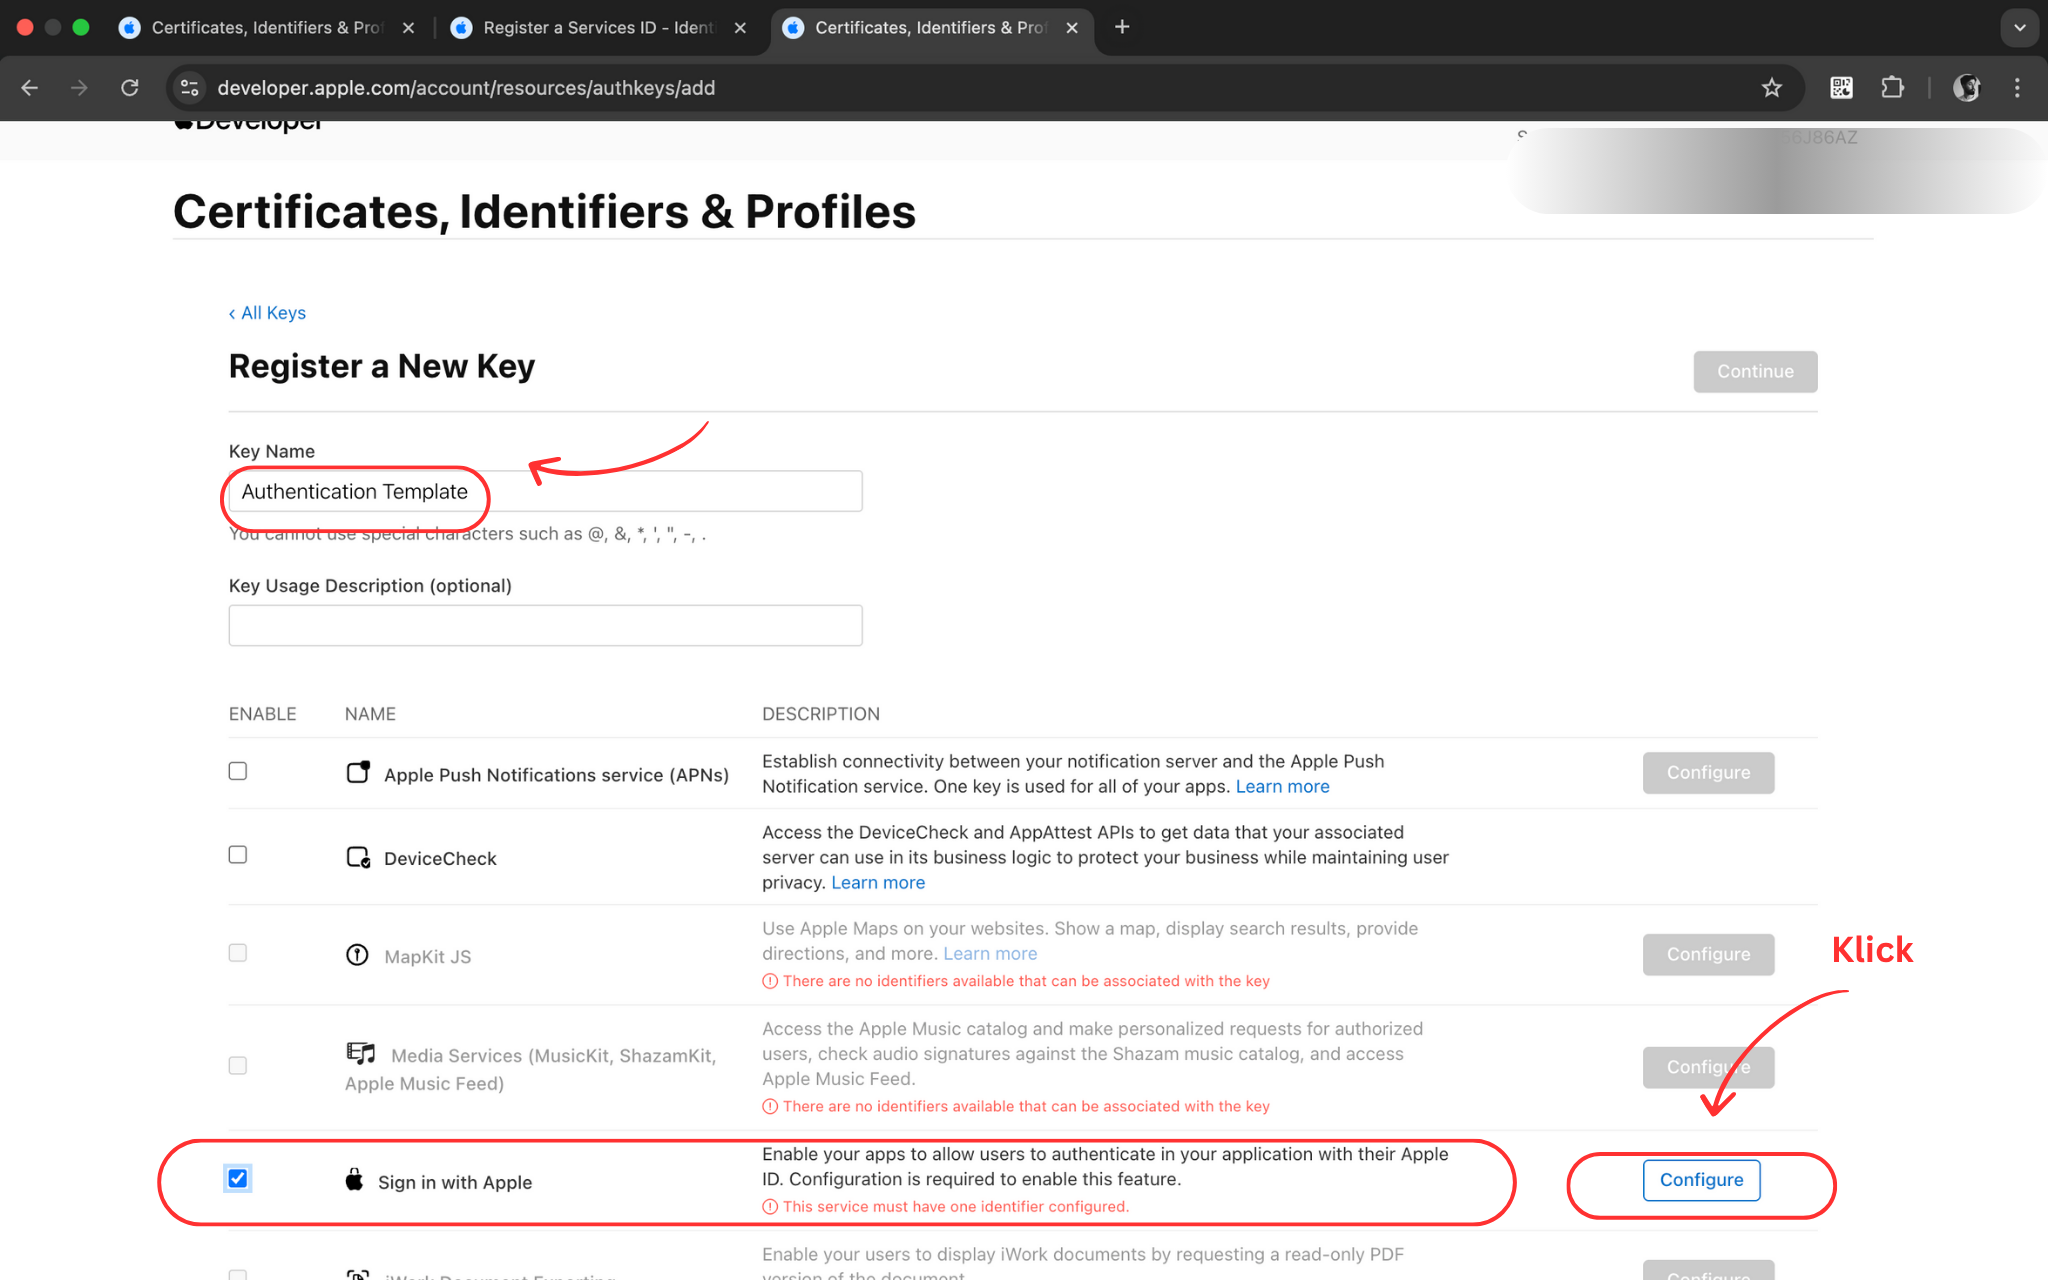
Step 30: Create Apple Sign-In Key
🎯 What you'll do:
Configure a new key for Sign in with Apple service.
🔧 Detailed Instructions:
- Enter a descriptive name for your key (e.g., 'MyApp Sign in with Apple')
- Check the 'Sign in with Apple' checkbox to enable this service
- Click 'Configure' next to Sign in with Apple
- This key will authenticate your app with Apple's Sign in service
- Proceed to configure the key settings
📝 Important Note:
Each key can be configured for multiple Apple services, but we only need Sign in with Apple.
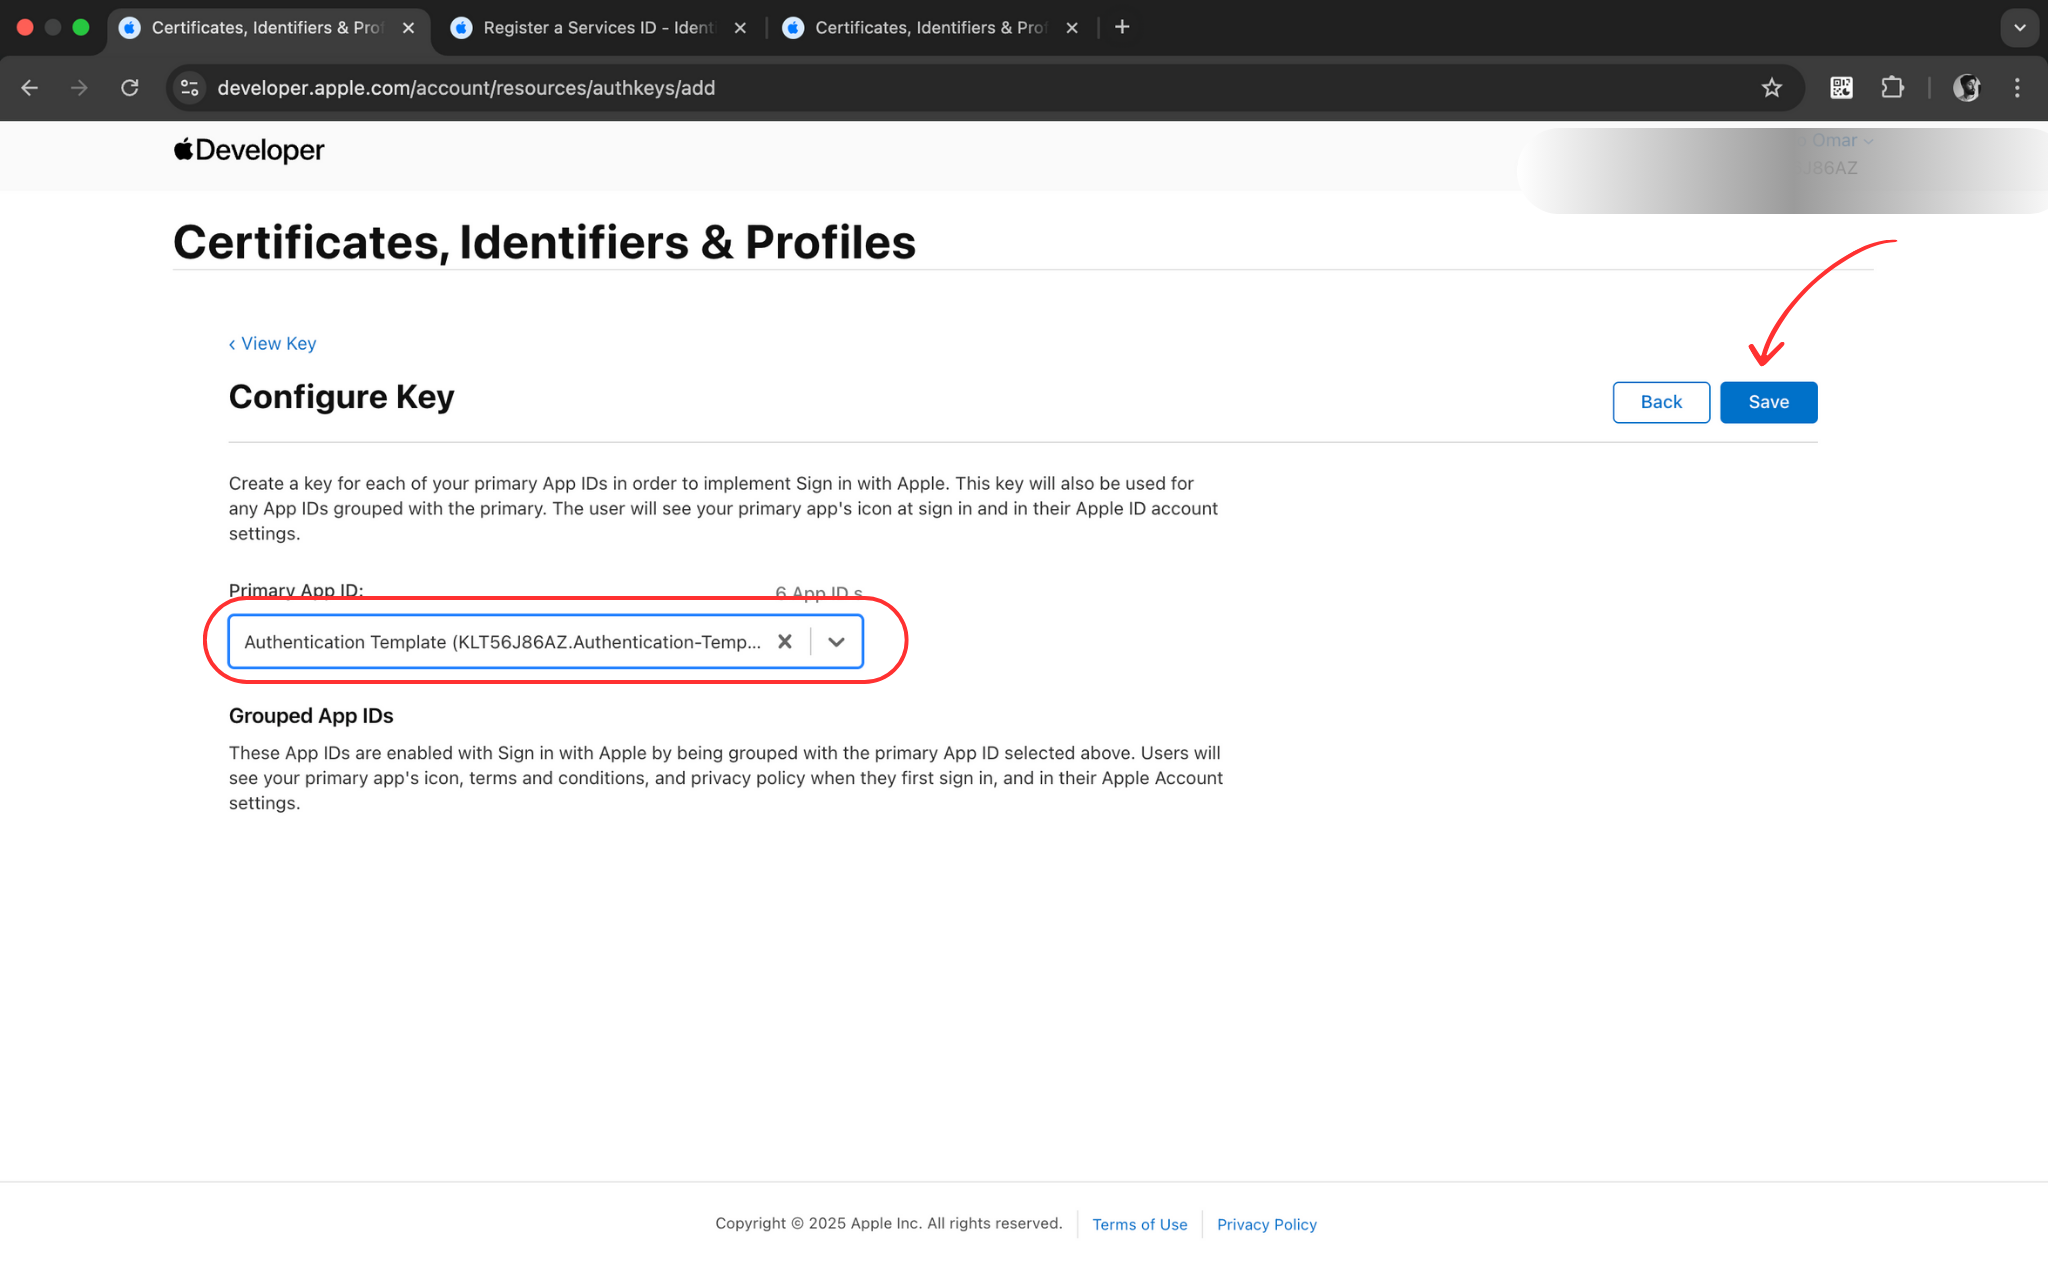
Step 31: Configure Key for App ID
🎯 What you'll do:
Associate your key with the App ID you created earlier.
🔧 Detailed Instructions:
- In the configuration screen, select your recently created App ID
- This links the Sign in with Apple key to your specific app
- Verify the correct App ID is selected from the dropdown
- Click 'Save' to apply the configuration
- This completes the key setup for your App ID
📝 Important Note:
The key must be associated with your App ID to work with your application.
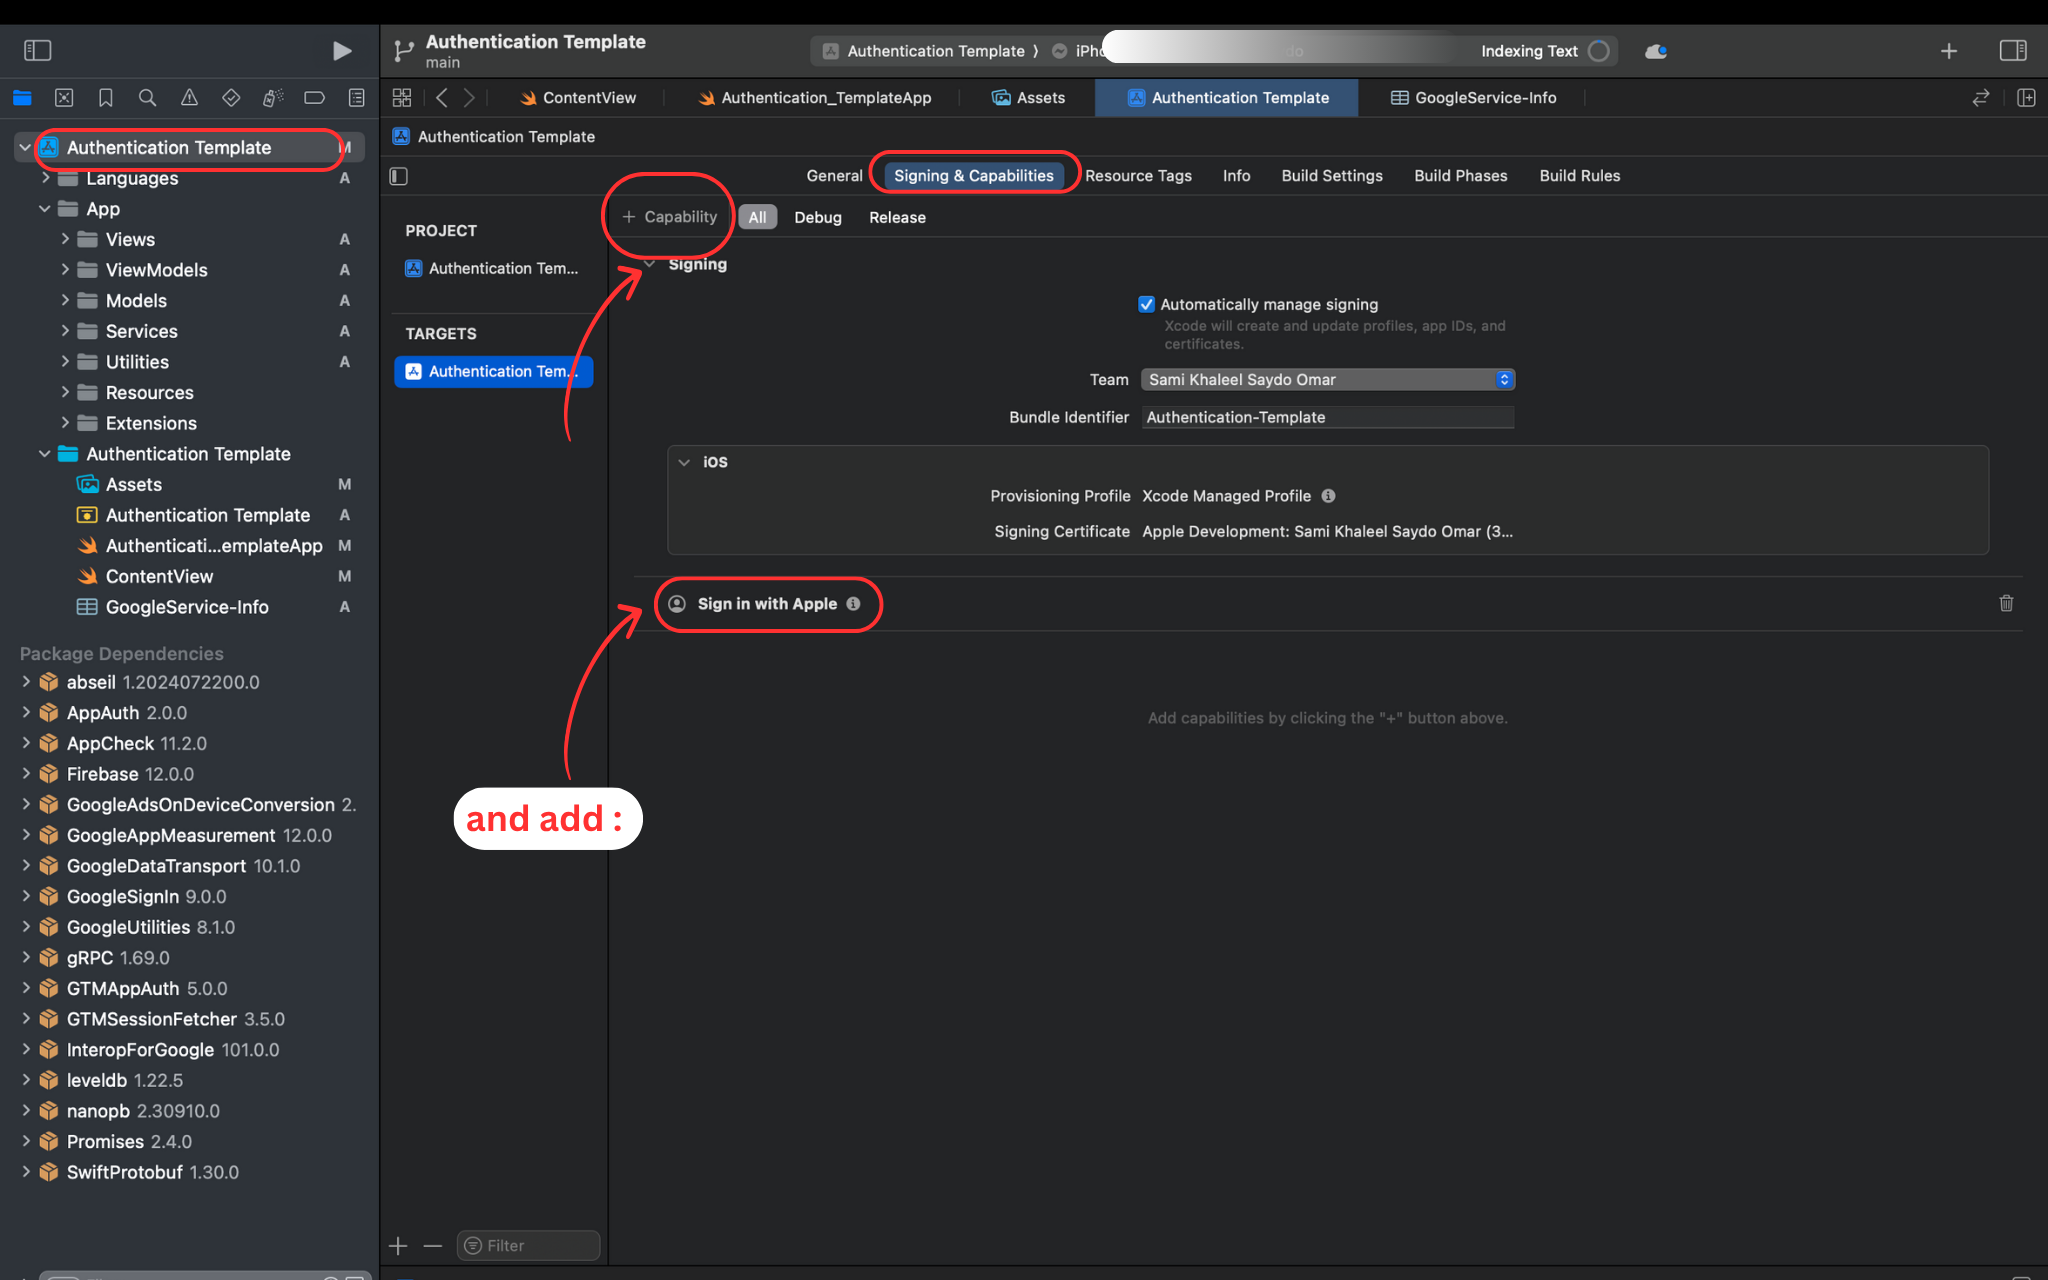
Step 32: Add Sign in with Apple Capability in Xcode
🎯 What you'll do:
Enable Sign in with Apple capability in your Xcode project.
🔧 Detailed Instructions:
- Return to Xcode and select your project target
- Go to 'Signing & Capabilities' tab
- Click '+ Capability' button
- Search for and add 'Sign in with Apple'
- The capability will appear in your project settings
📝 Important Note:
This capability is required for apps that offer Sign in with Apple functionality.
🎉 Setup Complete!
Congratulations! You have successfully configured your iOS Authentication Template. Your app now has professional authentication with Firebase, Google Sign-In, and Apple Sign-In integration.
🎨 Easy Customization
App Configuration
Customize your app settings in AppConfig.swift:
Theme Customization
Modify your app's appearance in AppTheme.swift:
✅ Pre-included Languages
The template includes complete translations for:
- English - Primary language
- German (Deutsch) - Complete translation
- Arabic (العربية) - Complete translation with RTL support
Adding Custom Colors
You can easily add your brand colors:
Adding New Languages
The template supports easy localization expansion:
- Create new Localizable.strings file for your target language
- In Xcode: File → New → File → Strings File
- Name it: "Localizable.strings"
- Localize: File Inspector → Localize → Add your language
- Translate: Copy strings from English version and translate
🔧 Troubleshooting Guide
Common Issues & Solutions
🚫 Google Sign-In Not Working
Symptoms: Google Sign-In button doesn't respond or shows error
Solutions:
- ✅ Verify REVERSED_CLIENT_ID in URL schemes matches GoogleService-Info.plist
- ✅ Ensure GoogleService-Info.plist is added to project target
- ✅ Check Google Sign-In is enabled in Firebase Console
- ✅ Test on physical device (not simulator)
- ✅ Verify Bundle ID matches exactly between Xcode and Firebase
🍎 Apple Sign-In Failing
Symptoms: Apple Sign-In shows error or doesn't appear
Solutions:
- ✅ Check "Sign in with Apple" capability is added in Xcode
- ✅ Verify App ID is configured in Apple Developer Portal
- ✅ Test on physical device with valid Apple ID
- ✅ Ensure proper provisioning profile is selected
- ✅ Check Apple Sign-In is enabled in Firebase Console
📧 Email Verification Issues
Symptoms: Verification emails not received or links don't work
Solutions:
- ✅ Check spam/junk folder in email client
- ✅ Verify Firebase email templates are properly configured
- ✅ Check authorized domains in Firebase Console
- ✅ Ensure Firebase project is properly set up
- ✅ Test with different email providers (Gmail, iCloud, etc.)
🔥 Firebase Connection Issues
Symptoms: App crashes on startup or Firebase functions don't work
Solutions:
- ✅ Verify GoogleService-Info.plist is properly added to project
- ✅ Check Bundle ID matches exactly in all configurations
- ✅ Ensure Firebase.configure() is called in AppDelegate
- ✅ Verify Firebase products are properly imported
- ✅ Check Xcode console for specific Firebase error messages
🛠️ Build Errors
Symptoms: Project won't build or compile errors
Solutions:
- ✅ Clean build folder: Product → Clean Build Folder
- ✅ Delete derived data: ~/Library/Developer/Xcode/DerivedData
- ✅ Check Swift Package Manager dependencies
- ✅ Verify minimum deployment target (iOS 15.0+)
- ✅ Update to latest Xcode version (15.0+)
- ✅ Restart Xcode and rebuild
Debug Mode Setup
💡 Enable Debug Logging
Add this code to your App.swift for better troubleshooting:
Testing Checklist
✅ Manual Testing Checklist
- ☐ Email registration with valid email
- ☐ Email registration with invalid email format
- ☐ Email verification process
- ☐ Email login with correct credentials
- ☐ Email login with incorrect credentials
- ☐ Google Sign-In flow (on device)
- ☐ Apple Sign-In flow (on device)
- ☐ Password reset functionality
- ☐ Username selection and validation
- ☐ Logout functionality
- ☐ Network error handling
- ☐ UI responsiveness on different devices
- ☐ Localization in all supported languages
- ☐ Accessibility features (VoiceOver)
- ☐ Dark mode compatibility
📞 Support & Contact
Getting Help
💬 We're Here to Help!
Need assistance with your iOS Authentication Template? Multiple support channels available for fast help:
Email Support
Technical questions, customization help, and detailed problem solving
Contact: sami.dev.studioo@gmail.com
Response: Usually within 24 hours
Telegram Chat
Quick questions, status updates, and direct communication
Contact: @samidevstudio
Response: Fast response during business hours
Remote Support
AnyDesk screen sharing for complex setup and configuration issues
Available: On request for technical problems
Perfect for: Firebase/Xcode setup help
CodeCanyon Messages
Official support through CodeCanyon platform
Contact: Item page comments & messages
For: Purchase-related questions
🆘 Need Immediate Help?
For urgent issues or setup problems:
- 📧 Email first: Describe your issue in detail with screenshots
- 📱 Telegram: For quick questions and real-time updates
- 🖥️ AnyDesk: Available for live Firebase/Xcode configuration help
- ⏰ Response Time: Usually within 24 hours, faster on Telegram
💡 Before Contacting Support
To help us assist you faster, please include:
- Xcode Version: Which Xcode version you're using (15.0+)
- iOS Version: Target iOS version and test device
- Error Messages: Screenshots of any error messages
- Steps Taken: What troubleshooting you've already tried
- Firebase Setup: Which setup steps you've completed (1-32)
- Bundle ID: Your app's Bundle Identifier
Support Coverage
✅ What's Included in Support
- Setup Assistance: Help with Firebase and Apple Developer Portal configuration
- Integration Support: Assistance integrating the template into your existing project
- Customization Help: Guidance on modifying colors, themes, and app settings
- Troubleshooting: Help resolving authentication and build issues
- Documentation Clarification: Explaining setup steps in more detail
- Best Practices: Advice on iOS development and authentication security
🎉 Quality Guarantee
We're committed to your success! Our iOS Authentication Template comes with:
- Comprehensive Support: Multiple contact channels for fast help
- Regular Updates: Template updates for iOS and Firebase compatibility
- Professional Service: Experienced iOS developers ready to help
- Community Support: Join other developers using the template
Ready to Get Started?
Download the iOS Authentication Template and start building your app with professional authentication!
What's Included in Your Purchase
Complete SwiftUI Source Code
MVVM architecture with comprehensive comments
Firebase Integration
Authentication and Firestore ready to use
Google & Apple Sign-In
Complete implementation and setup guide
Email Verification
Password reset flows included
Username Selection
Real-time availability checking
Multi-Language Support
English, German, Arabic with RTL
Dark Theme
Customizable colors and styling
Complete Documentation
This guide plus online resources
Next Steps After Setup
- Test Thoroughly - Use the testing checklist to verify all features work correctly
- Customize Branding - Update colors, fonts, and app name to match your brand
- Add Your Features - Build your app's unique functionality on top of the authentication system
- Configure Analytics - Set up Firebase Analytics and crash reporting
- Prepare for Store - Add app icons, screenshots, and store listing content
- Submit to App Store - Follow Apple's review guidelines for successful approval
Getting Help
💬 Support Channels
- Documentation: Complete Setup Guide
- CodeCanyon Comments: Ask questions on the item page
- Email Support: Contact through CodeCanyon messaging
- Video Tutorials: Step-by-step video guides available
Additional Resources
- Firebase Documentation: Official Firebase iOS Guide
- Apple Developer: iOS Development Documentation
- SwiftUI: SwiftUI Documentation
- Google Sign-In: Google Sign-In for iOS
🎉 Congratulations!
You now have a professional, production-ready authentication system that would typically take weeks to develop from scratch. This template provides a solid foundation that follows iOS best practices and Firebase security guidelines.
Focus on building your unique app features while the authentication handles user management seamlessly. Your users will enjoy a smooth, secure onboarding experience across all authentication methods.
📱 Ready for the App Store
This template is designed to meet App Store review guidelines and includes:
- Privacy-compliant authentication flows
- Proper error handling and user feedback
- Accessibility support for all users
- Responsive design for all iPhone sizes
- Professional UI following iOS design principles
Created with ❤️ by
SamiDev Studio